Thursday, 19 December 2024

Project Pickle - grill time (part 9.5)

With the rest of the car being tackled paint-wise, it was time to address to the situation at the front. Because it fit quite well on the old front wings, I had decided to stick with the original grill. As I had already suspected the little truck must have had a most likely not so little crash as the front left frame end was a bit bent. With two new front wings it became rather apparent that the grill wasn't even remotely as straight as I had originally thought. 

But first: drilling out snapped bolts. 

After "some" bending, hammering and redrilling of the mounting holes, the grill was back to the point where it could at least be somewhat attached to the front. 

Should be rather obvious what I meant, when I wrote "kind of attached"...

Not sure why, but the bottom end had to be narrowed down quite a bit in order to fit. 

As usual: the previous owners' strategy for rust treatment was to slather it in bondo, so this meant even more work by fixing dozens of pin holes and grinding them flat again.


On the upside, if the paint works as intended, the results are pretty spectacular.


... and lastly because the stock plastic door handles absolutely s*ck, I ordered the metal ones as fitted to the Indian Army Maruti Gipsy. 

Sunday, 15 December 2024

Project Pickle - backdoor action (part 9.4)


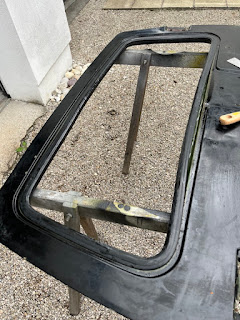
In the strictest sense this was an unnecessary purchase. I mean the Pickle came with a completely bent and rusty backdoor and whilst it is bad, it is definitely still salvageable . Yet still a much better one came up (almost) locally.

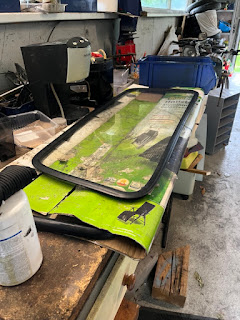
Here's one for those who are afraid of taking out glass on your own: Don't be. The rubber was too hard, to just be able to push it out, but with a bit soapy water and a spatula, I pryed the rubber off the glass where it was stuck on really good. After that it was literally just as the picture suggests: fold the rubber over and slowly work your way round. Much easier with two or three of those, so the old rubber doesn't snap back into place all the time.

Remember (or better mark) the orientation of both the rubber seal and the window and reinstall will hardly be a ten minute job. Also: store the gasket installed on the plane of glass this makes it much less likely to chip a corner or the like.

As it came without a door handle or locking mechanism, I took all of that from the original rear door. There's really just two important clips you have to be aware of: the red one for the actual door handle and the metal clip holding the actual locking barrel in place.


Once you know how to do it, the whole paint and primer thing is pretty straightforward.


As you can see in the background, I wrapped the car up and sprayed the roof again. (Ultimately doing it two or three times just to make sure.)

To be fair, if the individual components react the way they are supposed to, the results are pretty good. 


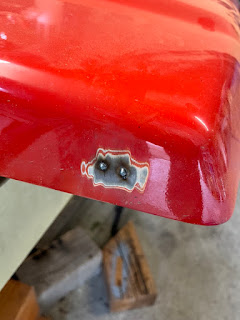
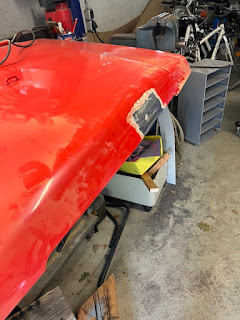
In defense of the seller of the backdoor, it was never advertised as accident free, but removing the bondo definitely shaved off a pound or more (seriously) and pushing it back made it look a lot less worse than it was.

Friday, 13 December 2024

Project Pickle - not going to win an award for most daring choice of color (part 9.3)

 So rolling the paint onto the warmed up body yielded some mostly acceptable results. 


Until the paint started to flash off. It appears that it started to chemically react with the primer and the bubbles being the result of some weird off-gassing.


So what do you do in this situation? That's right, you stubbornly ignore the facts and continue to paint the roof in cream color and realize it's only bad the first the first time, but if you then roll it another time... it ends up being remotely acceptable. Which was good news because I had to roll the roof on the inside anyway.


Let me just reiterate one more thing: only absolute idiots paint cars in multiple colors and doing it again is definitely not a testament to me being capable of learning from my own mistakes. BUT I had one of those "talks" with my paint dealer, which resulted in both of us having a long phone call with the manufacturer, who demanded some pictures and then informed me about my mistakes regarding how I mixed and applied the primer. But it resulted in me getting the black paint for the floor for free as they said that still it shouldn't have caused problems to this extent.


And whilst I was at it, I also painted the firewall black.

To be fair the results were a lot more in line with what I experienced the last time. Whilst I was fully aware that I wouldn't be able to save the paintjob on the outside this gave me the hope that I could make it "usable". So another coat it is, but this time sprayed on.

It turned out much as one would expect: a bit 3.6 Roentgen - not great, not terrible, but only if you have ignore the futility of the attempt. At least this bit wouldn't rust immediately, because of the millions of pin holes.

Classic case of this really being one of the hardest lessons: To sometimes accept defeat and keep moving on. (As depressed as this may sound it has kind of grown on me - definitely not something anybody else would copy on purpose.)

Wednesday, 11 December 2024

Project Pickle - paint primer party. It's my party I can cry, if I want to... (part 9.2)

 I'll be honest, I thought I was on a bit of a roll. The metal content of the body was nearing the factory fresh state, everything had come apart without excessive drama and disassembly didn't reveal any new drama. It's a warm afternoon in late September and the car is stripped down as far as it has to.

It was going too well. I was planning to play it safe, whilst I was aware that the paint I used on the Lada wasn't exactly perfect, it was cheap, relatively elastic and last time it was easy enough to use.

There were just two deviations from last time: I used a spray gun and I followed my notes from the Lada whilst someone at the paint manufacturer had changed the recipe, resulting in the primer now being ready for spray paint and not set up to be rolled on thus being much thinner viscosity.


Also it reacted with whatever it was that the previous guy spray (generously) over the lower sections of the interior.


At this point there's two ways of tackling the situation: the correct (professional) way or my way. Get out a set of rollers, push the car into the sun to get the metal to heat up a bit (would probably have been more effective, if I had gone with a darker primer) and roll on the primer nicely thick. Remember: in case of doubt you can always call it art or some kind of statement.


The good thing about September? There's plenty of sun,nice temperatures and with a bit of wind, which means you don't get much more than a quick snack between coats...


Sunday, 8 December 2024

Project Pickle - paint and preparing for it was actually the easy bit (part 9.1)

 In case you haven't seen the status update from about a month, the paint scheme I most seriously considered was this very, very 50ies combination of a light mint green and a cream colored roof. 

You well enough know that this didn't happen, but let me tell you, I was pretty close. Another thing I wasn't even closely done with was to do more seam sealing. In hindsight, I am not even hoping to keep all the water out at this point, I just want to politely show it the sort of the right direction by now. 😉


The oldest joke when repairing old cars? "That'll be the welding part of it done." In this case it mostly has to do with the fact that the old antenna was nearly ripped out of the A-pillar and let the water in, which then resulted in the driver-side sill... you get the idea. Not sure, where I'll put the new one, but it most likely won't be here.


Hard not to notice: the windscreen is out. Compared to the Lada way too easy. Aside from the fact it shattered, because someone had glued the old windscreen rubber in and it was waaay too late, when I realised it. (Or in other words the glass was already cracked.)

The following picture shows the arrangement of all the cables going to air-vent-levers and as I couldn't find ANYTHING similar somewhere on the internet (and no the one from the later models is entirely different), maybe this one will help. Also, if someone knows which ones are hooked up incorrectly on this one... let me know, because the cable for the heater valve is way too long.

(Also some fine craftmanship with the powersupply for the radio bodged onto the cigarette lighter, if I may say so myself...)

With the dashboard mostly cleared out, this left only the heaterbox that needed to be removed. The first two bolts are very, very obvious.

And then there's this one, which goes through the firewall and hides behind the distributor.

Other than that it's just two cooland hoses and the fact that you most likely removed a small ecosystem from the vehicle.


As such, cleaning it out thoroughly and removing whatever lives inside makes quite the difference. (Quite a pile of moldy leaves actually)