My XS Triple Sidecar has got two major areas, where it leaks oil like it's getting paid extra to do so:
the cylinder base gasket, which is a design flaw as there's no bolts holding the cylinder to the cases, which especially around the camchain leads to the affore mentioned leaks.
On the tachometer drive.
After a bit of research, it's one of those I-should-have-done-it-when-swapping-the-engine-in-jobs. Luckily someone at Yamaha must have forgotten drawing up the tach-drive and made it a completely removable unit, only held in by an M6 bolt and a C-clip.
Heating up the aluminium outer case, freed up the threaded inner section. Not sure if this is always so well stuck or whether it was due to the all-year-round-nature of my sidecar.
As now the whole lot is properly heated, the seal almost removes itself without my help, i.e. it was so hardened and shrunk that it nearly fell out.
The seal is a 7x13x4 seal, which is (luckily) still available new as it used in various other bikes, part no. #93104-07036 and it's not even very expensive.
As the M6 bolt installed was most likely the wrong one anyway and it was rather mangled, a longer stainless bolt with a lot of copper-slip will do the honours of holding the tach-drive in place in the future.
While I was in there, I noticed a little stress-crack in one of the joints of the new headers and patched it up as well, while the exhaust was still hot.
And that's the sidecar back on the road and in service again.
On the same afternoon I got into a bit of a down-pour and guess what, after almost two years of riding around, I couldn't smell hot oil being burned off on the headers, but only steam from the water that splashed up on the engine.
The following blog post might only be interesting to a very limited audience, but as it was quite the eye-opener for me, you just have to endure it now.
It all started with the TR1 suffering from some jetting issues on the way back from the mountains, i.e. it ran pig rich, even though I ran it the same way I had done a few years back, based on my jetting notes.
And guess what it wasn't NOT idleing, because it was running dead rich, but because it was running incredibly lean. The jetting was #20 pilot and #180 mains, air-screw 2 turns out. Blipping the throttle revealed that after being incredibly lean, it instantly went to pig rich, which sort of explained why the bike ran VERY hot.
So I swapped the pilot jet for a #17.5 and turned the air-screw all the way in. When blipping the throttle everything stay at around 11.3 to 11.5, where it dropped to somewhere like high 9:1s or 10:1 before. With the air-screw all the way in it decided to idle quite acceptably. Yet notably rich(er) than it should with the idle dropping down to around or below 1000rpm.
So I decided to give the air-screw half a turn and bingo, much better. Still a bit rich, but now it started to idle just fine.
So let's give it another quarter turn and whoops, tapers don't increase their flow in a linear fashion. But the AFR seems promising and is pretty much, where I wanted it to end up. But it was already idleing a bit high.
Right then, one full turn and see how it goes. Yup, much too lean now.
So, back to 0.75 turns out and adjust the idle to approx 1200 rpm.
As the title suggests, the engine is running really nice after all the work that has been poured into adjusting the carbs:
Verdict and/or hypothesis: Carbs with very small slide cutouts seem to react very strongly on adjustments to the airscrew and only once you lift the slide ever so slightly that's when actually the pilot comes into play. The other thing I noticed: The air-screw seems to affect the mixture much longer than I anticipated, in reality probably more like somewhere towards mid throttle openings. After going through the various specs and comparing them with the TM38 flatslides I had on there before, I am pretty sure that at least partially the small main-AIR-jet is to blame as the VM38s come with a 0.5 jet and the TM38s have none installed, so that's probably one of the next things I'll play around with... (Little addendum: They have been ordered an unless the shipping company lets me down, I should be in the position to play around with them on Tuesday, when I have a day off!)
This is one of those mods, which I must have thought of for several years. It came up again, when I swapped plugs after a rideout to the Austrian MotoGP races and felt just how hot everything under the tank got from all the heat radiating off the engine. I admit, it was a rather hot day and I had just done about 50km on the Autobahn at proper speeds, but still you could barely touch metal surfaces and having experienced a complete failure of one the ignition boxes a few years back, I decided that this couldn't be good at all.
As such the plan was very simple. Move the ignition box to the back in the (mostly) unused tray under the seat.
This meant that one of the cables was too short and once my spare ignition box sat there it became rather obvious that there wasn't half as much space as I initially thought. Actually I added about 20cm to the cable going into the loom and I am pretty sure if you tell the guys at Ignitech you wanted a special sub-loom, they would probably do that for you at the blink of an eye. (As long as they knew the exact lengths, which you will find rather soon on this blog!)
Except for notching the tray a bit to be able to route the cable a bit better not too much needed to be done
So how does it perform? Rather unspectacular. It's an ignition box and it sits in a cool place and is not rattling around, so I suppose it is rather happy.
(Please come back in a few days and you will find the "corrected" cable lengths here.)
Just a quick intermission, this time when I swapped the springs, I took the few minutes to measure the difference in wire diameter between the light and the stock springs.
... and as a matter of fact, yes you can quite notably feel the difference. 😀
If you feel like you have a deja-moo, well go back quite a few pages. Now I
agree with all of you, who think that flatslides are the way forward, but on
my Everyday TR1 practicality has its place too. And as I had to do an install
from scratch, I thought I might as well document it. But if you're only here
for the jetting and setup of the carb itself (stock settings in brackets
unless, I didn't change anything):
Mikuni VM38-9 jetting & setup
Pilot: 20 (30)
Main: 175 (330)
Air-screw 0.5 turns from a soft seat
Needle: 6DP01, 3rd/middle notch
Needle Jet: Q2
Slide cut out: 2.5mm
No Air jet
Parts
two VM38-9 carbs,
two VM38-200 inlet rubbers,
two 90 degree silicone reducer bends 57 and 64mm on their respective ends
(that is if you want to suck through the frame and stock airbox like me),
a 2in1 throttle cable for VM36/38 available from various XS650 shops
(#51-6506),
choke-knobs as fitted to TM38s (not strictly necessary, but makes it easier
to pull them out),
two 40 degree throttle cable adjusters and
four (4) M5x16 allen head bolts and spring washers per carb for a total of
eight (8).
The latter not being strictly necessary, but it's a lot nicer to have some
nice hardware on your carbs. The stock philipps bolts are actually JIS-heads,
which means it's very hard to get screwdrivers in Europe that have the correct
angle and not tend to slip out.
Optional
you can also get a softer throttle spring (VM34/55),
longer straight throttle adjusters (VM30/77) and
a Mikuni Hex-mainjet jet tool if you think, you will have to change jets
often. (This will allow you to swap mainjets with the carbs installed very
easily.)
The lower half of an Yamaha XS or SR left handle-bar switch, if you want to
remove the choke lever in the most clean way possible. One can also just
simply unbolt the lever on the stock switch cluser.
Installation
Take the float chamber off and swap mains and pilots for the sizes of choice (in
my case 20 and 175). Add a bit of copper-slip or other anti-seize of choice to
the new bolts (after you put on the spring washers) and reinstall the float
chamber.
Swap out the lever choke (the lever is on the wrong side) for the knobs as they are easier to reach and more comfortable. The stock ones are usable though.
Yes, the TM38 chokes are a bit too long and will not go down all the way.
Installation may also be easier with the knob pulled upwards.
Now the next step is, where things get a bit tricky. In the past, these 40
degree bends resulted in the perfect slack in the throttle cable, but either the
cable I used when assembling the carbs for the pictures, has been shortened by me before (quite possible, as it wasn't in the
original bag) or the other ones are slightly longer, either way they ended up being too
short by a few mm. In case you want to go with straight adjusters there's longer (straight) ones available with
Mikuni part-no. VM30/77, as the pre-installed ones are too short not allowing you to set the cable slack tight enough, which will ultimately lead to breaking the single cable.
On the subject of how to get it all back together, i.e. how to install the
spring and hook the cable into the slide, that's how I do it.
And then finally install the lot. As you can see, the 40 degree bend would be
nicer as it routes cable in a wider bend, decreasing the forces substantially as
it avoids that last kink. Now if I absolutely wanted to make it happen,
shortening the sleeve of the single cable by 20mm or so should give me ample
room for adjustments, probably even 10mm being more than sufficient.
Now being a stubborn b*st*rd has its merrits, especially if if ends in
"I-want-those-40-degree-bends-and-even-if-it-kills-me". If you leave out the
locknut, the cables are just long enough then.
With that sorted, my old parts stash was raided for a suitable lefthand switch
cluster lower, which comes without the choke lever. As they absolutely
identical, it's just a case of not losing any bolts and swapping bits over.
The original TR1 lower.
And then the last bit was to properly sync the carbs both at idle and at
midrange.
So that's taken me longer to write down than to install, which was roughly 45
minutes to one hour all in all. Does it require a sync? Well thanks for
asking, but if you check the cable lengths of the twin cables and they are the
same, all you have to do is set the adjusters on the carb tops to the same
height and that'll be good enough for a first start. Mine idled a bit higher
than I like and the airscrew was out a bit too far, but after filling the
float bowls up with some fuel, she fired right up.
As I had to revisited this post anyway let me recommend some further reading
from this blog, some of which I wrote much later:
This was meant to be a fairly straight-forward build a new exhaust, do some maintenance and finally jet the sidecar right job. That was over a month ago. To be fair, I've built two exhaust, because the first one was rubbish, we will simply act as if the first never happened. 😉
That's what I started with – obviously the sidecar has already been removed.
As one can clearly see in the second picture, with the longer (and stiffer) shocks in the rear, the rear wheel can't be removed without removing the right silencer. This on its own wouldn't be too bad, but some numpty put a reinforcement of the sidecar subframe right over it, which makes removing the silencer a royal pain in the backside.
Also I always I suspected that the bike would benefit from some sort of cross-over to increase low-end torque, which to be quite honest is the thing sidecar'ists like me care most about. Of course when taking the old headers off, the last few remaining studs came out as well, so now they're all made from stainless.
A new exhaust-bracket to position the silencer lower and further to the back of the bike to clear the centerstand. (Also take note of the still existing sidestand at this point.)
As I found out the hard way, every inaccuracy is multiplied by the length of the tube after it, the header bits were all trimmed to length on the lathe.
A pleasant side-effect of this was that the fitup (of course) came out to be phenomenal, resulting in some text-book tig welds.
The bit that caused the biggest headache was how to make the inverted y-section, especially as it would be in full view all the time.
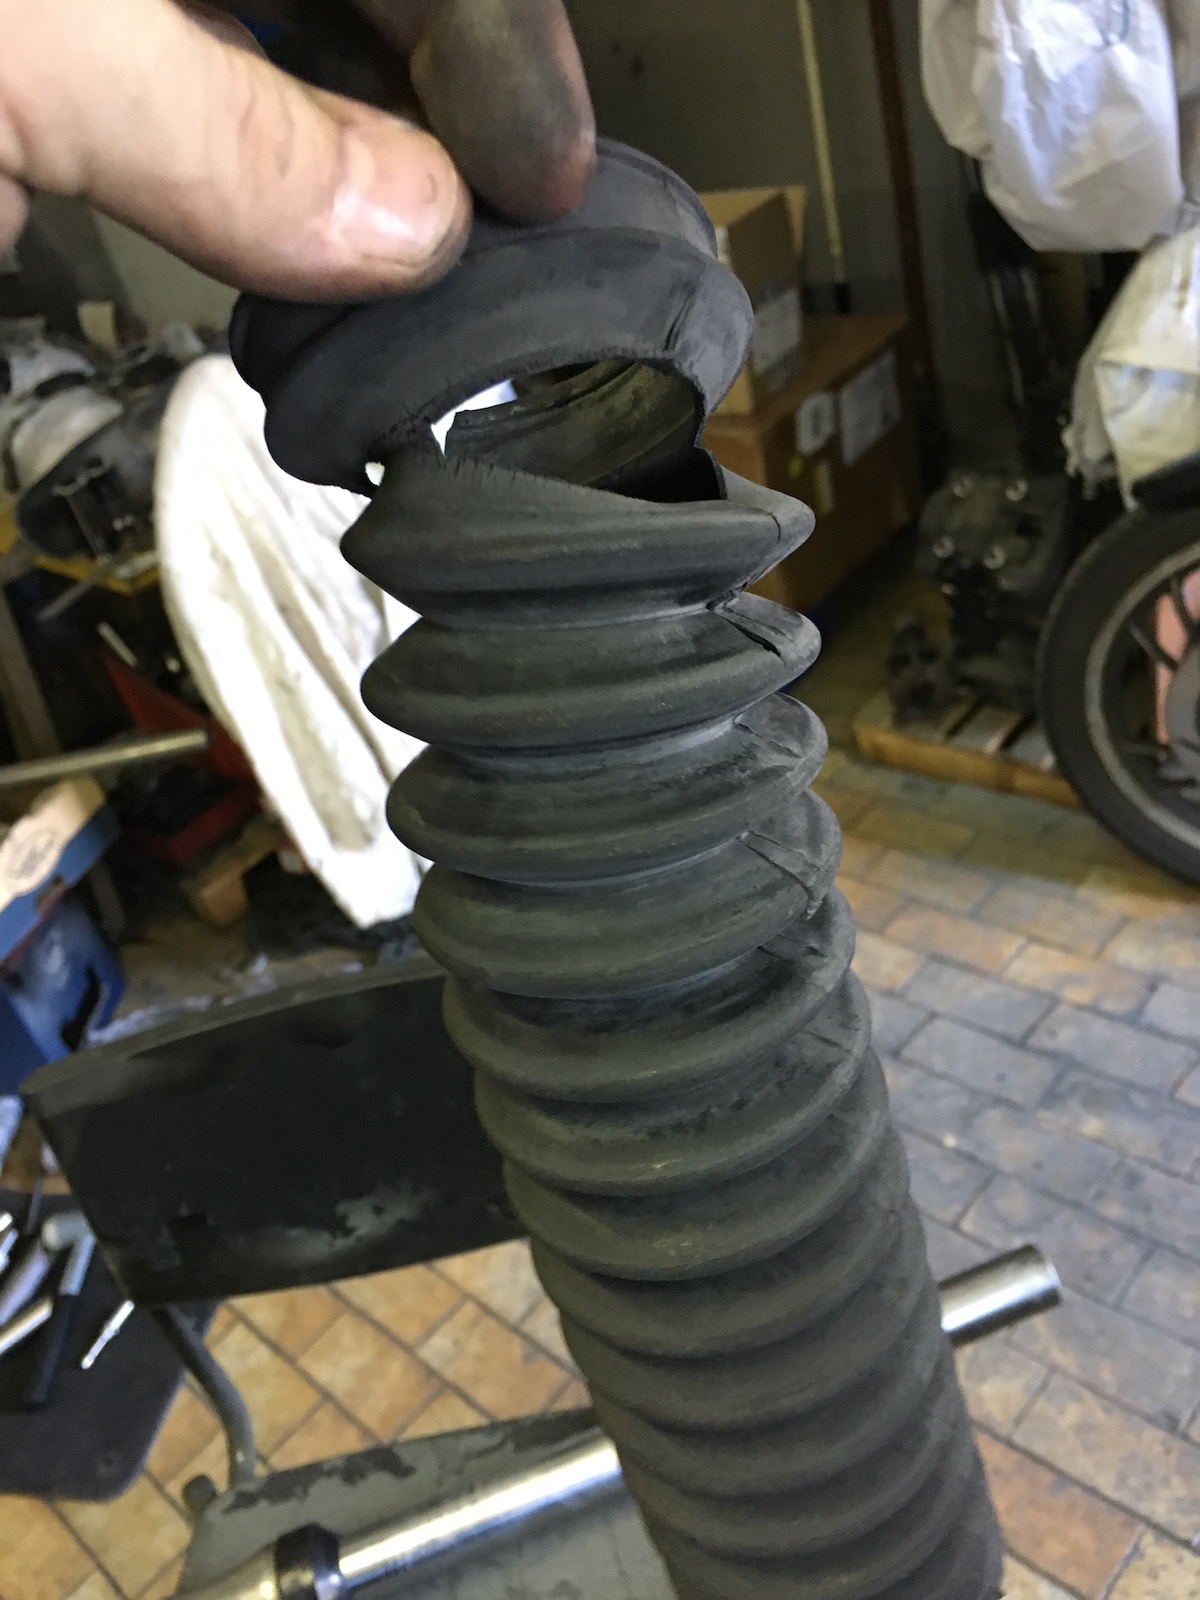
In order to get better access I then decided to remove the front forks and prop the bike up on the centerstand and subframe. When removing the forks, I found the fork gaiters to be in a way more desolate state than I originally noticed.
From the last picture to the ones coming up next was about a full day of work to fit up the tubing in a satisfactory manner.
... and when the flanges have dropped all the way down for the umpteenth time, you add some drops of filler to the backside to step them from doing that.
Now I couldn't resist to do a little heat treating to the headers (yes, my neighbours still love me...) and gosh, do these flow better than the old stuff...
The last step in finishing the exhaust was to build an X-pipe collector. Not perfect for maximum throughput, but I have been more than willing to trade torque for horsepower on the sidecar.
And that's the (more or less) finished header and X-pipe done. There's no realistic way to fit any more collectors on these headers anyway.
What I absolutely wanted was to have a bung to install my wideband to facilitate tuning the carbs.
Let's just say, my welding skills are proper hot. 😎 On a more serious note (as I found out the hard way), always apply PLENTY of copper-slip on both bolt and bung when welding in an AFR bung to prevent them from seizing during or after welding. If it burns off, it leaves PLENTY of carbon, which keeps things separate and ensures that everything comes apart smoothly.
With all the bits laid out on the workbench it always looks a lot like next to nothing was achieved at all.
Really came to grips with the new welder finally - fused the db-eater (bored out to just over 1") into the silencer, so Mr. Policeman knows it's not easily removable.
The installation-rubber-mallet is strictly mandatory of course. As was expected it runs a lot leaner down low, so shimming the needles and installing one size bigger pilots was necessary in order to make it idle properly again.
13.4:1 doesn't sound too bad, but that was after blipping the throttle and it would drop even further, making the bike very sensitive to oil- and air-temps. (Expect more wideband action in coming posts, I think this is a brilliant little toy to play around with!)
And of course, you want to hear it, don't you?
So what's the verdict? Big, big success. Usable torque now starts at about 2000 rpm and I can cruise around at 2500 to 4000 rpm, which makes the bike a lot more relaxed and economical. Also with the added torque, 5th gear is finally usable, which means I can actually use the bike on the Autobahn and cruise at 130 kph sitting in 5th at around 5000 rpm, not sure if there's a lot more to come beyond that, but to be the quite frank that'll do plenty for now...