... I mean it would be the sensible thing to do to pretty much do nothing at all. Would. Have. Been. On the other hand stock mounts are 29mm tubing and relatively thin-walled too. (We're talking about 2.5mm wall thickness before it got attacked by rust. There's quite a few tales of snapped lower front mounts on Velorex'es actually.)And on the other hand, there was this absolutely gorgeous 30x5mm thick wall seamless tubing sitting on my bench.

... the sort of rust one finds on a tube that was sealed off properly. Doesn't take much imagination to work out what one of the more exposed tubes might look like on the inside.

Modify the new thick wall tube for clamping ...
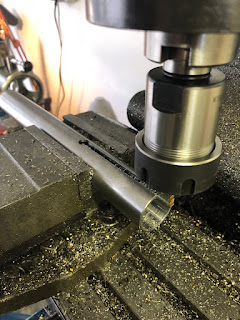
and then weld it in.

And the same on the rear. (If you tell me, starting with an IZH Sputnik sidecar frame would have saved me from a fair bit of work... yes, it's essentially what I copied and yes, it would have been cheaper as well.)

Bit of bracing in the corners and as mounting points for the upper struts.


And with those welded on it was well about time to decide on the geometry of the sidecar, draw it up on the floor and then make the swan necks. Lead was decided to be 265mm and the track width 1080mm.


Strictly speaking, at this point it's a sidecar.

Obviously the rear strut is "a tad" long. Now the simple way would be to just throw it on the bandsaw and weld it back somewhere in the middle. (See the soon to be replaced front strut.) Now there's two problems with that: First you shouldn't load a weld with bending forces or if that's not an option, at least put a reinforcing tube on the inside. In the case of these struts said tube would get into serious conflict with threaded adjuster. There is a right way though. In original form, there's a pin which slides into the tube, so if one has to shorten one of these, start at the base and free the pinned end.

Also due to the beefyness of the pin, cranking the welder up to 11 is an option.

And there you go...

... or do you? I had to make one more set of top hats, so the flange bolts would only be loaded under tension and not on bending. (Same idea as above.)

At this point I realised that my sidecar sits about 40-45mm too high and the sidecar swingarm needs to be modified. With the stock Velorex shock being questionable and unreliable at the best of times, the next step will be to make a new sidecar swingarm, which will then incorporate a regular length SR500 rear shock. This will give me more suspension travel and due to the different shock angle also a stiffer suspension. Oh and those extra 40mm should also allow me to fit the 18inch sidecar wheel within the stock mudguard without trimming off the lip like on the last one.