... because more better is how it is done overhere. 😏
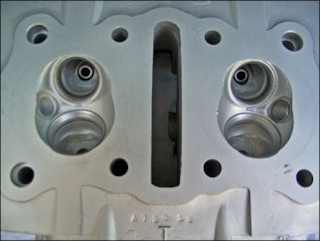
Two sets of fresh valves and a bit of cleanup on the 700 heads kick it off.
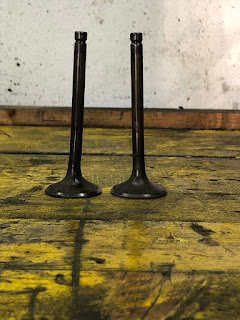
Shame that those exhaust valves are bent...
Either way, get the new valves out and polish them to remove the coating.
After a quick lapping session, it's time to install the fresh valve(s)
... and then fill the exhaust port with petrol and see if anything seeps through.
And whilst I was at it, I cleaned up a small protrusion from the vacuum tube.
Quick shot of the old valves (bent - in case you didn't notice)
Headswap - other heads off, swap cams and adjusters and then time and install and reassemble the old girl: five and a half hours. I am starting to think that I might have done this a bit too often.
Some random stuff:
First the spark plug after 300km - looks like setting up the mixture with a wideband AFR meter has got its merrits.
Second: As these heads "failed" me the last time (it really was just a valve stem seal on one of them), I am very happy to report that not only did the heads NOT fail this time, the squish pad also seems to work rather well as indicated by the clean spots.
So why swap back? Well the 700 heads work a bit better at low rpm and the bike overall is not as hungry for revs. Also to harvest the full potential of the welded up heads, I would either have to angle the squish pad ever so slightly or run the old girl with an Ignitech box as there were some early warning signs for detonation. Just for the record: With the 700 heads and an optimised carb setup* some personal bests in the top speed department were recorded.
*VM38: #20, #180, one shim under needle, air screw one full turn - the shim equals to about half a notch on the needle. Next test will be raising the needle a full notch just to see whether this changes anything
A friendly public service announcement for those, who run an APSX wideband sensor for tuning: The single most vanilla Bosch Wideband Sensor (LSU4.2), made for a plethora of models from the VAG group and fitted to all sorts of Audis, VW and Seats (and if you're looking for it at the breaker's especially in 1.8T models), Bosch part no.: 0 258 007 351 is the one you need to get your APSX gauge working again, once you killed your wideband sensor...
I paid for mine 75 Euros (new), but if you can get one from a breaker, you'd probably pay a fraction of that...
Tested myself and working like a dream. You're welcome. 😏
With fitting those welded up heads onto my TR1, I have sort of opened a can of worms in my head. And it is a large and ugly one. As I pointed out 4 years ago the wedge design I chose was the most simple I could think of and also the most easy one to manufacture. The designs appears to be sound, so why change it? In short, because I was inspired by a much more complex shape and I secretly hope that amongst my readers there is someone, who has sufficiently got his feet wet with cylinder head combustion chamber design for two-valve designs.
My Problem, I was inspired by the combustion chamber of the XS400 and XS850 engines, which both run an 8-shaped combustion chamber.
Spotted the difference?
On an XS400 the combustion chamber gets narrower towards the exhaust valve, whereas on the XS850 it opens up. As a result one can make a fitting case and argumentation for each design:
Narrowing the combustion chamber towards the exhaust valve creates a high-pressure zone around the exhaust valve, leading to a much higher pressure difference once the exhaust valve opens and a faster evacuation of the exhaust gas and thus potentially a higher gas velocity in the exhaust. Also as the gas is experiencing a progressive increase in the backpressure it is likely that it will "pile up" in the center of the combustion chamber and stay under the spark plug longer thus making it a more efficient burn perhaps?
Widening the combustion chamber towards the exhaust valve makes use of the inertia the gas already has when it is sucked in and biases the gas to move more towards the exhaust valve and flow through the chamber faster. All of this may happen for the price of a slightly less efficient burn in the chamber.
What has got me so confused with those two examples above are that even though one is a twin and the other a triple, they have roughly the same max. rpm and the powerband is more or less in the same rpm-range as well. Also both engines have been designed at roughly the same time, the wedge head on the late XS750/850 maybe came a bit later, but for the sake of this argument it is safe to assume that they were designed at roughly the same time. The specs of both engines aren't exactly enlightening to me either:
XS400 - bore x stroke 69 x 52.4mm, compression ratio 9.2:1, max. output 27kW@8100rpm and max. torque 33NM@8000rpm
XS850 - bore x stroke 71.5 x 68.6mm, compression ratio 9.2:1, max. output 57.7kW@8500 rpm and max. torque 70NM@75000 rpm
As one can't simply normalize the results on a per cylinder basis as the triple has got an extra cylinder (duh) and thus provides 50 percent more impulses per crank revolution, at the expense of only 33 percent more friction losses, the only obvious difference lies in the stroke of the two engines. (I am well aware that this last paragraph is overly simplified and those numbers are definitely not going to hold up to scientific scrutineering, but I am convinced the general direction is correct.)
Therefore I assume it is the right thing to do to go with a combustion chamber that widens around the exhaust valve. Especially as the stroke on my XV1100 crank is closer to the XS850 than the XS400.
After this long winded explanation let's get to the status quo - a wedge perpendicular to the camshafts rotational axis or more easy to imagine along the main axis of the bike.
The most easy fix (at least on a new head) would be to angle the wedge to create a low(er) pressure area around the exhaust valve. The downside to this idea is undoubtedly an obstruction around the inlet valve, which may obstruct the airflow around the inlet valve.
On the existing heads angling the wedge is very likely only very hard to achieve without having to deck the head once more and there's honestly not that much meat left, before one would have to cut deeper valve pockets into the piston. As such mimicking the already existing taper around the exhaust valve could help with both reducing valve shrouding (if one were to move the wedge much further in) and create a lower-pressure area around the exhaust valve.
Assuming that the new wedge runs right through the middle of the sparkplug-thread, in order to unshroud the valves an 8-shape might be the way forward for those heads. Obviously this would mean to either sink the spark plug seat in further into the head's casting and use longer-threaded sparkplugs with some elaborate milling-work.
I am totally aware that the way the circles are drawn around the valves they are exactly opposite of what I described before as my strategy - please see them more as a sketch and the basis for discussion.
In reality this post neither doesn't supply a conclusive answer nor does it attempt to do so. I hope for it to be a conversation starter. Especially as most of the two-valve head designs that I have encountered are traditional hemispherical combustion chambers (thinking of all the big fours aside from the XS1100, which goes with the 850 design) and the same goes for the old SR500/XT500 engines. So if you have some to share that would really be great and could help a lot in deciding how to go ahead with this project.
It all started so innocently: After being tangled up in all sorts of other projects (not that they are finished and you missed out, no worries...), I thought about two things: First the old trusty girl could do with some love in the form of a bit of maintenance and secondly, if I shimmed the needles on the VM38s I should be able to get rid of the lean spot in the midrange, which caused some ever so slight yet annoying lean stutter, when "power-cruising".
With the carbs installed, sync'ed and jetted 17.5, 175 with the airscrew 0.75 turns out the AFR-probe showed some very nice results. The slightly lean midrange had moved to 11.5 to 12:1 afr, which should result in a lovely strong midrange and the added benefit of some nice engine cooling, when cruising. The jetting on top could probably do with a 180 mainjet, but the engine rev's nicely to 8500 and then it seemed like the carbs hard run out of fuel, which was fair enough as I wasn't planning to use the old girl whilst there's still salt out on the roads ... WAIT A SECOND 8500rpm and beyond? Yup, at this point I was absolutely convinced that the old girl died of natural causes.
When the starter clutch slipped, I then just thought to myself: Guess, I am one lucky fella as that could have happened right when I was out and about with the old girl last time and I had that smug grin on your face. (Which only happens, when something terrible is about to follow...)
Due to a severe lack of starter clutches, I chucked the presumably broken one in the lathe, removed the backplate, realised that this was totally unnecessary and welded it up.
As a matter of fact you only have to weld the shaft to the backplate and the job's a good un'.
Gave the old starter bit of its annual clean as the carbon dust isn't exactly helping in getting the most out of my starter.
Now I'll skip the part, where I swapped in an already semi-burned out starter and found out that one of the solenoids I had on the shelf was broken as well and head straight to the more interesting part. Now the starter gearing on a TR1 (and for what I know on the XV1000) is 19:35. As you can see below Yamaha changed this to 18:36 on the XV1100, even though this should be a bit slower on paper, it also means less strain on the starter motor and thus effectively resulting in a higher starting rpm. (Fun fact: the starter clutch pictured on the right was taken out because it slipped - I forgot to mark it on the box or the part and had to pull it out again and weld it up.)
At this point I still didn't know that the bike wouldn't start because it had two bent valves, but after finding the isolation completely destroyed on the alternator and ignition pickup loom I was pretty sure it was all down more of a no-spark situation. (To be fair, certainly didn't help...)
In case you're running into the same issue - this is the original pinout for a twin-pickup loom.
If you lean the bike far-enough to the right, you can do all that starter work without draining the oil.
Bit of sealant on the rubber pass-throughs to keep things nice and sealed.
Didn't have any of the orange/brown cable so yellow has to do.
Next I took multiple starters apart to build a single good one. As in really good. The shaft was slightly to thick, so it was polished until it slid into the starter clutch without force.
And here you can see the locked-out (welded) 18-tooth starter clutch during one of the numerous test-fits on the shaft. (Smart me welded the clutch straight on the shaft, which caused some ever so slight distortion and meant that I would return to the lathe a few times...)
This was roughly the point where I was convinced that it should start no matter what... So I did a compression test and it read 0 (Z-E-R-O), I checked the gauge on the SR500 and even though it only read some funny numbers, it didn't register zero, so it was holding pressure. Logically I tried a leakdown test.
At this point I went over to my dad's and had a little break - only to return with my endoscope in hand. And without the hint of a doubt, that valve kissed the piston.
But there was another problem: I had no heads left except for the welded up heads, which I retired about 4 years ago because of valve stem seal issues. After cleaning them up I found that the welded up portion showed no signs of discoloration, pitting or any other signs of fatigue.
They were missing a vacuum port though.
With the heads ready for install, I took the 700 heads off, swapped the cams into the "new" heads and had a look at the carnage. The pistons hadn't taken any damage, the valves on the other hand were beyond hope.
Luckily the bike didn't fire up again or I probably would have needed cylinders and pistons as well...
... and as we all like a happy ending:
Strictly speaking the welded up heads have done about 1200km so far, which isn't a lot, but last time a failed valve stem seal ruined the party - I hope that it was just a faulty seal and not the retaining lip, which wasn't the greatest and which would ultimately mean to replace a valve guide. A quick blast (about a quarter-mile up and down the road outside the workshop) revealed some slight losses in the midrange department, but the engine becoming VERY lively once it got past 5000rpm.
Ultimately these heads will go onto the engine that is currently in the Turbo as that bike will become my test-mule and the 700 heads will go back on onto the old Tractor... that is unless an extended testride in the coming days doesn't change my mind.