Friday 27 December 2019

The Stinkerle (part 1)

Ever since the days, when I did multiple RD engines for some other people, did I want to build a quick two-stroke for a bit of vintage road racing on a budget following the classic Colin Chapman mantra: "Simplify, then add lightness."

Over the last few years I have amassed quite a few left-overs from various other bikes. With the move completed it's now time to have a look at all the parts and decide whether the best course of action is to sell the whole lot and never speak of it again or actually dig into it and build a usable racebike from it.


The engine is the biggest unknown quantity, as all I knew about it was that it was stuck. Better start somewhere else then. 😉


For mere test-fitting the old ball-bearing headstock bearings would have been more than sufficient. But over the years not a single one of the balls stayed where it should, so new tapered roller bearings were the order of the day.


Equally shocking (and a good indicator to the troubled past of this frame): some had already installed a needle-bearing conversion in the swingarm and some grease fittings.
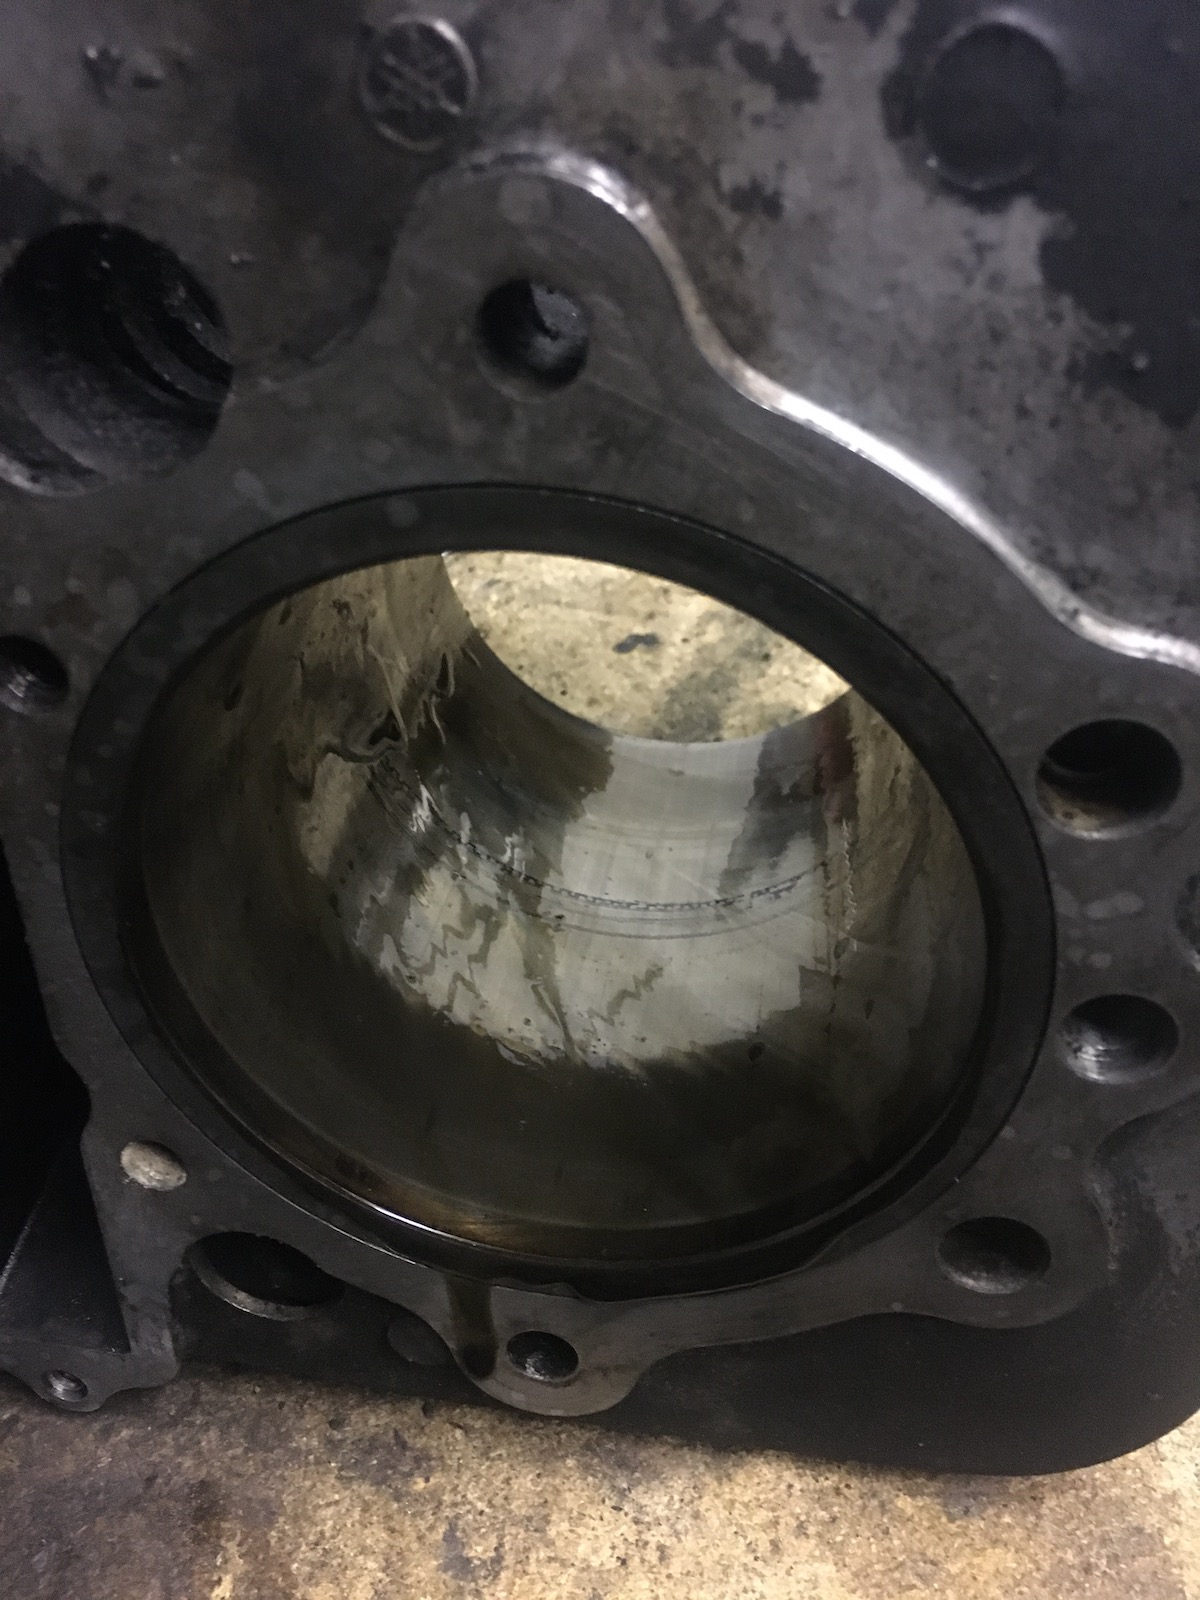

Moment of truth:


Yep, piston seized in bore (what I secretly hoped for) and not a seized crank. And both pistons were in a position, where they more or less close inlet and exhaust ports. The root cause most likely being a combination of the ignition timing being waaaay too advanced and still a relatively tight bore from the cylinders being freshly honed.


Even though someone in the past had already put on RD250 cylinders (this is a YDS7-block) and try his (or her) best to slaughter the engine, the crank still feels fine and rotates freely. It must have been dry and oily down there. So nothing but a good clean up and we should be golden. 


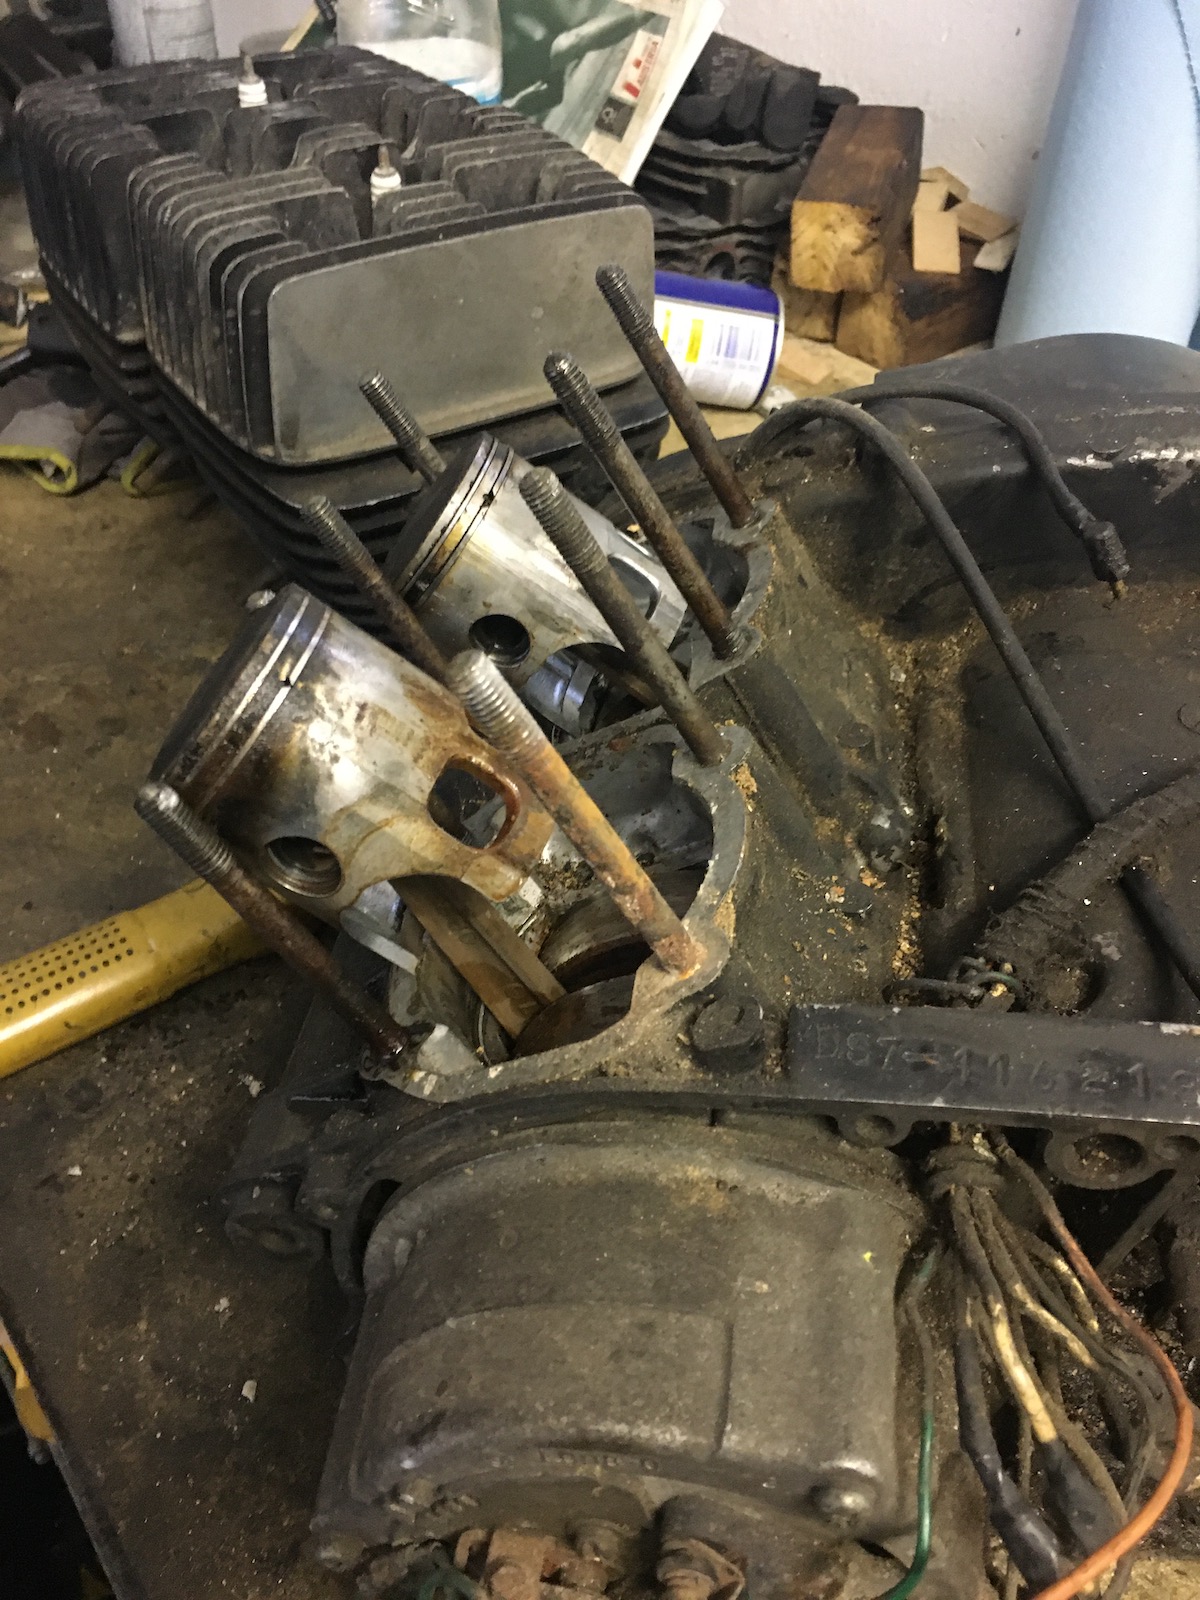
Talking of cleaning... I chiseled and washed off about one to two kilograms of caked on dirt from the engine.


And yes, I went with the ubiquitous RD50 fuel tank. Just a note, it fits nicely on the frame, the petcock has to be moved a bit further forward to better clear a frame rail.


Not sure about the seat hump, it's what I have at the moment and it fits quite well over the frame rails.


So what's the bigger plan: I've ordered some super-cheap 125 expansion chambers, because I don't have any exhausts. I already have a set of mildly worn out RD250 cylinders, pistons and cylinder covers. A set of SR500 front stanchions should come in over the holidays and I already have all the bits for the rear wheel, which are missing in the pictures. The ultimate goal is to stay as close to the 100kg-mark as possible, which currently looks rather doable. Now if I can get the engine to make around 30-35hp with the given carb and exhaust setup this should be plenty enough for me.

Sunday 22 December 2019

A discussion on common terms of gas dynamics in internal combustion engines

Or why can't I just bolt a huge 2in1 manifold onto my engine and expect it to make infinite torque. (This has been taken out of an actual discussion and is a slightly simplified view on the things going on in the intake and exhaust side of a 4 stroke engine. This is a recurring topic in the V-twin world.)

Imagine that your engine isn't breathing air, but jelly just to make it easier to imagine what's going on.

Scavenging: When the exhaust-jelly leaves your engine it will create a bit of a low-pressure area behind it (imagine a plastic water/soda bottle) and this scavenging will help you fill your cylinders with fresh gas/jelly. That's why your valves have overlap, i.e. both the intake and exhaust valve are open at the same time for a very short time period. Scavenging is (mostly) dependent on the exhaust design. If you sit down and think about it, you will probably be able to work out, why a 2in1 exhaust will work better than two separate exhaust pipes (which aren't connected in this example) in terms of scavenging.

Intake resonance: Now let's go back to our jelly-filled cylinder, if the intake charge (air-fuel-mix) rushes into the cylinder head (doesn't matter if there's a carb or a 2in1 manifold at this stage) a good amount will enter the combustion chamber until the inlet valve closes. Now what happens with the rest of the intake charge? It bounces off the inlet valve and flows backwards towards the carb/manifold. (Ever noticed that your bike/car makes some weird noises, when you open the throttle and don't have the air-cleaner on? Yep, you just heard the intake resonance.)
Now as our little ball of jelly travels back the wrong way through the intake, the inlet valve opens again and fresh gas comes the other way. They both crash into each other, mix and then flow towards the inlet-valve/combustion chamber again. The amount of mix is determined on the one hand by the restriction on the inlet outside of the head(airfilter, carb) and on the other side intake-port, valve-size as they determine the mount that can physically go through the port. The tricky thing is, if you time these collisions right, you can actually achieve to get more fuel into the engine than you normally would. E.g. imagine the fuel molecules bounce into each other very close next to the inlet valve and you have a strong vacuum from the scavenging-effect in your exhaust and all of a sudden at a certain rpm you suck in more fuel than you could, if there weren't any resonances happening in your intake and exhaust.

Intake runner length: Is the distance between your intake valve and the slide of your carb. And pretty much simply determines the maximum time it takes for the intake charge to bounce back and force or better it can take.

Any intake setup can (and should) then be tuned for a certain frequency, i.e. a certain rpm where this works best for your engine. Because all of the above would be way too simple the way it is, said intake resonance happens not only once for a given rpm, but multiple times. Out of which the 2nd and 3rd wave contain more energy and thus provide a stronger charge. (Otherwise we would simply bolt our carbs directly to the inlet valves as that would make the shortest possible runner length and ensure that the inlet charge bounces off the valve and carb-slide and then back into the engine.)

You can probably guess by now, where this is going... the longer the intake runner length the more time there is, which is especially important at low rpm, the shorter the intake runner the length the better at a certain higher rpm. (Remember we're not hunting for the first reflection, but for the 3rd.)

Plenum volume: The amount of air-fuel-mix available in the area from the (closed) carb-slide to the closed intake valve. This can fulfill multiple purposes: a) it can be imagined as a sort of storage (we already noticed above that under ideal situations we can suck in more air-fuel-mix than can otherwise be provided in one go) and as a dampener (e.g. for unwanted) resonances at certain rpms. If we get back to our jelly example, if you have a lot of jelly waiting in a plenum, it's pretty easy to imagine how this will slow down any way bouncing off the intake valve. The amount of energy consumed over time (and this being the result of distance divided by speed) basically determines the strength of the intake signal. (Which is what the resonance is called in professional terms.) Again a case of think this through and should explain, why you can't create an infinitely large plenum on an engine or infinitely long runner lengths or at least it won't do you any good. But what it will explain is, why a longer will at some point flow less than a shorter one.

As such we can conclude, plenum volume makes sense up to a certain limit. Above that it won't do much harm, but also no extra good. Also it should become apparent, that there isn't no such simple wonder-solution to all induction problems. As changing the intake runner length isn't a simple "make it longer, make more torque" thing, but there's a lot more to it. Hence why you can't say that a 2in1-manifold will automatically make more torque, because if the intake runner length and plenum are too large you will basically kill all the potential gains.

Sunday 15 December 2019

Make Dre-XT-Stueck great again - engine (part 2)

With all that work in the suspension department, it only seems fitting to up the ante a bit in the engine department as well. For this reason a 55W XT600 Tenere engine has been acquired. I didn't know exactly a lot, except that it looked a bit nicer than I expected and it had been taken out of a running Tenere ten or fifteen years ago.


An inspection with an endoscope revealed that the right inlet valve had lots of oil deposits on it and quite a bit more play than the left one. So I gambled a bit and decided that a fresh set of aftermarket valves, new valve stem seals and a quick hone of the cylinder should do it for now.


The exhaust valve covers were properly stuck.


Hammer, chisel and brute force was called for.


Rockers and cam aren't new, but well within usable spec. Even though I think someone was a bit sloppy with oil-changes or ran the bike a bit low on oil.


My standard trick to get the piston closer to the cylinder head's squish band didn't work in the end as the piston only sits 0.4mm low and with approx. 1mm for both head- and base-gasket combined risking things with only 0.9mm of clearance on a roller bearing engine appears to be a bit daring. Especially as the squish has probably worked quite well judging by how clean those areas on the piston and head were.


With a bit of solvent and a lot of manual labour, the cylinder head cleaned up nicely and in the end I only had to replace one inlet valve and the valve seats actually looked very nice.


The piston had some marks on the skirt and lots of carbon buildup on top and most importantly a stuck oil-scraper ring, which probably together with that one inlet made for a very smoky engine.


From being parked for such a long time, the rings had left quite some marks in the bore and even a light hone job didn't get them out, BUT it should have broken the edges of the marks. (Ultimately this engine will grow some sort of high(er) comp piston and cam anyway...)


When I took off the left foot peg, I had a bit of a shock as water started dripping out. Now this isn't my dad's CX500, which are known to have their frames rust to bits, but still maybe a drain hole would be a reasonable addition.


One thing to note: Contrary to what some XT600 engine swap pages say, the 55W and 43F run the same alternator and ignition. (Thank me later)


Another pro-tip (thanks to my dad for pointing this out to me): Install the carbs, whilst you only have the swingarm/upper rear engine mounting bolt in. The extra space makes installing the carbs an absolute breeze.


Bit of dielectric grease on the connectors won't do harm either. I hadn't encountered any issues (yet), but they did look a bit crusty to start with.


Pre-lubricating a dry-sump engine prior to the first start is always a bit nerve-wrecking. This time we filled about 0.5L of oil into the engine via the breather to give the oilpump some fresh oil to pick up.


And also filled the oil-filter housing with a syringe and the rest into the oil-tank as you usually would. 


Couple of kicks...


... and it's job's done. Now the 600 has definitely got a lot more torque, it was a bit too cold for a decent test ride and also during disassembly one of the inlet rubbers fractured and was only hastily glued together with some engine silicone.

Sunday 8 December 2019

Make Dre-XT-Stueck great again - Forks and brakes (part 1)

For the better part of the last year, the old Dre-XT-Stueck served in a lot of roles, most prominently as my daily ride to get to work and general run-around in town. It's not like it wasn't comfortable or reliable enough – much the contrary to be honest – but it lacked in two main areas.

  1. Brakes and suspension
  2. downright horsepower
As the old girl is a type 55A, which means it's a smaller-bore version of the XT600N, type 43F, it also means it originally runs both the very first version of the XT brakes and forks. At a casual first glance both calipers look rather similar. 


The particular issue with my Gen 1 caliper was that it tended to fade terribly after a few repeated harder stops. Also it tended to feel a lot more wooden. (It should be noted, that both calipers at the time of comparison have been freshly and relatively freshly overhauled and were in fully working condition.) On both calipers the brake-piston is the same diameter, but the one crucial difference is where the pads are guided: Gen 1 is using a screwed in guide rod, which gets all sorts of stuff thrown at it, where as the later model only guides the pads with two noses, reducing the risk of pad stiction in the caliper. 

The new brake caliper (and fork legs) came in as part of a trade for the troubled XT600 Tenere and actually worked. 


Turns out, I hadn't prematurely ordered a stainless steel brake piston and fresh seals. Also as the Dre-XT-Stueck is being used all year round (more or less), the stainless brake piston should last notably longer than the OEM chromed mild-steel one.


The casual oberserver will not that the spacing of the mount points is radically different than on the older caliper, which in turn also meant that the actual fork legs had to be switched out as well. 

Generally I drain the old oil and then flush (multiple times) with Diesel. Usually it's a case of draining the forks and then rinse them once with Diesel and it's good. In the picture below you see what came out after the second go. I suppose these were still filled with the original oil.


As the oil-seals still were up to the job, I left them in place and filled the forks to Tenere specs + 5percent (600ml) and they appear to be damping very nicely and stiff.


One of the things that annoyed me in the past was that I was only able to affix the front mudguard with two bolts as one of the rear ones had snapped in its bolthole making the whole lot a rather flappy affair. 


As usual methods hadn't worked, the triples had to come out and a nut was tig welded on. As a certain someone suffered a bit from "my-foot-slipped-off-the-clutch-mista-officer"-syndrome on the tig-pedal, it formed a rather elegant blob of molten metal.


Regardless of which, the stub then came out nicely.


Luckily the headstock bearings (I had bought a new set of fresh tapered roller bearings) only needed a bit of fresh grease, but otherwise were in good condition. Top-tip: don't skimp on the grease and also add some to the bearing cover cup. As that extra-grease prevents water from coming in. 


And that's it - the Dre-XT-Stück is sorted in the suspension department (at least the front end). Now I hear you say, hey why didn't you go with forks from something a tad more modern? Firstly these were essentially more or less free and due to the Tenere springs and oil-level a reasonable amount stiffer and quite frankly these make for a deniable asset in the case of a police control. 

Friday 29 November 2019

Phour days to phantastic - a Honda CX500 tale (day 3)

As the casual observer will not, it might have (already) been a tad longer than 4 days, but I never said, those four days would happen in direct succession. 😉

We left this story off with the need for a new second carb-body, as the first one was ruined (by me).


Turns out, that I also needed a new o-ring on the link-tube and some other bits, so another carb overhaul kit, a float chamber gasket and two needle valves were ordered.


Now there's a mighty good reason, why nobody wants to do needle valves on one of these. They are are an absolute bastard to get out and only some really nasty tricks persuaded them from leaving their place. Including literally raging hell on them with a hot-air gun and driving a woodscrew down the first seat.


The amount of crud behind the seat (even though it was freshly cleaned in an ultra-sonic cleaner), was incredible.


At this point I had thought, I had seen the worst. The second one mandated even more drastic measures in the form of drilling and properly tapping it to M6.


I figured, that the only way to get the new needle valve in without damage would be to freeze it as cold as I could and heat the carb body as much as I could.


Let me just put this here once and for all: I totally get, why people convert to two individual carbs. The installation of the stock carbs has definitely left a mark (on my fingers).


From there onwards, it was almost anti-climactic: hook up an auxiliary tank, fire her up and sync the carbs.


Last but not least with Winter lurking round the corner, the water was drained and the radiator filled up with a water-coolant mix.


So what's still up to do for the fourth day? Bit of wiring is probably the most important bit. It still needs the headlight to be wired up, so not only the pilot-light is working and working indicators front and back would be nice. (Currently none work.) Ah yes and the forks are bent to buggery, so we'll have to find a position where the frontwheel and bars roughly point in the same direction, but this almost counts as a vanity-mod. 😁 And then she'll be off for her roadworthyness-inspection in Spring.