Sunday 28 May 2023

Comrade Car - towbars for mechanized mules (part 10)

When it comes to towbars and cars, I am a man of very clean and outspoken opinions: If your car doesn't have one, why haven't you fitted one yet? I am willing to make some exceptions for exotic and spicy sportcars and the like, but if you drive around in something that is best described as the missing link between car and tractor, I won't let "nope" count for an answer.

So after brushing off old paint and cutting off the rear support that goes nowhere on a 1600, copious amounts of primer were slathered onto it. 


Followed by an equally careful and lovingly applied layer of "all the black".

Only to realize that I got ahead of myself and should really have closed up that tube with a proper bit of plate. Not for structural reasons, but for rust proofing. 

Followed by the kind of welding that will give you a suntan even behind a mask.

"The bigger the gob, the better the job" or as someone else said: Don't use dead cats for painting parts.

I'd much rather call this one ready for installation.

Sunday 21 May 2023

Comrade Car - crawling under the car (part 9)

 As seen in the last post Comrade Car is starting to make a good first impression on the outside and the previous attempts at fixing all those holes on the underside suggest that this part is done as well. Except it isn't.

First of all there's a few technical items that need fixing/need to be replaced, like this absolutely beautiful weld repair on the resonator may suggest.

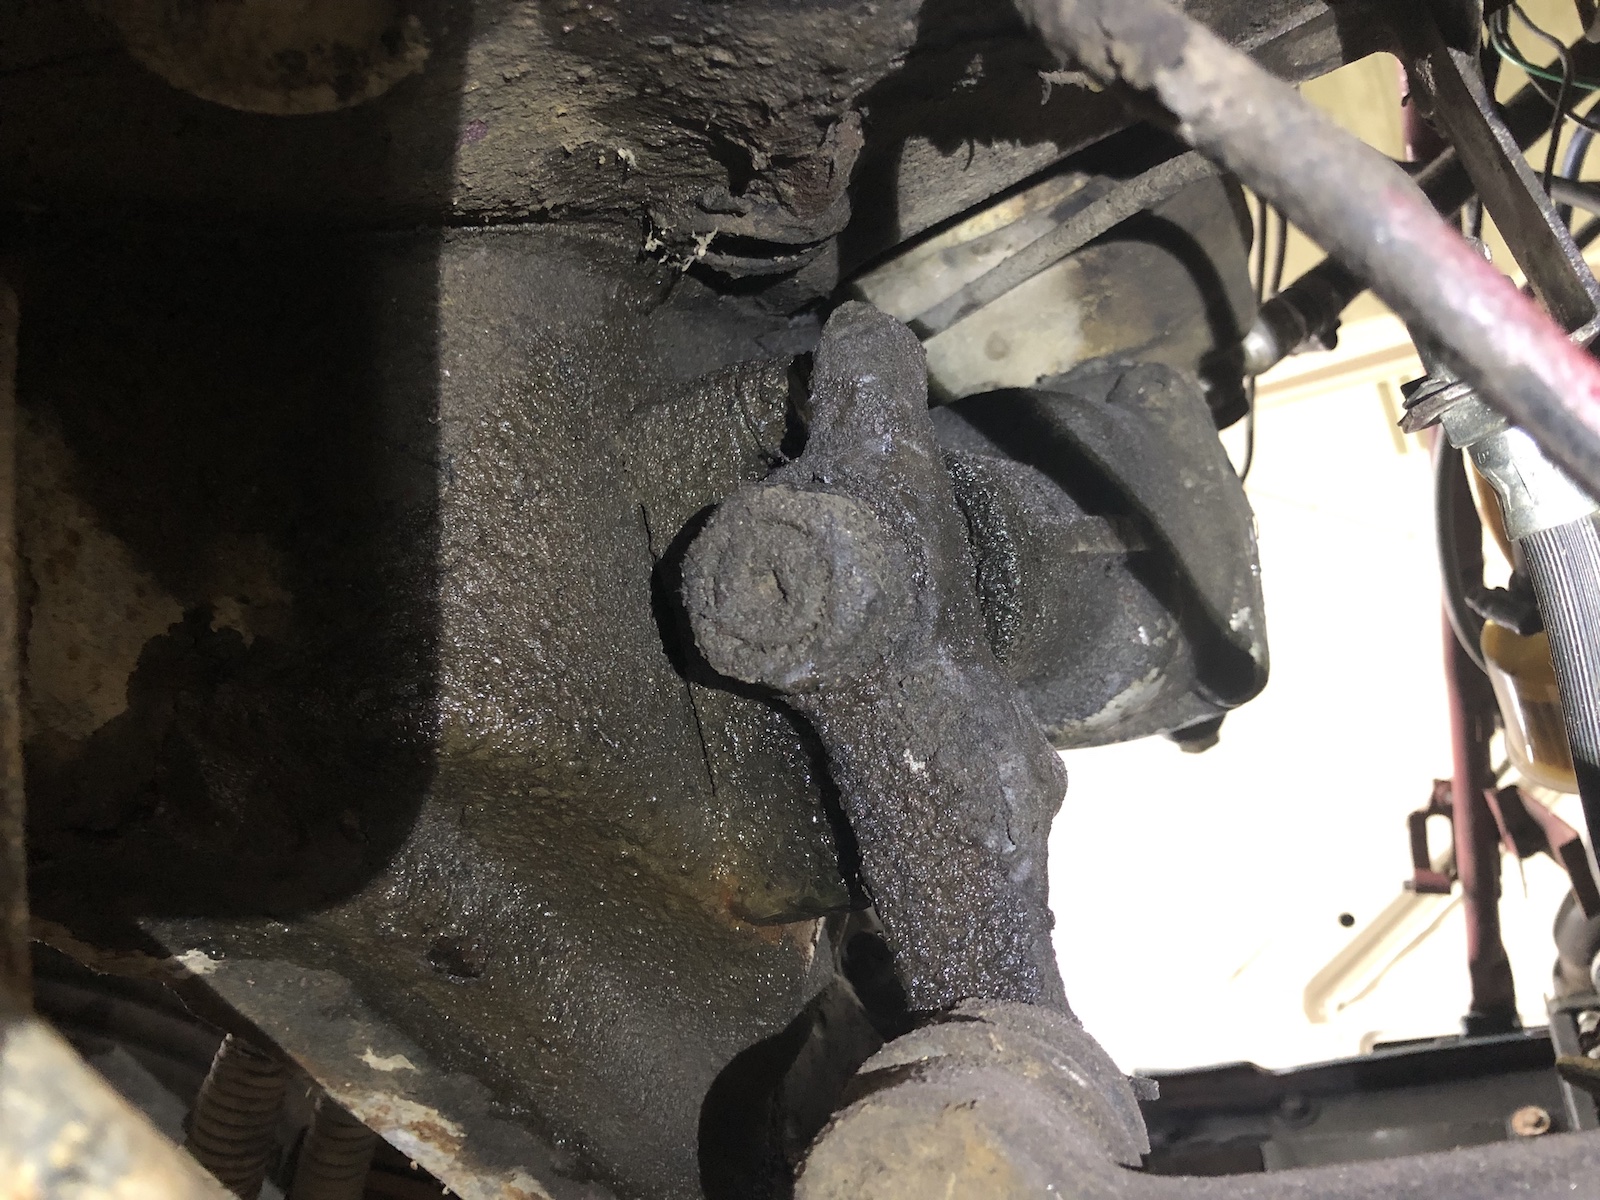
Or "a bit of" oil seeping from the steering box. (Mind you, this is normally a sort of "hotspot" for finding rust... this one's very, very well preserved.)


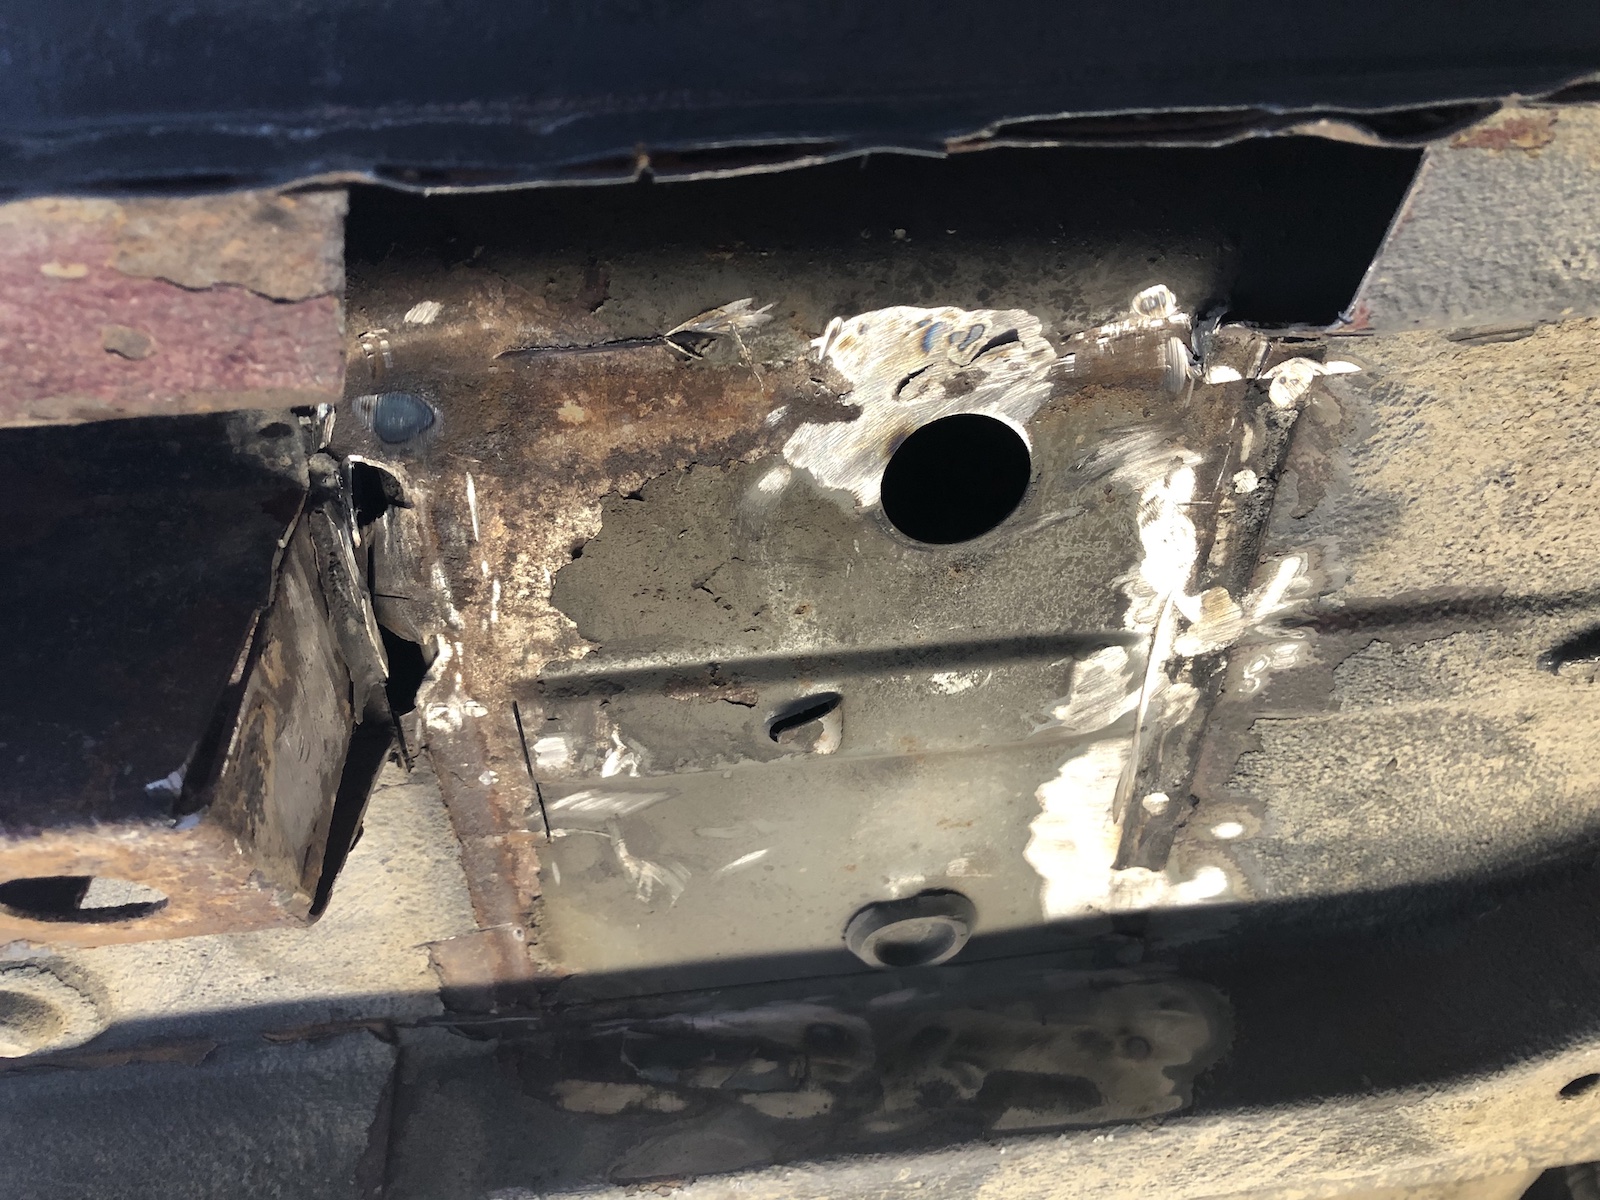
Following the theme of the resonator repair, there was one more spot, which was lovingly repaired by adding layer over layer of sheet metal onto the front frame member, which in the end looked a lot like a rusty piece of pastry. (Sorry for the shaky picture - just be happy that it somewhat spared you the actual extent of destruction. 

The pile would grow quite substantially after peeling back those first few layers.

After peeling back all those sheets of rusty and rotten sheetmetal, I found the actual front bumper mount lying in there. That in itself wouldn't warrant all the effort, weren't it for the fact that this bit also forms on of the two mounting points for the towing hooks on the front. Given the overall surprises with this car, I'd rather rely on a towing hook, I made sure was anchored down solid rather than... well you know. On top of that mounting the front bumper properly, definitely won't make passing the inspection more difficult.

And that's a proper bit of 3mm thick plate welded on, giving that element the kind of strength I want to see in it.

Whilst this was a VERY important fix on the underside of Comrade Car, the whole ordeal started with what was at most a slightly bigger pinhole, caused by wet mud piling up on the inside of the sill. (Again - but this time it's the other side.)


Shortly after, well the shortly part is a bit of a lie, that bit is not going to give me trouble again any time soon.

 It was at this point that I decided to remove the lift points for the factory jack, because a) I don't have one, b) they were quite rusty (yet structurally sound) and c) one of the mounts, I welded on was crooked. 

Which was a good idea, because look what I found.

Engage no prisoner mode. Luckily it was in a relatively easy to reach spot now that the lift point was removed.

Downside of no prisoner mode is that one has to take into account that some losses may occur. So the mount for the rear axle longitudinal struts, wasn't looking too fresh anymore. (Not without plenty of sand and dry dirt ending up on my face again.)

Whilst annoying the real problem lay in those two relatively small holes I tore into the floor plate.

Not exactly very big, but beautifully illuminated with some dangerous looking red light...


Admittedly, the holes themselves aren't the big problem. But the fuel tank and filler neck right above it surely are.

So out came the fuel tank, which to be honest was a lot easier than anticipated. Definitely helped by the fact that there was next to no fuel left inside. 


This also meant that I could simplify the whole fuel system by quite a bit and install proper hoseclamps and new flexible lines. 

Probably the main simplification was to remove the post 1986 breather system from the fuel tank, which included some several valves, carbon filled breather boxes and enough hoses to make someone with a rubber fetish very, very happy. Also the return-line, which is only needed with the later Solex carb was removed. The solution for the new breather is remarkably low tech and can be seen on numerous motorcycles. 

... and with the tank out the remaining spots could be patched up, without me worrying on whether the car would actually explode or just burn down slowly. 

... and this spot marked the last planned rust repair on the underside of the car - because one of the pre-owners couldn't get the correct towbar for a 1600, they "installed" most of what they had from a 1700 kit. And with installed I mean they welded it to the frame.

Said towbar will be the star of the next update, because how could you have a car without one?

Thursday 18 May 2023

Everyday TR1 - two ways of not fixing the oildrain and a third one that actually worked

 Oilchanges - not much to it: drain the old oil, swap the filter, fill in new oil. As I said not much to it. 

What you see here is almost to the day last year's attempt in fixing the stripped thread of the drain-plug. As the very astute amongst my readers might have noticed that's both the thread insert AND the drainplug coming out in one piece. I traced this back to two specific issues during installation: first, I used medium strength thread lock and second I only tightened the insert by hand and solely relied on the thread lock to hold it in place. 

As a result two areas of improvement have been identified, the first one being the use of high strength thread lock and second come up with a means of torquing the insert down to a level that ideally exceeds what the drain-plug will be installed to and only use the high strength thread lock as an additional level of safety.

With the threads on the old plug being a bit chewed up anyway, I went ahead and made a new one from stainless. M18x1.5 on the outside and M14x1.5 on the inside. Overall length 20mm, with 16mm of M18 thread.


Which put me pretty much where I ended up with the old insert and meant next was the need for a decent way to torque it down. 

So my first idea was to mill a hex onto the head in order to be able to torque it down this way.

Used some paper to protect the threads and countersink it/remove the burrs from parting off.

The finished product.

So after some very, very thorough cleaning of the thread in the engine case, copious amounts of high strength thread lock were applied and the insert installed. 


As you can probably tell, there's not exactly a lot of room around that hex to torque it to spec. So I sacrificed one of my cheaper 22mm wrenches and milled its jaws down to fit. 


As you couldn't really make the hex-head any smaller, because some surface area is needed for the copper washer to seal against the idea was then abandoned. M14x1.5 is a weirdly specific kind of thread, for example spark plugs use it, but also wheel studs and -bolts of a lot of German cars do.

So another threaded insert was made...

... and in order to turn this into an installation tool a M14x1.5 locknut had to be made. (Impossible to buy locally.) In a first step, I milled two flats onto the "nut" in order to be able to tighten it down onto the wheel bolt.


Followed by milling it to a 20mm width hex.

The finished nut, after some touch up with a file.

The picture below should also give an idea why I decided to make the lock nut so tall. In order to install the whole lot, nut and insert are threaded onto the wheel bolt and locked down with the nut and bolt. Then use the head of the wheelbolt to thread it in and tighten it down PROPERLY (assisted with some high strength thread lock).

Hold the bolt still (which is why you have to do this immediately, before it starts to cure) and undo the nut and simply wind out the bolt. As I gave the whole lot a good tug (far more than I would tighten down the drain plug) and the high strength thread lock should add another 30 to 60NM of break away torque, I'd say this is rather likely to work.


... and it did. Check out the witness marks on the two photos below.


 So why this somewhat "elaborate" solution and not just go with a M18x1.5 drain plug straight away? (common on a lot of cars) First of all the 40 year old ally is pretty tired by now and in case this thread failed again, there wouldn't have been any material left over for a more oversized (and still at least half-way common) thread. Additionally despite my best efforts, I somewhat doubt that the M18 thread in the engine case is perfectly perpendicular to the mating surface given the fact that I had to drill it free hand. An undoubtable benefit also lies in the fact that from now on a steel bolt is threaded into a stainless steel drain and thus this would in theory allow much higher torque and no more wear on the well aged ally.