or more simple: pointless electrickery.
Imagine the following situation, you have a pretty worn out pilotlight socket and because the alternator on your sidecar isn't exactly the strongest in the world, you decide to ride around on the pilotlight a lot during the day to charge the battery quicker, when you're only riding around in the city at low revs. Now a while ago, I bought a sh*tload of LEDs with push-in sockets, because that's what I use for instrument lights on my various bikes. Unfortunately my pilot light needs a proper bayonett-socket.
In order to make the original LED ba9s bulb fit, I had to grind it down in various dimensions. It would go through the hole, but touch the reflector and as such would increase the likelihood of a bad contact and or the bulb falling out, when it was pushed in.
This is one of the new LED bulbs. I bought two sets, one of this more traditional kind, with an acrylic reflector on top of it and a more modern version with just a cob, which are A LOT brighter. Also the orange dot marks which one of the leads is plus as LEDs are diodes and thus can't be hooked up either way.
Next up was a bit of lathe-work to make the actual "cup" for the led. I wanted it to be a tide slide-fit into the orifice on the reflector, so I wouldn't have to use a rubber o-ring or something along those lines for retention.
After drilling the cups and doing a testfit, they were filled with hot-glue to hold the LEDs and also give them some rigidity.
I also made sure, that the short bits of original wire and the soldering were inside the cup and the hotglue should prevent the short bits of wire from breaking off right at the board.
And that's what it looks like, when it is installed.
The picture only does it insufficient justice. The cob-pilot light is so bright, I think I might have owned 6V-bikes in the past with a weaker mainbeam on the headlight. Of course it's not as focussed, but it was enough to see what's going on in the garage at night, with all other lights turned off. From a time-is-money point of view, it was a completely pointless endeavour of course. Such bulbs can be bought for (at the most) ten Euros and I easily spent an entire Saturday morning making the bits (let alone considering the fact that the POM-bar I turned to cups from wasn't free either. It certainly solved a problem I had, so it was worth it in the end for me. The thing I am still somewhat wondering about is, will heat-dissipation of the LED-cob become an issue? Only time will tell.
Friday, 27 September 2019
Saturday, 21 September 2019
Project outlook (or why there will be a bit of a lack thereof)
Ok, so a couple of things have come up and will need tackling.
First and foremost: I have to move out of my current workshop, which is bit of a bummer, because by now I have quite well settled in. I've got a new place lined up, but its further away, so quick jaunts to fiddle with stuff will be more of a challenge. On the plus side, it's in the country side, which means there's quite a few roads, where I can do some testrides and not bother anyone. (Except maybe for some deer and the occasional rabbit or hare.)
Second: The TR1 engine needs rebuilding (again). The cylinders were rather worn to start and I thought I would be able to get away with it. Spoiler-alert: nope I don't. When ridden normally it's all nice and dandy in terms of oil-consumption (0.2 to 0.3L/1000km), but when flogged like the engine wants to on the Autobahn, she easily exceeds the 1L/1000km mark, actually more like double that figure.
Yes you saw right, I've got another BT1100 engine lined up and those internals will go into my own Everyday TR1 engine. Making me benefit from those Nikasil plated cylinders and lighter rotating assembly. Other than that, the basic recipe with XV700 heads and decreased squish gap will stay pretty much the same. It should be an interesting build nonetheless, even though probably more for me, as it's all about those little differences. In the course of this, I will also have a look at the gearbox, because even though it works just fine, when I had the clutch out, it showed a lot of sideplay on the input shaft, so I might find some drama there as well. Also I plan to fit some springs to hold the muffler-elbows in place.
Third: The Dre-XT-Stück will receive a super-rare* Austrian XT600 43F frame and I will build a 600 engine for it. I have, somewhat by accident, acquired a XT600 Tenere 1VJ (the one from the engine build) and after testriding it back to back with the Dre-XT-Stück building a 600 engine has become imperative. (No, I can't just fit the 1VJ engine into the new Dre-XT-Stück frame as the 1VJ is a an electric-start engine and they are wider...) Now in Austria back in the day, there were only two tax and insurance classes: up to 500cc and from 500cc to infinity. This basically meant, if you bought a 600cc bike, you paid the same amount of taxes as you would on a 1000cc or 1500cc bike, which meant if you weren't a complete nutter and absolutely wanted such a bike, you would have bought a tax-saving version like the Dre-XT-Stück currently is. (This is meant to illustrate, why Austria has had some quirky small-bore versions of various dirtbikes, e.g. XT600s, DR600 and also why the KTM LC4 started out as a 500 overhere.)
Fourth: Quite simply put, I owe my dad some help on his CX500 and his other bikes to get them up to a decent standard so he can enjoy them a lot more next year than he did this season. Ironically tackling the CX500 will be one of the first of the Winter projects to tackle as really it is mostly about getting the carbs done and then work out, why it is draining the battery when parked and fitting some rear indicators and a couple of other small jobs all around the bike. All in all, maybe two days of work on the bike and she should be ready to go on the road.
First and foremost: I have to move out of my current workshop, which is bit of a bummer, because by now I have quite well settled in. I've got a new place lined up, but its further away, so quick jaunts to fiddle with stuff will be more of a challenge. On the plus side, it's in the country side, which means there's quite a few roads, where I can do some testrides and not bother anyone. (Except maybe for some deer and the occasional rabbit or hare.)
Second: The TR1 engine needs rebuilding (again). The cylinders were rather worn to start and I thought I would be able to get away with it. Spoiler-alert: nope I don't. When ridden normally it's all nice and dandy in terms of oil-consumption (0.2 to 0.3L/1000km), but when flogged like the engine wants to on the Autobahn, she easily exceeds the 1L/1000km mark, actually more like double that figure.
Yes you saw right, I've got another BT1100 engine lined up and those internals will go into my own Everyday TR1 engine. Making me benefit from those Nikasil plated cylinders and lighter rotating assembly. Other than that, the basic recipe with XV700 heads and decreased squish gap will stay pretty much the same. It should be an interesting build nonetheless, even though probably more for me, as it's all about those little differences. In the course of this, I will also have a look at the gearbox, because even though it works just fine, when I had the clutch out, it showed a lot of sideplay on the input shaft, so I might find some drama there as well. Also I plan to fit some springs to hold the muffler-elbows in place.
Third: The Dre-XT-Stück will receive a super-rare* Austrian XT600 43F frame and I will build a 600 engine for it. I have, somewhat by accident, acquired a XT600 Tenere 1VJ (the one from the engine build) and after testriding it back to back with the Dre-XT-Stück building a 600 engine has become imperative. (No, I can't just fit the 1VJ engine into the new Dre-XT-Stück frame as the 1VJ is a an electric-start engine and they are wider...) Now in Austria back in the day, there were only two tax and insurance classes: up to 500cc and from 500cc to infinity. This basically meant, if you bought a 600cc bike, you paid the same amount of taxes as you would on a 1000cc or 1500cc bike, which meant if you weren't a complete nutter and absolutely wanted such a bike, you would have bought a tax-saving version like the Dre-XT-Stück currently is. (This is meant to illustrate, why Austria has had some quirky small-bore versions of various dirtbikes, e.g. XT600s, DR600 and also why the KTM LC4 started out as a 500 overhere.)
Fourth: Quite simply put, I owe my dad some help on his CX500 and his other bikes to get them up to a decent standard so he can enjoy them a lot more next year than he did this season. Ironically tackling the CX500 will be one of the first of the Winter projects to tackle as really it is mostly about getting the carbs done and then work out, why it is draining the battery when parked and fitting some rear indicators and a couple of other small jobs all around the bike. All in all, maybe two days of work on the bike and she should be ready to go on the road.
Thursday, 19 September 2019
Yamaha XV single carb manifold (part 1)
So, I've been to a bit of a vacation (thanks for asking, yes it was lovely) and then instantly fell ill and since have spent a bit too much time my bathroom porcellain. As such there's not quite the progress to show, that I wanted to show you, i.e. a finished first manifold.
As I have a good friend, who is (like me) strongly opposed to single carburettor manifolds on Yamaha V-twins, we decided that I would build a few different ones, ideally test them on his dyno and work out what works and what doesn't, with the intention of building a n/a setup for the turbo TR1, so I can (every now and then at least) use it on the road and not only as a very decorative coat hanger and also distribute the other remaining ones among some people I know.
So this is my Mk.1 design, an idea which I actually built (and used) on my very first turbo-setup. It's a rather elaborate design that starts off with a y-piece that is turned 45 degrees to allow for better fitment. Both runners are off the same length. It's not the shortest runner-length design possible, but at least on the first turbo it worked quite nice. (But then again, turbo's aren't particularly picky about flow, they just cram stuff into the engine and that's the end of it really.)
It sure does look a wee bit elegant with all those sweeping curves, doesn't it?
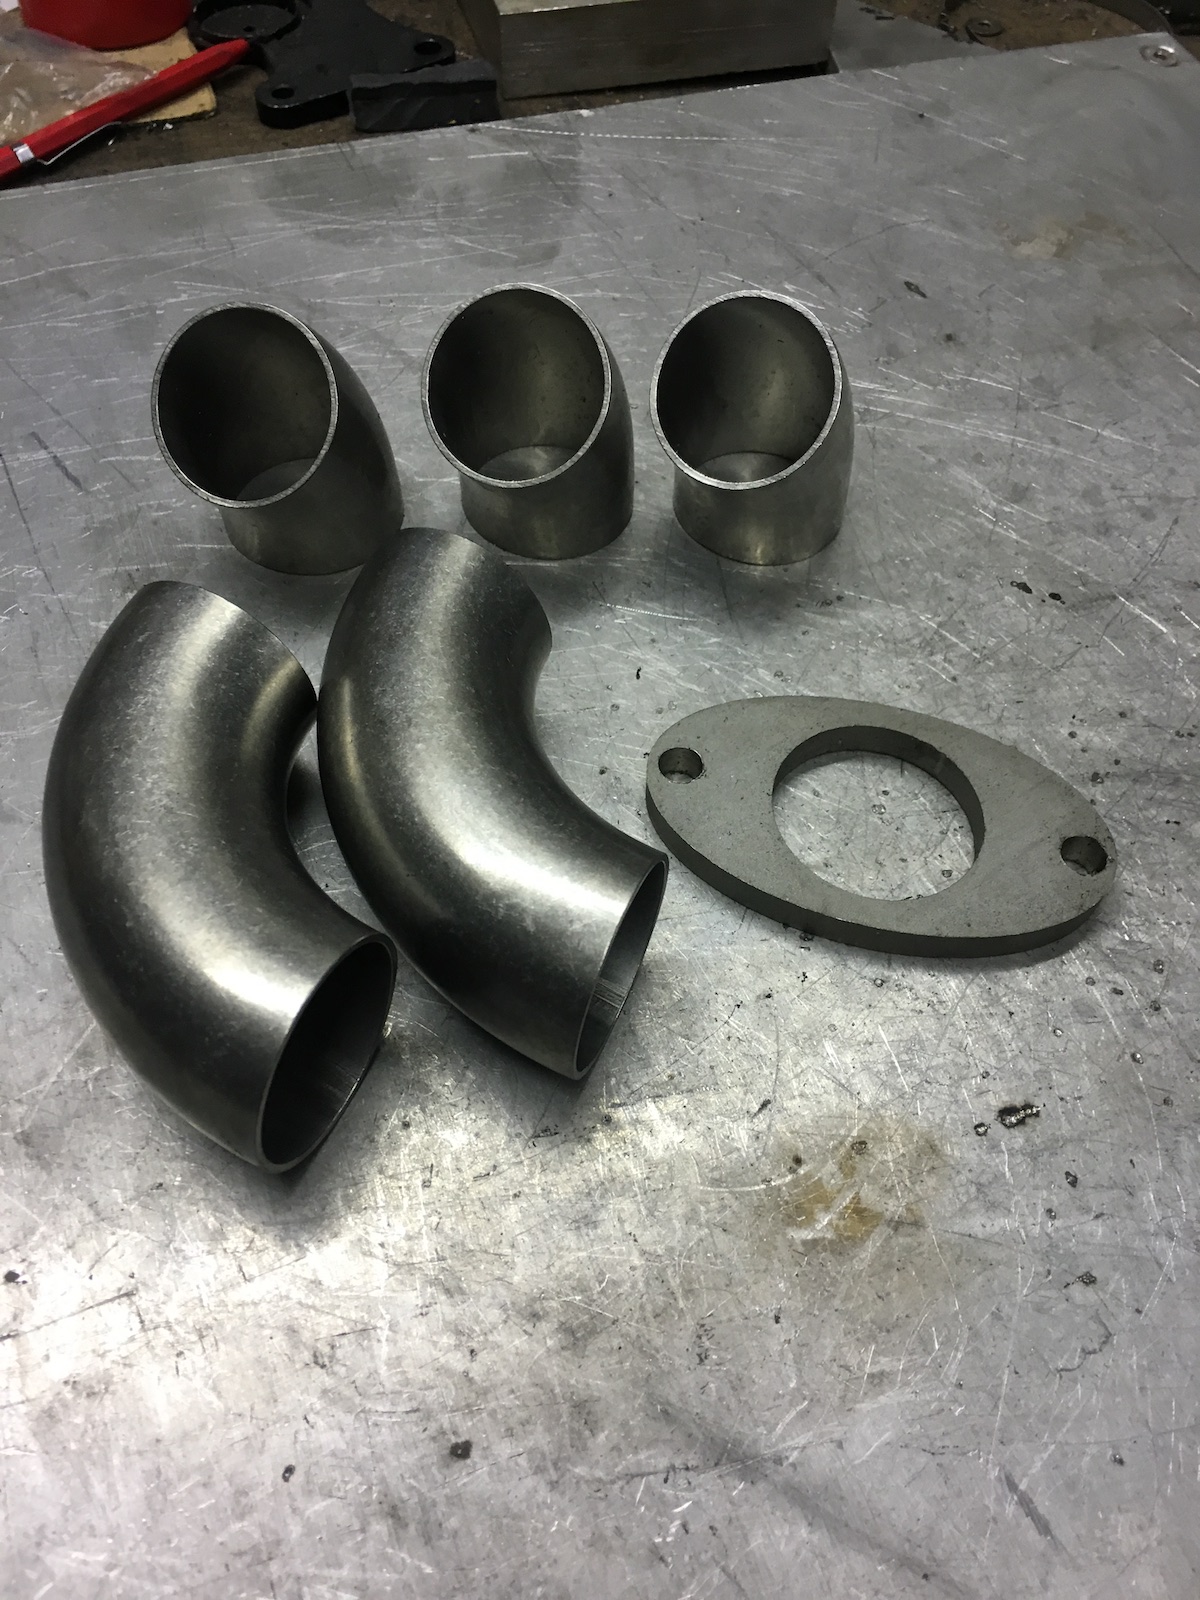
So why is this not done already? Well, I changed tubing suppliers and this one sold me bends with a different radius, i.e. standard 90ies and not "tight" 90ies for wastegate use. So I have to come up with a fixture to shorten the tubes in the bandsaw and then weld it in with the flanges.
This is the setup I built a while ago with bends with the correct radius:
As I have a good friend, who is (like me) strongly opposed to single carburettor manifolds on Yamaha V-twins, we decided that I would build a few different ones, ideally test them on his dyno and work out what works and what doesn't, with the intention of building a n/a setup for the turbo TR1, so I can (every now and then at least) use it on the road and not only as a very decorative coat hanger and also distribute the other remaining ones among some people I know.
So this is my Mk.1 design, an idea which I actually built (and used) on my very first turbo-setup. It's a rather elaborate design that starts off with a y-piece that is turned 45 degrees to allow for better fitment. Both runners are off the same length. It's not the shortest runner-length design possible, but at least on the first turbo it worked quite nice. (But then again, turbo's aren't particularly picky about flow, they just cram stuff into the engine and that's the end of it really.)
It sure does look a wee bit elegant with all those sweeping curves, doesn't it?
So why is this not done already? Well, I changed tubing suppliers and this one sold me bends with a different radius, i.e. standard 90ies and not "tight" 90ies for wastegate use. So I have to come up with a fixture to shorten the tubes in the bandsaw and then weld it in with the flanges.
This is the setup I built a while ago with bends with the correct radius:
Sunday, 1 September 2019
Everyday TR1 - clutch disaster and other fixes
Lately with the carbs getting closer to being set up properly an all too well known beast reared its ugly head again: clutch slip. Now I admit, I had recycled some older clutch disks from my stash as they still looked (and felt) good, but hey this engine makes a quite substantial bit of extra torque over a stocker. So I ordered fresh clutch disks and soaked them in oil to give them a fighting chance and decided to take it from there.
Well, the old clutch disks had been burned up due to slipping, but the with only five of six springs being in service...
The only explanation I have for the post shearing off like it did aside from previous damage is that I was too aggressive, when milling it down and that the vibrations caused some sort of fractures. (Initially I also thought that maybe because I was using the stock bolts had blown the post to bits, but after closer examination of the broken bits there was still thread further down the hole, so this seems rather unlikely.)
Nevertheless, there's this engine sitting on my workbench and it kindly donated a modified clutch basket.
Because the bike was cold already anyway, I decided to re-check the valves once more as a friend of mine had recently suffered a broken adjuster and there was a bit of riding ahead of me. The valves were fine, but the plug to the alternator had (again) started to melt. Which made me bite the bullet (pun intentional) and convert to bullet-connectors and redo the section of the loom.
A bit of very thin wall rubber hose as both thermal and mechanical protection for the plugs.
When buying the hose I finally thought about buying a proper stainless hose clamp for the engine breather, so it would stop the oily-muck from running down my engine and potentially making the bike fail next years MOT-equivalent.
Also with the space freed up under the tank I had to make a new bracket and use an R-clip to hold the throttle cable splitter in place.
Curious to see, whether the additional air-flow to the heads will result in lowered oil-temps or not, but currently it looks a lot like this could actually be the case.
Well, the old clutch disks had been burned up due to slipping, but the with only five of six springs being in service...
The only explanation I have for the post shearing off like it did aside from previous damage is that I was too aggressive, when milling it down and that the vibrations caused some sort of fractures. (Initially I also thought that maybe because I was using the stock bolts had blown the post to bits, but after closer examination of the broken bits there was still thread further down the hole, so this seems rather unlikely.)
Nevertheless, there's this engine sitting on my workbench and it kindly donated a modified clutch basket.
Because the bike was cold already anyway, I decided to re-check the valves once more as a friend of mine had recently suffered a broken adjuster and there was a bit of riding ahead of me. The valves were fine, but the plug to the alternator had (again) started to melt. Which made me bite the bullet (pun intentional) and convert to bullet-connectors and redo the section of the loom.
A bit of very thin wall rubber hose as both thermal and mechanical protection for the plugs.
When buying the hose I finally thought about buying a proper stainless hose clamp for the engine breather, so it would stop the oily-muck from running down my engine and potentially making the bike fail next years MOT-equivalent.
Also with the space freed up under the tank I had to make a new bracket and use an R-clip to hold the throttle cable splitter in place.
Curious to see, whether the additional air-flow to the heads will result in lowered oil-temps or not, but currently it looks a lot like this could actually be the case.
Sunday, 25 August 2019
The XS Triple Sidecar - tachometer drive seal
My XS Triple Sidecar has got two major areas, where it leaks oil like it's getting paid extra to do so:
Heating up the aluminium outer case, freed up the threaded inner section. Not sure if this is always so well stuck or whether it was due to the all-year-round-nature of my sidecar.
As now the whole lot is properly heated, the seal almost removes itself without my help, i.e. it was so hardened and shrunk that it nearly fell out.
The seal is a 7x13x4 seal, which is (luckily) still available new as it used in various other bikes, part no. #93104-07036 and it's not even very expensive.
As the M6 bolt installed was most likely the wrong one anyway and it was rather mangled, a longer stainless bolt with a lot of copper-slip will do the honours of holding the tach-drive in place in the future.
While I was in there, I noticed a little stress-crack in one of the joints of the new headers and patched it up as well, while the exhaust was still hot.
And that's the sidecar back on the road and in service again.
On the same afternoon I got into a bit of a down-pour and guess what, after almost two years of riding around, I couldn't smell hot oil being burned off on the headers, but only steam from the water that splashed up on the engine.
- the cylinder base gasket, which is a design flaw as there's no bolts holding the cylinder to the cases, which especially around the camchain leads to the affore mentioned leaks.
- On the tachometer drive.
Heating up the aluminium outer case, freed up the threaded inner section. Not sure if this is always so well stuck or whether it was due to the all-year-round-nature of my sidecar.
As now the whole lot is properly heated, the seal almost removes itself without my help, i.e. it was so hardened and shrunk that it nearly fell out.
The seal is a 7x13x4 seal, which is (luckily) still available new as it used in various other bikes, part no. #93104-07036 and it's not even very expensive.
As the M6 bolt installed was most likely the wrong one anyway and it was rather mangled, a longer stainless bolt with a lot of copper-slip will do the honours of holding the tach-drive in place in the future.
While I was in there, I noticed a little stress-crack in one of the joints of the new headers and patched it up as well, while the exhaust was still hot.
And that's the sidecar back on the road and in service again.
On the same afternoon I got into a bit of a down-pour and guess what, after almost two years of riding around, I couldn't smell hot oil being burned off on the headers, but only steam from the water that splashed up on the engine.
Saturday, 17 August 2019
Everyday TR1 - a tale of AFRs at idle
The following blog post might only be interesting to a very limited audience, but as it was quite the eye-opener for me, you just have to endure it now.
It all started with the TR1 suffering from some jetting issues on the way back from the mountains, i.e. it ran pig rich, even though I ran it the same way I had done a few years back, based on my jetting notes.
And guess what it wasn't NOT idleing, because it was running dead rich, but because it was running incredibly lean. The jetting was #20 pilot and #180 mains, air-screw 2 turns out. Blipping the throttle revealed that after being incredibly lean, it instantly went to pig rich, which sort of explained why the bike ran VERY hot.
So I swapped the pilot jet for a #17.5 and turned the air-screw all the way in. When blipping the throttle everything stay at around 11.3 to 11.5, where it dropped to somewhere like high 9:1s or 10:1 before. With the air-screw all the way in it decided to idle quite acceptably. Yet notably rich(er) than it should with the idle dropping down to around or below 1000rpm.
So I decided to give the air-screw half a turn and bingo, much better. Still a bit rich, but now it started to idle just fine.
So let's give it another quarter turn and whoops, tapers don't increase their flow in a linear fashion. But the AFR seems promising and is pretty much, where I wanted it to end up. But it was already idleing a bit high.
Right then, one full turn and see how it goes. Yup, much too lean now.
So, back to 0.75 turns out and adjust the idle to approx 1200 rpm.
As the title suggests, the engine is running really nice after all the work that has been poured into adjusting the carbs:
Verdict and/or hypothesis: Carbs with very small slide cutouts seem to react very strongly on adjustments to the airscrew and only once you lift the slide ever so slightly that's when actually the pilot comes into play. The other thing I noticed: The air-screw seems to affect the mixture much longer than I anticipated, in reality probably more like somewhere towards mid throttle openings. After going through the various specs and comparing them with the TM38 flatslides I had on there before, I am pretty sure that at least partially the small main-AIR-jet is to blame as the VM38s come with a 0.5 jet and the TM38s have none installed, so that's probably one of the next things I'll play around with... (Little addendum: They have been ordered an unless the shipping company lets me down, I should be in the position to play around with them on Tuesday, when I have a day off!)
It all started with the TR1 suffering from some jetting issues on the way back from the mountains, i.e. it ran pig rich, even though I ran it the same way I had done a few years back, based on my jetting notes.
And guess what it wasn't NOT idleing, because it was running dead rich, but because it was running incredibly lean. The jetting was #20 pilot and #180 mains, air-screw 2 turns out. Blipping the throttle revealed that after being incredibly lean, it instantly went to pig rich, which sort of explained why the bike ran VERY hot.
So I swapped the pilot jet for a #17.5 and turned the air-screw all the way in. When blipping the throttle everything stay at around 11.3 to 11.5, where it dropped to somewhere like high 9:1s or 10:1 before. With the air-screw all the way in it decided to idle quite acceptably. Yet notably rich(er) than it should with the idle dropping down to around or below 1000rpm.
So I decided to give the air-screw half a turn and bingo, much better. Still a bit rich, but now it started to idle just fine.
So let's give it another quarter turn and whoops, tapers don't increase their flow in a linear fashion. But the AFR seems promising and is pretty much, where I wanted it to end up. But it was already idleing a bit high.
Right then, one full turn and see how it goes. Yup, much too lean now.
So, back to 0.75 turns out and adjust the idle to approx 1200 rpm.
As the title suggests, the engine is running really nice after all the work that has been poured into adjusting the carbs:
Verdict and/or hypothesis: Carbs with very small slide cutouts seem to react very strongly on adjustments to the airscrew and only once you lift the slide ever so slightly that's when actually the pilot comes into play. The other thing I noticed: The air-screw seems to affect the mixture much longer than I anticipated, in reality probably more like somewhere towards mid throttle openings. After going through the various specs and comparing them with the TM38 flatslides I had on there before, I am pretty sure that at least partially the small main-AIR-jet is to blame as the VM38s come with a 0.5 jet and the TM38s have none installed, so that's probably one of the next things I'll play around with... (Little addendum: They have been ordered an unless the shipping company lets me down, I should be in the position to play around with them on Tuesday, when I have a day off!)
Friday, 16 August 2019
Everyday TR1 - Moving the Ignition box under the seat
This is one of those mods, which I must have thought of for several years. It came up again, when I swapped plugs after a rideout to the Austrian MotoGP races and felt just how hot everything under the tank got from all the heat radiating off the engine. I admit, it was a rather hot day and I had just done about 50km on the Autobahn at proper speeds, but still you could barely touch metal surfaces and having experienced a complete failure of one the ignition boxes a few years back, I decided that this couldn't be good at all.
As such the plan was very simple. Move the ignition box to the back in the (mostly) unused tray under the seat.
This meant that one of the cables was too short and once my spare ignition box sat there it became rather obvious that there wasn't half as much space as I initially thought. Actually I added about 20cm to the cable going into the loom and I am pretty sure if you tell the guys at Ignitech you wanted a special sub-loom, they would probably do that for you at the blink of an eye. (As long as they knew the exact lengths, which you will find rather soon on this blog!)
Except for notching the tray a bit to be able to route the cable a bit better not too much needed to be done
So how does it perform? Rather unspectacular. It's an ignition box and it sits in a cool place and is not rattling around, so I suppose it is rather happy.
(Please come back in a few days and you will find the "corrected" cable lengths here.)
As such the plan was very simple. Move the ignition box to the back in the (mostly) unused tray under the seat.
This meant that one of the cables was too short and once my spare ignition box sat there it became rather obvious that there wasn't half as much space as I initially thought. Actually I added about 20cm to the cable going into the loom and I am pretty sure if you tell the guys at Ignitech you wanted a special sub-loom, they would probably do that for you at the blink of an eye. (As long as they knew the exact lengths, which you will find rather soon on this blog!)
Except for notching the tray a bit to be able to route the cable a bit better not too much needed to be done
So how does it perform? Rather unspectacular. It's an ignition box and it sits in a cool place and is not rattling around, so I suppose it is rather happy.
(Please come back in a few days and you will find the "corrected" cable lengths here.)
Thursday, 15 August 2019
Mikuni VM38 - the difference between light and stock springs
Just a quick intermission, this time when I swapped the springs, I took the few minutes to measure the difference in wire diameter between the light and the stock springs.
... and as a matter of fact, yes you can quite notably feel the difference. 😀
Subscribe to:
Posts (Atom)