Saturday, 24 October 2020

Dre-XT-Stueck - the re-Dre-XT-Stueckening (pt. 4)

 ... or got head? 

There is an inherent risk of burning out the right exhaust valve due to the way auto-decompression system is operated on XT600s. If the auto-decompressor-cable is maladjusted (too tight) the exhaust valve won't be able to fully close again. If you're lucky this only burns out the valve, if not... well see below. 

But first a bit of an overview - in general there's two big families of cylinder heads on 4 valve XTs. The ones with one bolt on the camchain tunnel and those with two, generally being referred to as earlier and later models. As I mostly only care about the earlier heads (and there's more variants of those), these are the ones I will go into more detail. 

If you live in Austria or any other country (mostly in Europe) that during the 1980ies taxed bikes over 500cc heavily, you will encounter this first head, marked 5Y6 and was originally meant for the japanese XT400-version of the XT550. These sport the smallest inlet and exhaust valves of all XT heads and are actually too small even for 500s to make reasonable power.There's a 5Y1 version, which is the one originally found on XT550ies these should have slightly bigger ports and valves and I honestly wonder, whether they are the same casting or not.

The next group are the early XT600 and TT600 (up to 1987) heads, marked as 34L (if coming from a XT600) or 34K (if coming from a TT600). These sport 36mm inlet-valves and 31mm exhaust-valves. Allegedly the TT600 heads are slightly different in terms of port shape and as they come from TT600s, they are quite a bit more rare. These are considered to be the weapon of choice if you aim for a more midrange-oriented build in your engine. 

And lastly the full blown max. power version is the head marked as 1VJ, coming from the very first Tenere models. Yamaha increased the valves by another mm, which allowed the old engines to breathe a lot better at the top end. If you want to have that one fastest XT600 in your local pub, this is the head for you. It doesn't come without some downsides, especially at low rpm the bigger valve size can be felt adversely, even when compared to a XT500 4-valve. But on the top... let's just say I properly broke the ton on an otherwise completely stock 1VJ with a freshly rebuilt engine. 

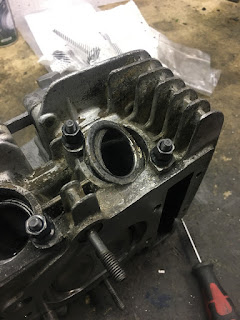
A while ago in preparation for this engine rebuild, I went ahead and bought the 34K-head you already saw above. It looked fairly decent - cam and cam-bearing surfaces were good, rockers were good and the outer appearance was a bit weathered but nothing cracked or broken off. In such a case the first step to properly assess the situation is to clean up the combustion chamber to see if there's any visible damage like cracks from one valve seat to the other or towards the spark plug.

Gasket remover spray and a nylon wirebrush work wonders, if you're a bit patient and let the gasket remover soak in for the odd hour or two.

So the head didn't show any cracks (the carbon deposits will remain in those after a normal cleaning, making them very easy to spot) and as such the next task was to clean up all the mating surfaces. Again a bit of gasket remover and a nylon wire brush make it a nicer (yet still not very pleasant) job. Then again, it pays off in the long run, when the engine is properly oiltight.


If needs must, a bit of scotch-brite (or the like) can go a very long way to clean up the last remaining bits stuck to the surfaces.

With the cosmetical side tackled, one of the most often overlooked bits in an overhaul like this is the valve adjusters. Originally they are ground to a spherical shape on the tip, but usage will over time create flat spots or actual flat traces, making a lot more difficult to adjust the valve play correctly and if you're unlucky and you now run an adjust 90 degrees to it's previous wear pattern, you will actually encounter premature wear on the adjusters. Additionally they're cheap as chips really and it's one less thing to worry about.

One of the cool things with old (and abused) hardware is always the kind of stuff you find, when cleaning them up. I guess someone was following the age-old principle: when one gasket doesn't seal, two probably won't either.

With all of this lovely cleanup being done, it was time to turn my attention to the valves and their respective valve seats... If you ever dropped a valve in an engine, you worked out that, if you hit a valve spring hard enough so that it binds up, there's a good chance that the collets can come unstuck. With a gentle hand (i.e. a big hammer) and a sparkplug socket that's one hell of a quick way to get the valves out.

Now the secret of the oily ports has been discovered rather quickly - valve stem seals shouldn't just loosely sit on top of the valve guides.


And then it was nasty-discovery o'clock.

The valve seat was completely cracked from overheating due to the auto-decompressor cable not letting the valve close fully. Most likely once heated up it would also come loose and the valve hammered it back into it's seat and breaking off bits in the process. 

As a result I have ordered a spare (used) head, another 34L just as the one, which is currently installed on my engine - wish me luck that it won't come with the same fault. Whilst waiting for it, I'll quickly take a spare 1VJ head apart and have a look inside. It shows some slight signs of oil-starvation in the past, but it could still be salvageable - a bit of micrometer-measuring work will (hopefully) reveal the truth.

Friday, 16 October 2020

Dre-XT-Stueck - the re-Dre-XT-Stueck-ening (pt.3)

Aside from doing the engine, one of the essentials of this was to swap the frame for a genuine 600 one. A word of warning beforehand: if you plan to do a frame-swap, make sure you get a good and unmolested frame or as you will see in this instance, you will end up doing a lot of extra work. That being said, my frame was for free and Michi, the previous owner told me about the "problem-areas".

But first, take the old bike apart and in order to do that, drain the old oil as a first step. 

Take the engine out (thanks to my dad)...

... and put the swingarm spindle back in.

Turns out, if you unplug the ignition and a couple of other wires, you can take the upper triple clamp off with the entire loom attached.

Swingarm came out with no drama, but one of the bearing bushes could have done with a bit more lubrication in the last 80.000km.

And at this point the re-assembly started. Fresh bearing on the steering stem with lots of grease - hence the name.

Put the frame on a beer-crate and ...

... fit the rear subframe. I took the linkage and the swingarm bearings apart, cleaned it and greased all of them and I have to say, it's in a lot better state than the original condition of the bike would have suggested.

Among one of the more unpleasant bodges of the frame was the fact that the lower mounting point for the exhaust has gone missing over the years. (Same goes for the nut that held the muffler on the upper mount, but I can't fix that until I have the engine back in.)

A bit of an old shelf was cut to size and welded in. I expect the hole to be filed out to suit or just drilled bigger, if I am lucky, but at least it's a start for now.

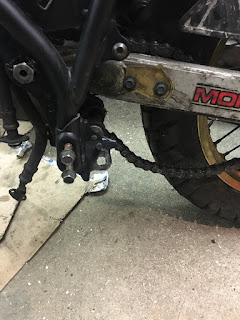
But the part that put on the biggest fight was the sidestand. The mount on the frame looked the same (mostly) and I was absolutely convinced that my sidestand would fit. I mean... they are both from essentially the same model, right?

I might at some point even have surprised myself with the number of swear words I know. After approx. 3-4hrs of modifying both frame and sidestand they now fit acceptably. Not really wonderfully, but acceptably.

The next thing to tackle was the fact that the stock engine guard mount is only rivetted to the engine guard and in my case, those rivets failed a while ago, resulting in an astonishing amount of rather worrying sounds coming from the engine. 

As the holes were just about the right size for some M5-hardware, from here onwards this is bolted on properly with some stainless M5 allen bolts (didn't have any standard hex-head hardware at hand), proper washers and locknuts. I know singles vibrate, but I do hope these last a while.

And then, slightly prematurely I didn't only just put the airbox, oiltank etc on, but also all of the plastics for a bit of a morale-boost.


And if I may say so, the old girl looks great with the black frame. I also had a look on how to fit a proper pannier rack to it and (by accident) found out, how much stiffer I would like my rear shock to be: Exactly like it feels without the engine. Maybe I should really earmark some funds for that next year. With all of this out of the way, the engine is the next bit that will deserve some attention.

Sunday, 11 October 2020

The XS Triple Sidecar - it's been a bit quiet...

 ... and that''s not a bad thing. With the old Dre-XT-Stück in bits and the TR1 running flawlessly (*knocking on wood*) had a very simple job as being a reliable parts and all-sorts-of-stuff-hauler for me. Obviously this does not make for very exciting blog posts. 

So the biggest tasks of all of Summer, where to pass the annual roadworthyness inspection and for that get a "new" i.e. vintage Pirelli Gordon for the front, which I will probably only have to take off at some point, because the rubber cracks as it is about as hard as well seasoned wood.

If anything at all, it was smaller jobs, like swapping the bolts on the tail-light for decent allen-key hardware and fixing up the connection inside the Guzzi V7 taillight as they were a bit erratic at best.


One of the things I tried out this Summer, was to turn down brake disks on my lathe. With an RCX-insert, I had to face some vibration issues, but in hindsight, these might have been the ticket for the pads biting into those disks, like it's going out of fashion now. 


And for the upcoming Winter, I will simply assume it'll be as mild as the last one, I've put on a set of used Michelin Anakees for the mostly wet (and sometimes slushy) weather. 

Remember the hole on the top of my throttle housing? Well originally on a DR600 it would have been a drain hole. Now that it's facing up, it's a brilliant point for oiling the cables.

Lastly, here's a little treat to myself: I always wanted to try a proper Avon Sidecar tyre and find out myself, whether it would actually be worth it to buy one new. Well this is a "well seasoned" one from 2013, which I plan to put on next year.

At this point, I have to make a confession and admit that earlier this week, I nearly bought a Guzzi as a new tug for the sidecar. 😱 Due to some worries with the paperwork, I decided against it and made a list of stuff I want to fix either before Winter comes or in Spring:

  • sidecar wheel axle - now that I don't run a sidecar brake anymore it's unnecessarily long and as my swingarm is a bit bent, a completely new unit is the smart move in my book
  • replace the sidecar shock - have to find one from a Suzuki GS750/1000/GSX1100E
  • work out some sort of airbox for the carbs, at WOT the engine's induction noise is deafening (the exhaust really isn't too bad)
  • take care of the tinwork on the sidecar - at the moment it's just some edge/surface rust, but it will turn into A LOT more work quickly, if not taken care of
  • fit the shorter final drive off a XS1100 - by now I have enough horsepower to use the 5th gear on level ground (and get the old girl to go a lot faster than the legal speed-limit on the Autobahn), but it would be nice to be able to use it all the time. Same goes for a shorter first, the engine has got some grunt down low, but in a sidecar more is more better. 

And then there's a second engine sitting in the workshop, which will get done some time in 2021 as the current one is an impressive fighter, but should have been done ages ago. 

Saturday, 3 October 2020

Everyday TR1 - Long Distance Riding Mods (pt. 2)

 After laying out the parts in CAD it has become quite clear that with a bit of clever measuring the necessary accuracy is rather easy to achieve. In reality the actual foot-support would only need four holes in the right spot and right in this case only means symmetric, which as long as you machine both parts at the same time, is rather easy to achieve.

A set of adaptors was also necessary.

In order to interface with the mounts on the footpeg-frames, a square had to be milled onto the back. (30x30x5mm is a good start, if you have similar ideas...)


As the astute amongst my dear readers will notice: there's only 3 (through-)holes, the 4th is just 5mm deep and meant for a press-fit button, so that the button takes all the weight and not the bolts.


Considering the fact, that I use M8-bolts, it is absolutely unnecessary, but it's the sort of engineering mindfulness that gives me those warm fuzzy feelings... 😊

The finished product.

Doesn't look like much from above - but it's a full 10cm (4") further forward.


Hold on a second, what's the point with these pictures? Simple, I built the forwards and realised I have to completely revise them, so I converted the bike back to almost the starting point - the handlebar-raisers (25mm) are still in place.


So was it a complete failure? No, not at all. 130-140mm are about where I want to end up. The whole setup was too wide, i.e. I couldn't adjust the rear footbrake the way I wanted it and even after shortening shift lever twice, I still couldn't reach it even half decently (hence the controls would have to be moved even further forward), yet further shortening would definitely not be possible as the gearchanges were already a bit stiff. (Very precise though) As a sidenote: the new setup will be made from stainless allowing me to dramatically cut back on the thickness of all the plates. It will be an absolute nightmare to machine though.