Showing posts with label welding. Show all posts

Sunday, 11 June 2023

The SR500 Sidecar - shortening a sidecar strut

I admit it, I have a (basic) engineering degree. Most of the time in my life this does not adversely affect me too much. But every now and then the little engineer in me wants to come out and play. On those days, when he does come out, he can be the most overcomplicating and obsessive person you can imagine. Here's an example.

For quite a while the front sidecar strut was too long, which in this case meant that there was next to no room for adjustments to alter the lean of the bike. It was pretty spot on, but as the little engineer in me demanded adjustments, I decided to give in. (Also the strut had to be repainted as the paint flaked off in one spot over the Winter months.)

So the strut was put in the lathe (unfortunately it is exactly as thick as the spindle throat so no chance of a quick job) and clocked in on the steady rest.

Parted the clevis off, which is only held on by a bit of weld and a press fit section that goes into the tube.


Touched up the slightly recessed weld in the middle of the tube where I shortened it the first time, not very elegant, I know, but I was young and pressed for time. 


Finally TIG-welded the clevis back on, which looked quite a bit neater than the original MIG weld that used to be on there. Probably quite a bit stronger as well.


And that's it - applied a fair amount of paint and hung it up to dry. Real world effect of all of this? 20mm more thread for adjustment of the lean angle, which quite frankly I'll probably never use and a well painted strut, which makes the rest of the bike look a bit more shabby. I'd call it a win.

Saturday, 4 December 2021

The XS Triple Sidecar - XS1100 swingarm installation

It all started with a comment from Ralf that he fitted an XS1100 swingarm and final drive into his XS750 sidecar. To be fair I had the same idea a while ago, but it always only came back to mind, when I really needed the old girl to be working and doing her thing on a daily basis. 

The hard facts: approx. 7 percent shorter gearing, which should fix the issue with a slightly long first gear, when pulling a sidecar and as an added bonus 30mm more wheelbase due to a longer swingarm and being quite a bit sturdier than wouldn't do harm either. 

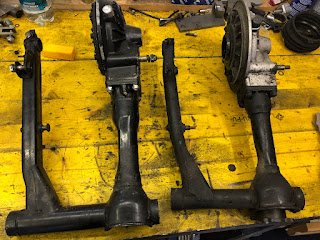
It's rather apparent that not only the XS1100 swingarm (on the left) is beefier than its 750 counterpart, but also quite a bit wider.

19mm wider to be precise. Luckily due to the way the swingarm mountin is arranged on these bikes the odd millimeter up or down wouldn't make a differents as the swingarm runs on adjustable pins.

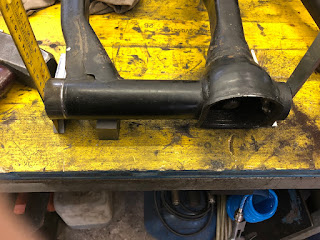
With the in mind, only way to do this - get the angle grinder out and hack that swingarm to bits. Sounds dramatic, but I knew that the outer bearing cup was originally only welded on (for those who want to do the same, the lip is about 5mm deep), so cutting it off sufficiently far away from the cup made the rest a rather simple job.


Clocking it up in the lathe using the original bearing cup of the swingarm bearing as a reference was a tad nerve wrecking, but I got it within 0.02mm between high and low spots.

Then turned it down to a nice press fit inside the swingarm tube

A final sanity check with the cup pressed in and it ended up spot on in terms of the width. Same 281mm as my stock swingarm.

An old 17mm rear axle out of a XV750 had to sacrifice it's thickened part, where it normally is clamped in the swingarm to act as a draw bar and alignment tool for the swingarm. 


I admit, my TIG weld looks nicer than the stock MIG weld that was there before. It's probably also a lot stronger. (There were some penetration issues in the original weld that became apparent, when I shortened the swingarm.)

Fitting the swingarm was a royal pain as it is rather heavy and obviously imbalanced and there's not a huge deal of room to wiggle it in. Also some idiot forgot to put the rubber boot on.

Swingarm out again - aside from the width, the indent on the right and the brake brace mounting point had to be modified.

Next stop was the splash guard on the rear wheel. Turns out with it installed the rear wheel doesn't clear the final drive housing.

The bolts dig into the housing and if you were to replace them with countersunk bolts the studs of the final drive housing eat into the shroud.

Once you look at both the triple and the 1100 units, it becomes rather apparent why it won't work as the 1100 unit is more or less flat and the triple inner cover has got the wheel coupling sitting a notable bit further out, giving plenty of room for the shroud.

In the end it all aligned rather nicely.


Let's waste no more time and tackle the elephant in the room: Was it worth it? Oh hell yeah. First gear is now short enough that I can take off without touching the throttle on level ground. First and second gear as soon as the engine gets into the power band makes the rear wheel light up and me grin like an idiot. And in the end, ain't that what it's all about?

Friday, 7 June 2019

Fixin' the TIG

... and while I am at it also make some overdue modifications.

The thing that had to be fixed was the gas-solenoid. Unfortunately this seems to be a rather common issues with these TIGs and mine was no exception. So the stock solenoid tended to not shut the gas off unless it was gently bumped.


As I know, not everybody takes apart a new welder, here are two shots, showing off the internals. And all joking aside, Chinese electronics manufacturing has come a long way in the last years. The PCBs are nicely laid out, the traces are soldered up where needed and silastic/hot glue prevent stuff from dangling around and all the boards are conformally coated nice and even. 


... and they didn't skimp on the copper heat sink. 


After soldering the wires back together to fit the new solenoid, I hot-glued it to the fan-housing as the original fitment with zip-ties might have broken the cables in the long run.


One thing, where my old welder terribly spoiled me was the quick-release on for my TIG-torch'es gas-line. This will allow to start using my flex-torch setup again and keep the stock one set up for the heavy stuff (and aluminium). 


My local pneumatics-shop had all the fittings for the conversion on hand and it was a whopping 24 Euros, so not exactly breaking the bank on that one. 


I still need a different plug for my other torch-setup as the older welder had the small bung and this one runs the big-one, but that should be rather easy to sort.

Wednesday, 27 December 2017

Setting up a Stahlwerk AC/DC 200 Pulse correctly

Those following this blog might have noticed earlier, that I actually do quite my share of welding, but for as long as TIG is concerned, I am doing mostly stainless. Now with the TR1 engine build I have a situation, where I have to dust off my old aluminium welding knowledge and get to it. In order to do that I had to do a couple of things to get that Stahlwerk 200 AC/DC Puls working as it should.
To be fair and just to get this out of the way, my TIG set isn't the most expensive in the world and with it being an analogue setup, if it weren't for the inverter setup instead of a transformer and the HF-start, I could have been straight out of the 70ies technologically. After doing some welding in the last few days it's actually a whole lot better than I dreaded, but there's a couple of catches to make it work, some of which are down to somewhat insufficient q.c. on the manufacturer's/retailer's site. The following points are therefore not meant to shed a bad light on the machine, but to give you some info on how to professionally do some fault-finding, if it simply doesn't work.

1) If you want to use a footpedal and NOT use it as a on-off switch, turn all the amperage dials on the machine to zero.


2)  At least on my footpedal the pedal-stop was stopping the pedal to go all the way down. Actually it was more set up to be around the 50 percent mark.


3) The potentiometer on the footpedal doesn't seem to be perfectly matched with the machine, I can only turn it up to 8-ish or so or it will turn the footpedal into an on-/off-switch again. Only this time it's pedal to metal means full-throttle really.


4) Impulse-amperage can and has to be set at the machine and once it goes over zero in AC-mode, it means that display shows some rather random numbers.

5) If you want to weld AC, make sure pulse is set to off, or the pulse generator will randomly interfere with the HF-start, which makes lighting the arc a bit of a gamble. Once that is covered, the HF-start is really nice.


6) On the subject of AC-welding. The manual explicitly states that in AC-mode the machine can only do 100Hz as max. frequency. Turning the knob to a value higher than that will have the pulse-generator interfering with the welder, resulting in a terribly flickering arc.

7) Pulse-width is marked in "Everlast"-style, displaying "DCEP" or cleaning, i.e. 80 percent on the dial means 80 percent positive or cleaning action.

8) This is slightly more general, but worthwhile to know: Up-slope and down-slope only work in 4T, which basically means: A proper TIG-welder uses a footpedal.


So what's my verdict: It's a proper oldskool machine in the spirit of one of those half-ton lumps that used to clutter workshops in technical colleges and secretly died out many years ago with the advent of modern inverter technology. So if you learned the welding craft on one of those, you'll love it. The arc is nicely stable on even the lowest settings and once you get the hang of it, it truly is quite a good machine to use. To be honest though, there's a few things, I really want in my next machine, which incidentially means, I'll finally go digital on my next TIG set: More than 100Hz in AC-mode (because 150+Hz really makes that arc tighten up), up- and down-slopes working in 2T-mode, multiple wave-forms in AC and pulsing beyond 200Hz in DC mode for working on really thin tubing.