Friday, 26 June 2020

Everyday TR1 - more ignition and electrickery

One of the first questions I asked myself with regards to using a Gen2 ignition box was, whether the advance curves would be identical (and whether the thing would actually work, but sometimes you just gotta stay positive.

Now I deliberately left the cables a bit long for the box, to be able to move the box around as I like, but the position under the seat didn't make me very happy as I noticed that the seat was pressing on the top of the box.

Take out some ally sheet (totally not an old street sign), trace a stock ignition box and this will ultimately form the new baseplate for the ignition box to go under the tank. 


... and then the box basically does what you expect from it:


Except it doesn't start quite so well. After a bit of probing with the wideband it became rather apparent that the curves are different: It uses less ignition advance down low (good, because I had some detonation issues, when opening the throttle on a REALLY hot engine) and quite a bit more on the top. (Also good, because I know this engine still leaves some on the table, as its top speed is lower than the old worn out engine with an Ignitech installed!) Both of which would require quite a bit of rejetting to get it to work (same as I observed when going from the stock box to Ignitech many, many years ago) and my car not being usable, the standard box went back in, because it fires up instantly and works well (enough) for a daily at the moment.

The other two thing that needed tackling, where that the silicone sleeve on one of the three wires coming out of the alternator had split and the second, ever since I put on this Guzzi-tail-light I had problems with a flickering (and regularly failing) light.


Once and for all fix: drilled a small hole through each brass contact strip and soldered it directly onto the bulb. Job done - sometimes you do actually have to solve electrical issues with the big hammer. 


I am currently a bit hesitant to make major changes to my TR1, but I have received my new Ignitech and I will at least make a new mounting plate and prepare everything so it can go in and I will probably also go ahead and re-adjust the carbs to work with the Gen2 box at some point, so I can swap over to that as the actually IC-based timing calculation is a notable step forward compared to the analogue setup of the tinbox TCI that was installed stock.

Friday, 19 June 2020

XV Ignition Intermission - Plastic box ignition on TR1 (pt. 5)

This week there finally was some time to try to wire up a very late J4T00871 to my TR1. The somewhat anti-climactic result: works flawlessly and just like before with the stock metal box ignition.

In order to get the cable lengths right, I used a broken ignition box as a template


6-pin connector on the ignition box - as I didn't have all the right cable colours, yellow is my substitute for orange (rear cylinder).


The very left yellow cable on the loom-side is just t-ed from the other yellow and is how I drive my tachometer directly.


On the 4-pin plug the black wire should be brown.


And with this shot, you should be able to copy it, if you want.


They say the proof is in the pudding... well the old girl runs, but I haven't had time to have a testrun with the Gen2-box.


And then I tried out the original J4T00871 that "transaxle" sent me and yep, there's something amiss on the side of the rear cylinder.


So what's the point, as some know, by now my new Ignitech is already in the mail? Well, I wanted to see if it can be done and I will definitely do a testride to find out how well the old girl will go with this box.

Friday, 12 June 2020

Everyday TR1 - gets a new bench and the Norway-engine is put to good use again

It is said that if a change is just slow enough, you will have great difficulty noticing it, unless then due to some unexpected circumstances you have a direct comparison again. This time: seats. After merely 125,000km and mainly because the leather started to crack I decided to swap out the seat.


I lately toyed around with the idea of making a set of forward- or mid-controls for the old girl, just like the original Faust TR1 had many years ago. Turns out, on a stock seat you sit about 30-40mm higher than on the completely worn out bench that used to be on the Tractor. I might still do it, because Faust was probably the most comfortable bike I ever rode, but I admit it has gone from necessity to nice to have with the new seat. 


And then there was another little project I undertook: The Norway-engine, originally built for my friend Eerik, has sat dormant under the bench since last October. Now the time to shine has come for it. After stripping it of all its heavy and mostly broken internals it will now serve as a jig for making a series of 2in1 inlet manifolds and I hope to find a way to use it for building exhausts again, so the turbo and the Tractor can stay in one piece.


If you wonder why I as a strong proponent of twin-carbs will start (again) to build 2in1-manifolds, the answer is simple: A few friends asked me long enough, whether I could make one for each of them and the turbo might need a new and improved manifold as well. 


And to finish off this post, here's two pictures of the old girl simply looking gorgeous in the late afternoon sun.


Wednesday, 10 June 2020

The Stinkerle (part 2) - Asessing the engine situation

The old Stinkerle is progressing very slowly, but it is progressing nonetheless. First step was to fit a rear tyre and also assess the situation with the XT350 rearwheel that I swapped in.


Fueled by this progress I decided to be brave and have a look at the bottom end of the engine. Because in an ideal world, a swap of the crankshaft seals should be sufficient to get the bottom end in working condition again and swap out the alternator and ignition setup for something a bit more suited for its future application, i.e. racing. (Especially as the completely misadjusted ignition was probably the case for the engine failure in the first place.)


In order to get the rotor off, a M10x1.25 bolt is needed. And compared to some similar setups on other bikes it was dead-easy. 


On the other side under the clutch cover things looked even better. There was oil in there and the clutch looks like it hasn't done a lot of miles and there was nothing horribly wrong with it. 


As the oil-pump will not be used again, the drive gear can be removed. (It's just a press-fit.)


The clutch basket was in good shape and I didn't lose the ball that sits between the pushrod and the pressure-mushroom.


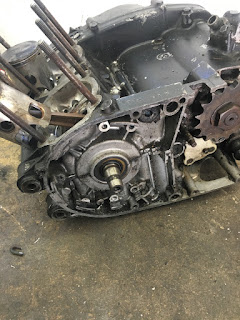
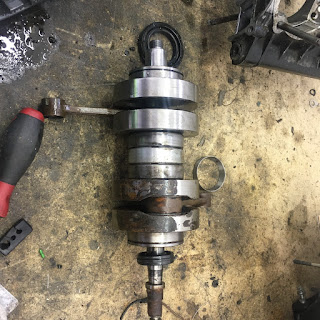
Splitting the cases is pretty simple on old RDs, but this was when the first (and only) nasty surprise came up. As the Stinkerle is parked near the workshop door some rain must have gotten into the crank-case and made the crank start to rust.


My loss is your gain though, as this means, I'll do something I haven't done in ages: rebuild a two-stroke-crank. (But not today - I first need the bearings and I have to either borrow a press or build my own - let's be honest, expect a hydraulic press build soon!)


Lastly the black paint smeared on the cases looks remotely acceptable in the pictures, but in real life a bit of industrial grade paint stripper quickly dealt with the matter.


Just a little bit of cleaning up with a plastic brush later and the cases look good again!


So what are the next steps? I need a hydraulic press (wanted one for a long time anyway) and then have to rebuild the crank. Also I will check the bore-size on the cylinders and then have a look, what the next suitable oversize will be.