Showing posts with label boring. Show all posts

Thursday, 11 November 2021

The SR500 sidecar build - sidecar mounts (part 6)

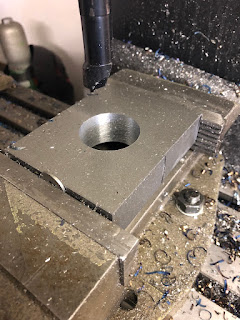
The first part of this post will look a bit like engineering class, introduction to parts layout and fixturing. Just to give you a few specs: The block below is 80x100x25mm - comprising of two 40x50mm firmly pressed together with a 38.5mm bore in the middle. 

Step one (after clamping everything in a vise), mark the center. Also if you wonder what the washer is doing there - if you hold parts in a vise and for whatever reason couldn't square it up beforehand, it is a clever idea to just press on it in a single point. (Some people use a ball from a ball bearing or the like to just push against a single point.)

Then I marked the hole I planned to bore just to check once more, if everything would fit.

And then get started with drilling a hole as big as my drills would allow. Mainly because drilling is a lot faster than boring with the boring bar.

Remember the boring bar from the last post, guess who's going to play a VERY prominent role in the rest of this post. 


In order to maintain alignment prior to drilling the holes for the mounting bolts as the parts are clearly too tall clamp them in one go and measuring and finding the holes again is prone to errors.

Which brings us to a classic do as I say, not as I do moment... or in other words, don't get overly excited. A knife-head makes short work of squaring up the part and leaves a remarkably nice finish.

Oh and it fits, but the two halves are almost touching, not allowing for much clamping force.

Bit of extra clearance is easy, took about 0.5mm off the inner faces and now there's plenty of room for clamping the tube so hard one could probably squish it in between. 

As I had some alignment issues and no long enough bolts, I only drilled and tapped the block for M6 bolts. Ultimately M10x100 bolts will be used.

And then the same had to be repeated for four more blocks. Which is where I found out that the sweet spot for this mill and boring bar combination was at an incredible 2100rpm and a 3mm feed on the diameter, which resulted in those lovely straw-coloured chips.

 Not the block from the picture, but to give you an idea how all of this went down and why I was so impressed with that little 6x26 mill.

I know you're supposed to either run inserts dry or flood cool them, but a bit of oil on the surface did help tremendously.

Also, if you clean up a part with brake-cleaner and then tack it... well, you may end up with a bit of a fire hazard. 

And that's the first of the blocks finished, as far as purely functional features are concerned. Held together by two M10x60 bolts.

So just have to do this three more times.

Now regarding the blocks the three things left to do are to test fit them, make them look a bit less square, pointy and sharp edged and then zinc-plate them.

Monday, 8 November 2021

The SR500 sidecar build - Boring (part 5.1)

... holes and making a boring bar that works with insert tooling. If you have a boring bar, most likely of Far-Eastern provenance, you will have encountered them - import boring bars, with their little (usually dull) carbide inserts soldered on. Now one can work with them rather well actually, with some rework on the bars with a diamond file to make the inserts resemble some sort of a cutting geometry and some very, very light cuts one can get some pretty good results with them. But with the task at hand of pushing what the 6x26-mill can take in terms of cutting and doing a lot of it, this quite literally won't cut it. 

As this isn't quite my first rodeo, in the past I got a cheap boring bar and modified it as below. Unfortunately (for this boring bar), I no longer run TCMT16 inserts on my lathe and thus would have to buy inserts solely for this one bar. Not very economical, especially as I have a ton of CCMT09-inserts.

So this one started it's life as a 16mm, right handed boring bar for CCMT09 inserts. I shortened it to a reasonable length. (The shorter, the stiffer and more stiffness means less vibrations and that in turn means a better surface finish.) Then turned it down in the lathe to fit the boring head. In my case this meant going down to 12mm. Also this is where cheap boring bars shine as they are made from some butter-like alloy and turn beautifully on the lathe. 

At this point, one could go ahead and just use it, but every time you install it, you'd have to clock it to get it right on center (or actually a bit below) again. So I put it in the mill and made a little flat spot to register against. 

And there you have a boring bar where you can burn through inserts and not care much about it.

Oh and burn through inserts... I did not. For five holes, which resulted in enough swarf to fill up the whole vice and pile up left and right of it, I had to change inserts once, because it got a bit dull.

Saturday, 3 June 2017

Boring yokes of Tom's RD400

My mate Tom recently passed by and asked me for a favour: He had just bought a RD400, but the original forks were completely shot. But as a true Yamaha-connoisseur he used to own several SR500s and had some good fork legs sitting around. The only problem: RD400s run 34mm forks and SR500s 35mm forks. Which is exactly where I came into play.


The thing with such jobs is, that it takes longer to have everything centered under the boring head than the actual boring job and even that takes quite a while. All in all it took the better part of two hours to have the yokes bored out to size.


There'll be an update on my XS Sidecar very soon, but I've been working a lot on my other XS Triple Sidecar and the XT to get them ready for their respective sales and had to do some fixing up on my car. So there's not that much to show as of yet.

Wednesday, 13 July 2016

XS400 to 450 Project (part 3) - a boring job

No really. Boring the cylinder block for the liners has got to be one of the most annoyingly boring jobs in this whole build. Each pass was 0.25mm on the diameter, because of the long boring bar and the resulting tool-chatter I had to endure.

Let's start with the aftermath: Looks like a lot of swarf after boring ? Check the last picture...


Now you know, you did a good job, when both holes are within 0.01mm. (At least that's what the internal mic said, i.e. it's below the instrument's accuracy, I presume!)


So this job starts, where the last one left off. And the it's a lot of iterations of the same really...

Bored and chamfered.

 Now that's what I call swarf... and I cleaned it up half way through the job!

Bore for the liner is now bigger than the case mouths. So that's the next job to do. 


Oh and as I said, it was a rather boring job...