Saturday, 13 August 2016

SR500 Hack - cleaning and dialing in

I think the vehicle that has seen the least coverage on this blog is my SR 500 sidecar. And there's a simple reason for that: it's mighty reliable, which is one of the reasons why I am holding on to it.

The base bike used to be a 1985 or 1986 SR500, type 48T. The frame has been altered in Walcher style, i.e. the backbone has been doubled up and the headstock beefed up. Additionally the rear lower mount has been beefed up with a solid rear footpeg mount off a 2J4-model and some gently applied 5mm steelplate.
The engine is pretty much stock, but with a stainless header pipe and a homegrown muffler, which lets it breathe "a bit" better.

I mostly use this bike during the Winter months and for hauling all sorts of sh*t around and it's extremely capable at that. I haven't encountered a situation (yet), where I had to get out the snowchains... In order to prevent some from eating the old girl up like a hot 'n' greasy hamburger (she's grown a bit leaky over the years), I marinated her with some S100 salt protection spray and I have to say, washing that off left me more than chuffed, but see for yourself.

My dad making sure the Dre-XT-Stück doesn't live up to her name.

The part you can't see in this pictures...

... in order to get the S100 stuff off ...

... we had to use spray-on kitchen cleaner and a hot water jet-wash.

The second part was to adjust to the toe in and pin the lower front mount in place as it had a tendency to twist away, once it was put under enough strain.

About two years ago, I replaced the lower sidecar mounts, which were just normal "clevis" mounts with proper sidecar balls and that was one of the best mods ever done. The little girl is super rigid and can be flung around corners like you wouldn't believe.

The next mods will include a longer sidecar swingarm to fit a proper shock there as the current Velorex-shock's damping is non-existent by now and additionally find some better shocks for the rear as the current Bilstein's are a bit leaky and even before that were softer than I want them to be.


Wednesday, 10 August 2016

The Dre-XT-Stück - more work that needs to be done

Back in pre-EU days Austria was a weird country when it came to motorized vehicles. The one most apparent in this particular case was the fact that Austria only knew two tax-classes for motorcycles: sub 500 cc and from 501 onwards. As such motorcycles such as an XT600 would have cost the same to insure as an old Zed thou or the like. Consequently various manufacturers offered sleeved down models in Austria to circumvent this situation. My dad's XT500 is exactly such a case. It's a model 55A, which most closely corresponds to the international 43F-model.

Whilst overhauling the carbs the last time, there was still some more left to do this time:

  • Adjust the float height correctly


  •  Overhaul the front-brake and fit it with a stainless brake piston and new pads


  •  Put on some nicer used sidepanels and headlamp mask
  • And lastly tune the carbs and test-ride the lot. Just for those interested - the secondary carb is supposed to open at 7mm slide movement of the primary carb plus the odd extra turn on the adjuster to make the transition go smoother. 

And trust me you can spend a whole afternoon trying to get those carbs *JUST* right...

Saturday, 6 August 2016

Everyday TR1 - waterproofing the airfilter and some sync'ing

Quite recently I was meeting up with some old friends in CZ. As it is custom at such events a slight drizzle turned into a massive downpour of quite epic proportions. This resulted in my airfilter (luckily it's a K&N element) getting sprayed by the rear-tyre as I only use the rear half of the airbox (due to it holding on the left sidepanel!)

A small bit of ally taken form a beer can, a pair of scissors and some liquid gasket:

Should do
Better than stock!
A month later I can report that my airfilter is a lot cleaner than before!

Technically unrelated, a quick checkup, whether the carbs were still in sync was due as well... I managed to get the fuel consumption down to 5.5 litres/100km, which is quite impressive for this old brute to be honest.


Wednesday, 3 August 2016

The XV750 CafeRacerProject: 2in1 exhaust

The next logical step in Andy's XV750 project was to build a nice 2in1-exhaust for him. Nicest surprise for me was the fact, that I had spent so long thinking about it, that I literally built it in a day.

When a mate of his saw the exhaust, he instantly decided he wanted another one. Which quite honestly spiralled off and I am now building number three and quite likely will build a fourth one just for good measure...


One of the key prerequisites was that the exhaust had to follow the engine as closely as possible. #1 will be reworked to be just as snug as #2... Bit of a challenge, but one I particularly like.


Sunday, 31 July 2016

End of July project overview

Right, the blog has gone quiet again for about two weeks, but I have a good reason for that:

  • I have officially been accepted to run the Turbo TR1 at the Glemseck 101 in the so called "Sprint International" class. Which basically means, additionally to my normal work, I am now rebuilding the turbo bike to be not only working, but race ready and just as you'd expect there's lots of new issues coming up.
  • Additionally I took on a cafe racer showbike(-ish) build and built multiple sets of 2in1 exhausts for XV750ies and TR1s. 
  • If that weren't enough, my dad's new XT 500 Dre-XT-Stück's carbs gave us more than a fair share of headache and have well eaten into the amount of time I have available for the blog.
  • And lastly I've been fettling with my SR500 hack's sidecar mounts a bit, as I deemed them to be a bit flimsy and I have to get a new Austrian MOT (TÜV) for it. 


All of those four topics will be covered in more detail in separate blog entries in the coming days...

Wednesday, 13 July 2016

XS400 to 450 Project (part 3) - a boring job

No really. Boring the cylinder block for the liners has got to be one of the most annoyingly boring jobs in this whole build. Each pass was 0.25mm on the diameter, because of the long boring bar and the resulting tool-chatter I had to endure.

Let's start with the aftermath: Looks like a lot of swarf after boring ? Check the last picture...


Now you know, you did a good job, when both holes are within 0.01mm. (At least that's what the internal mic said, i.e. it's below the instrument's accuracy, I presume!)


So this job starts, where the last one left off. And the it's a lot of iterations of the same really...

Bored and chamfered.

 Now that's what I call swarf... and I cleaned it up half way through the job!

Bore for the liner is now bigger than the case mouths. So that's the next job to do. 


Oh and as I said, it was a rather boring job...


Saturday, 9 July 2016

Everyday TR1 - wiring cleaned up and tach wired directly to TCI

Now there's a few things on Yamaha's TR1 models, which are *ahem* slightly suboptimal, aside from those mentioned before, one of the last areas of concern was the wiring or more specifically the starter cut-out wiring. Just like any other vehicle with an electric starter, the TR1 uses a starter relay. So far, so good. Unlike most other bikes I have owned so far though, the TR1 has got some pretty elaborate starter cutout wiring. Which prevents it from starting, when it's in gear and without the clutch-lever pulled in. (Funnily enough, there's no cutout on the sidestand though...) As you can imagine, after 35 years this doesn't exactly work as reliable as when new.

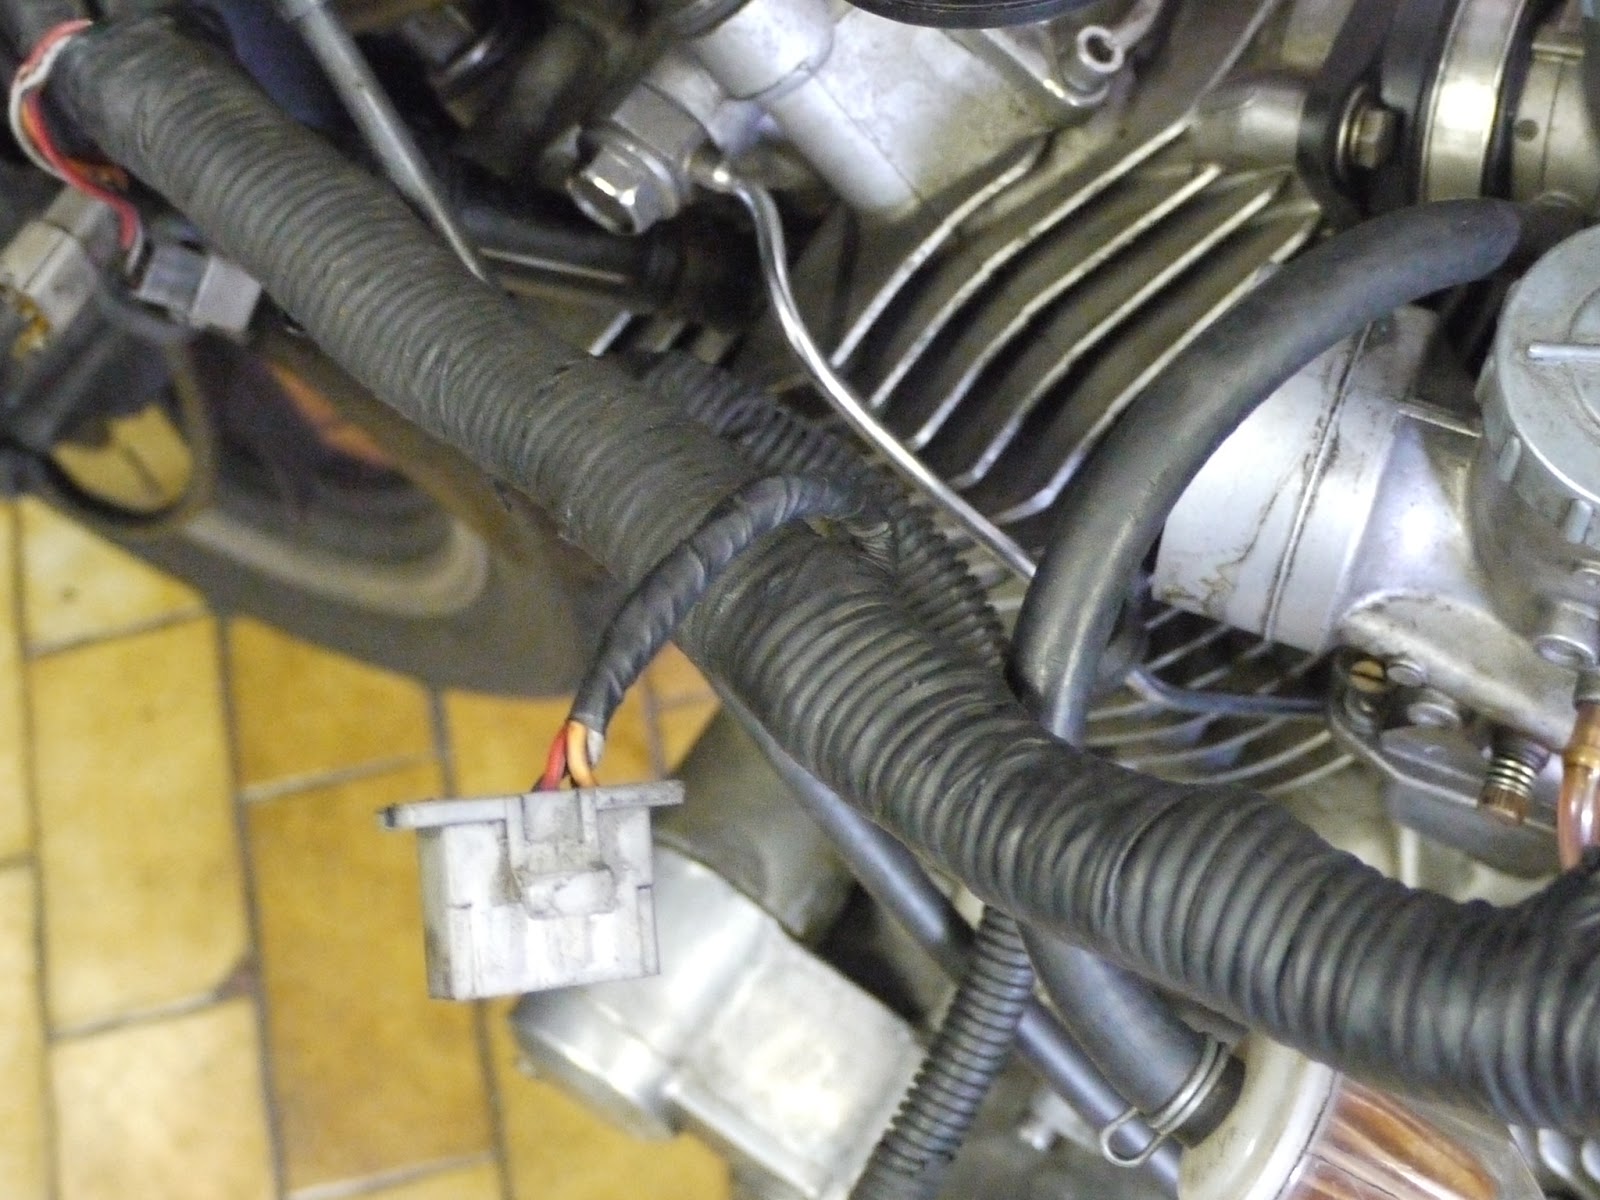
First, the schematic and the two following pictures are what it'll look like in real life.


The solenoid on the right is the one we want to eliminate. The light blue cable comes down from the neutral switch and the black and yellow one from the clutch switch. The cable with the bullet-connector is where the red-cable to the starter solenoid will go. The u-shaped loop can be removed leaving you with one red-white cable which actually goes back into the wiring harness.

That said, if your TR1's wiring harness is in good condition you may find these three pictures quite helpful:

 Green and yellow are the switched side and it should therefore be quite obvious, which wire goes where if you look at the pictures.


Now if you wanted to do it really cheap and easy, you could just pull this cable out of the plug and put it where the red and white u-cable would go and call it a day. In my case I wanted to deal with some other issues of wear and tear on the wiring harness and most importantly run the tach off the dedicated pin on the Ignitech TCI-unit.

On the Ignitech-side this is dead simple. Check out the pin-out diagram on the Ignitech homepage and find Pin 15 (it's the most center one, which is empty, and sits between a red and two blue cables and run it to the last remaining empty plug-hole on the connector to the wiring harness. Ignitech suggests using yellow-green cable and ideally you would want to go for 0.75 or 1.00mm cable as the pin on the TCI isn't made for heavy gauge cable.

Here you can see a slightly altered wiring harness, with the most major alterations being two adapter cables for the cables to the starter solenoid and oil-level switch as in stock form they are too short and as a result you have to take off the right foot-peg-holder, which is a bit of a pain. 


Now this is the 6-pin connector to the wiring harness and in order to alter the tach's wiring this is where you have to remove the insulating tape and work your way to the front and find the soldered Y-joint of the orange cable. The one going to the headlight shell is the one going to the cockpit and it needs a cable soldered on and then routed to the 6-pin connector.

 The stripped loom with said alterations.

The pictures don't show it too well, but the rear half of the wiring loom is now roughly half the diameter with all the cabling removed.

There's actually two more cables that can be removed: white-green and black-yellow. The first being used for the auto-cancellation of the indicators and the latter for the clutch-lever-switch.


I love to use silk-coroplast-type tape to wrap my looms, because it's very durable AND it does look rather professional, if I may so. 


And that's the amount of stuff that's left over plus all the old insulating tape...


Wednesday, 22 June 2016

XS400 to 450 Project (part 2) - Removing cylinder liners

Now this is my very personal recipe for crepe á la performance: Take a well aged cylinder block, put it on some stands and gently heat it in the oven to two-hundred degrees for thirty minutes.


Some weight atop the liners does speed up the process.


Wait for the noise...


The press-fit of the liners in the block is just a mere 0.05 to 0.10mm. (This will become quite important later.)