Thursday, 25 November 2021

The XS Triple Sidecar - back to snowmobile carbs

So I am going back to 31mm* snowmobile carbs and no it's not that I wasn't happy with the modified Gixxer flatslides, but to be honest I will need them next year on a mighty four that has been lurking way too long in another shed. (*Yes, previous iterations used 33mm snowmobile carbs, but I have sufficient carbs to make a 4-carb rack of those and only a single 31mm rack with three carbs, also torque is more important than outright horsepower on a sidecar once you reached a certain point.)

As usual they were properly mangled and not much use to me in their stock form.

This time I tackled the task differently than last time, because I wanted to use all the original inlets or at least the cast bosses as first I broke through the casting last time on one carb and second a fuel line in the way of the throttle cable during installation is no fun at all. 

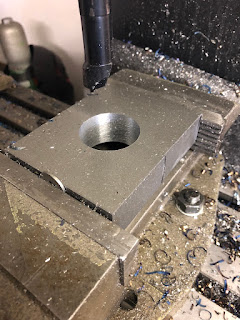
The one bit not shown is how I aligned the casting in the mill with a drill bit snuggly fitting into casting before milling the remnants of the pressed in fitting flat and then drilling it out.

Tapped M8x1.0 (standard hydraulics banjo bolt and banjo) and then after tapping gave it one more lick with a milling cutter to make sure the surfaces were square.


Milled down the boss on the left carb and there you go, enough room for the fitting. Don't think you could get it out with the carbs as a rack though. (But then again that was not the objective.) Also spot the challenge that came from turning a right into a left carb. The throttle-shaft hole is plugged.


Luckily in terms of the right carb, it is only plugged and can be knocked out with moderate force. (It's a nice press-fit though.)


It's a completely different story on the other end of the rack. Turning a left into a right carb involves a fair bit of thinking and machining. 

The first step was moderately easy once I summoned all my bravery to just drill into the casting. (As can be seen, I first tried to do a sort of lineboring job, but that didn't work, so I aligned a 16mm endmill with the casing and did what I had to do.)


Fun starts with the insert that needs to go in there. Because it has to be an inside and outside press-fit and has not too much wall thickness left, so each of the two will affect each other, if I c*ck it up. (Spoiler from this point onwards I do consider myself a proper engineer.) So turn it to 16.55mm as the bore in the case is slightly out of round and measures 16.52mm at the widest point.

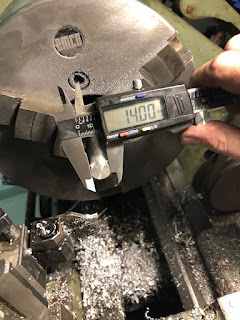
Then took the seal out of the carb body. It's a relatively normal 10x14x3mm lip-seal and if it weren't for a lockdown, I could buy one of these over the counter, if I screwed up. As can be seen, it checks out to 14.08mm and goes into a 14.00 hole. (So Mikunis press-fit was chosen a lot tighter than mine.)


Test fit on the lathe - wall thickness around 0.75mm (16.55-14.00mm) and yes, it distorts with the seal inserted. So I gave it another lick on the lathe and at least at that point it was round again.


Pressed into the casing, thanks to a light taper on the backside, it centered nicely and started with finger pressure.

Couple of tap-taps later and it sat all the way in and the shaft didn't bind up.


Making a solid 4mm tall, 14.00mm plug for a 13.95mm hole was almost relaxing at this point. Also, MGEHR-tools leave a beautiful finish. The 14.00mm were hit going straight down from 15.1x and this was the moment, when my ego politely pointed out that it was due for its own postcode.
Same trick, slight taper on the backside to get it started and the a few love taps to drive it all the way in afterwards.


The plan (obviously) was to use the throttle shaft I made for the Gixxer carbs and to be fair, I think that wasn't too outlandish to think it would work. Well, it didn't all holes are just a tad off to these. 

So I did it all again (sorry no photos, it's boring...)

Not sure, why I altered the throttle cable mount last time, but it clears just fine, so it'll stay (almost) stock.

And that's the finished product - aside from painting the carb tops black and making an extension to the idle adjuster shaft. 


Fuel line is now a pretty straight forward affair and the horizontal section will be zip-tied to the rail.


So there you have it - bit more work necessary to get it finished and I have to come up with something smart regarding the throttle cable to give it the 90 bend it needs for perfection, but in all honesty this should be the hard part done.


Sunday, 21 November 2021

The XS Triple Sidecar - unplanned maintenance

To be fair to the old girl right away, it was only unplanned, because I had originally expected to get through this Winter on the new sidecar. (Regardless of whether we're talking about the SR500 or the XV-sidecar.)

I checked the valves last year and the inlets were a bit on the tight side (I thought), but the exhaust valves, aside from the center cylinder one, were "about there". How wrong I was. For some weird reason I was absolutely convinced that on an Yamaha XS Triple, you run the common-place 0.10/0.15mm valve lash. For some reason today I decided to have a look into the book of lies and lo and behold it said 0.20/0.25mm, some frantic checking and rechecking of various resources on the net confirmed the finding and as a result making the notes below even more concerning.

How to read the chart, I and E stand for inlet and exhaust, the bottom number is the shim thickness installed, the number above is the initial valve clearance and the top value the valve clearance after the shim swap. Now I am in possession of a lovely box full of shims, but if you're not and check your valves, you go back to this handy chart and then can work out which shims to order.

So I rolled the old girl into the workshop, removed the fuel tank and got crackin'.


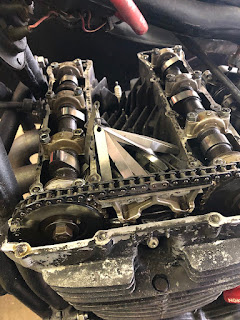
The big trick on an XS-Triple, you have to remove the camchain-tensioner, which usually ruins the paper gasket, but if you lubed that gasket up like this is part of some kinky massage-thingy, see below. 

Also when re-installing the tensioner, use the lock-bolt on the side to lock it into the rear-most position for easier installation.

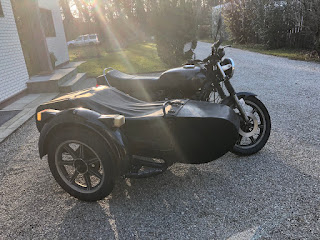
With everything assembled and the sun slowly setting on the old girl, just one question remains:

Why hasn't anyone snatched this beauty up yet?

Saturday, 20 November 2021

The SR500 sidecar build - bit of electrickery (part 7)

As other stuff kept me way busier than it should have, there's some left overs to report.

First of all as the old girl has got a busted 300 Ohm coil, I opted for a CDI Booster, which is a fancy way of naming an aftermarket CDI, which runs off the battery and not the stock coil inside the alternator. 

And the other thing I wanted to share was a neat little trick that I saw a few years ago on some construction equipment (and a similar fix can be found on the old TR1). If you have the tail-light wiring run on the underside of the rear mudguard, use some thick-wall fuel hose for protection.


Doesn't look like much, but those cables are well protected and weather-proofed. And that was it for this week, I hope that the next posts will bring a bit more on the subject of sidecar mounts and electro-plating.


Thursday, 11 November 2021

The SR500 sidecar build - sidecar mounts (part 6)

The first part of this post will look a bit like engineering class, introduction to parts layout and fixturing. Just to give you a few specs: The block below is 80x100x25mm - comprising of two 40x50mm firmly pressed together with a 38.5mm bore in the middle. 

Step one (after clamping everything in a vise), mark the center. Also if you wonder what the washer is doing there - if you hold parts in a vise and for whatever reason couldn't square it up beforehand, it is a clever idea to just press on it in a single point. (Some people use a ball from a ball bearing or the like to just push against a single point.)

Then I marked the hole I planned to bore just to check once more, if everything would fit.

And then get started with drilling a hole as big as my drills would allow. Mainly because drilling is a lot faster than boring with the boring bar.

Remember the boring bar from the last post, guess who's going to play a VERY prominent role in the rest of this post. 


In order to maintain alignment prior to drilling the holes for the mounting bolts as the parts are clearly too tall clamp them in one go and measuring and finding the holes again is prone to errors.

Which brings us to a classic do as I say, not as I do moment... or in other words, don't get overly excited. A knife-head makes short work of squaring up the part and leaves a remarkably nice finish.

Oh and it fits, but the two halves are almost touching, not allowing for much clamping force.

Bit of extra clearance is easy, took about 0.5mm off the inner faces and now there's plenty of room for clamping the tube so hard one could probably squish it in between. 

As I had some alignment issues and no long enough bolts, I only drilled and tapped the block for M6 bolts. Ultimately M10x100 bolts will be used.

And then the same had to be repeated for four more blocks. Which is where I found out that the sweet spot for this mill and boring bar combination was at an incredible 2100rpm and a 3mm feed on the diameter, which resulted in those lovely straw-coloured chips.

 Not the block from the picture, but to give you an idea how all of this went down and why I was so impressed with that little 6x26 mill.

I know you're supposed to either run inserts dry or flood cool them, but a bit of oil on the surface did help tremendously.

Also, if you clean up a part with brake-cleaner and then tack it... well, you may end up with a bit of a fire hazard. 

And that's the first of the blocks finished, as far as purely functional features are concerned. Held together by two M10x60 bolts.

So just have to do this three more times.

Now regarding the blocks the three things left to do are to test fit them, make them look a bit less square, pointy and sharp edged and then zinc-plate them.

Monday, 8 November 2021

The SR500 sidecar build - Boring (part 5.1)

... holes and making a boring bar that works with insert tooling. If you have a boring bar, most likely of Far-Eastern provenance, you will have encountered them - import boring bars, with their little (usually dull) carbide inserts soldered on. Now one can work with them rather well actually, with some rework on the bars with a diamond file to make the inserts resemble some sort of a cutting geometry and some very, very light cuts one can get some pretty good results with them. But with the task at hand of pushing what the 6x26-mill can take in terms of cutting and doing a lot of it, this quite literally won't cut it. 

As this isn't quite my first rodeo, in the past I got a cheap boring bar and modified it as below. Unfortunately (for this boring bar), I no longer run TCMT16 inserts on my lathe and thus would have to buy inserts solely for this one bar. Not very economical, especially as I have a ton of CCMT09-inserts.

So this one started it's life as a 16mm, right handed boring bar for CCMT09 inserts. I shortened it to a reasonable length. (The shorter, the stiffer and more stiffness means less vibrations and that in turn means a better surface finish.) Then turned it down in the lathe to fit the boring head. In my case this meant going down to 12mm. Also this is where cheap boring bars shine as they are made from some butter-like alloy and turn beautifully on the lathe. 

At this point, one could go ahead and just use it, but every time you install it, you'd have to clock it to get it right on center (or actually a bit below) again. So I put it in the mill and made a little flat spot to register against. 

And there you have a boring bar where you can burn through inserts and not care much about it.

Oh and burn through inserts... I did not. For five holes, which resulted in enough swarf to fill up the whole vice and pile up left and right of it, I had to change inserts once, because it got a bit dull.

Sunday, 7 November 2021

The SR500 sidecar build - A boat (part 5)

... a boat, a kingdom for a boat.Well not quite a kingdom, more like some resin and some glassfibre matts. Guess there's a first time for everything and this time it was making a mess with glassfibre and polyester-resin. Why polyester and not 2k? My lack of knowledge and I have always been told that these Velorex sidecars are made from polyester, so I was pretty convinced that sticking with the same stuff would be the right choice.


So here's what I learned: Respirators aren't dumb, I worked in my dad's garage with both doors open and a gentle breeze going through and I ended up with a proper headache, so the whole "well ventilated area"-thing is no joke and honestly even two weeks later the resin gave off a very distinct smell. The next thing is: plan ahead. I cut up a fair amount of strips and patches beforehand and but them in the old oven tray for later use. (Also the mat is the cheap part, so saving there will not change much, but make the whole affair a lot easier.) On the subject of mats, there's coarse woven ones, fine woven ones and those "messy" ones. I picked up a pack of each as I saw that the boat was covered on the inside with the erratic stuff and the substructure was made from the coarsely woven stuff. 

Another tip on personal protection, remember the pink (or in my case yellow) kitchen gloves your mum or granny used, when doing the washing up? Yep, get a pair of those and then wear a pair of normal nitrile gloves over them. This way you end up with NO glasfibres on or in your skin and you can take off the second pair of gloves, when you have to cut some additional bits of mat and don't have to bother with sticky resin being everywhere.

Whilst I was picking up some supplies, I also got some paper cups for mixing and picked up this little tray, which appears to have been some sort of cheese wrapper or the like. If you can get one of those bigger trays, like the ones in which meat is sold in, you'll probably have an even easier life. 

Originally I anticipated the resin to be much thinner than it actually was, yet still it surely didn't do harm to put the boat onto one side to have gravity work in my favour. The work itself is pretty simple: You put the bit of mat you want to use into the tray, pour some resin on top of it, mash it in with a brush until it is a sticky mess and then take it out and place it on the hole you want to patch up. As there will be quite a few air bubbles trapped underneath tap it flat with a brush.


I then waited about a week or so (more like ten days to two weeks), cut up some of that messy mat, soaked it will and dear with resin and filled up the hole from the outside. 


As the reinforcing lips on the sidecar body had quite a few cracks, I made some strips and laid them over the cracks inside and out. It looks terrible in the picture, but the excess material can be trimmed back later when the resin has hardened.

And there you have it... that's all I know after working with GRP for a couple of hours. 😁