
The first part of this post will look a bit like engineering class, introduction to parts layout and fixturing. Just to give you a few specs: The block below is 80x100x25mm - comprising of two 40x50mm firmly pressed together with a 38.5mm bore in the middle.
Step one (after clamping everything in a vise), mark the center. Also if you wonder what the washer is doing there - if you hold parts in a vise and for whatever reason couldn't square it up beforehand, it is a clever idea to just press on it in a single point. (Some people use a ball from a ball bearing or the like to just push against a single point.)

Then I marked the hole I planned to bore just to check once more, if everything would fit.

And then get started with drilling a hole as big as my drills would allow. Mainly because drilling is a lot faster than boring with the boring bar.

Remember the boring bar from the last post, guess who's going to play a VERY prominent role in the rest of this post.

In order to maintain alignment prior to drilling the holes for the mounting bolts as the parts are clearly too tall clamp them in one go and measuring and finding the holes again is prone to errors.

Which brings us to a classic do as I say, not as I do moment... or in other words, don't get overly excited. A knife-head makes short work of squaring up the part and leaves a remarkably nice finish.

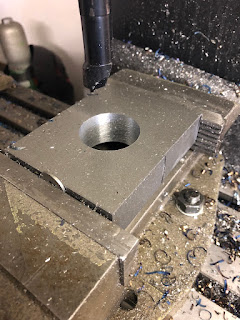
Oh and it fits, but the two halves are almost touching, not allowing for much clamping force.

Bit of extra clearance is easy, took about 0.5mm off the inner faces and now there's plenty of room for clamping the tube so hard one could probably squish it in between.

As I had some alignment issues and no long enough bolts, I only drilled and tapped the block for M6 bolts. Ultimately M10x100 bolts will be used.

And then the same had to be repeated for four more blocks. Which is where I found out that the sweet spot for this mill and boring bar combination was at an incredible 2100rpm and a 3mm feed on the diameter, which resulted in those lovely straw-coloured chips.

Not the block from the picture, but to give you an idea how all of this went down and why I was so impressed with that little 6x26 mill.
I know you're supposed to either run inserts dry or flood cool them, but a bit of oil on the surface did help tremendously.

Also, if you clean up a part with brake-cleaner and then tack it... well, you may end up with a bit of a fire hazard.

And that's the first of the blocks finished, as far as purely functional features are concerned. Held together by two M10x60 bolts.

So just have to do this three more times.

Now regarding the blocks the three things left to do are to test fit them, make them look a bit less square, pointy and sharp edged and then zinc-plate them.
No comments:
Post a Comment