Wednesday 28 March 2018

Project overview 2018

As I got caught by a bit of the old manflu, I thought it may not be the worst idea to come up with a project plan for 2018.

Sidecar:
  • fit the TM33 flatslides (I've got all the parts, so that'll hopefully be the next project, but it requires salt-free roads, as the bike most likely will be out of service for a few days)
  • fight the rust
  • alter the rear subframe a bit, so the mufflers can be angled up a bit mor, so to be able to remove the rear wheel without taking the mufflers off
  • fit a new front mudguard (needs sandblasting and paint)
  • fit LED bulbs in both tail-lights
Tractor (everyday TR1.1):
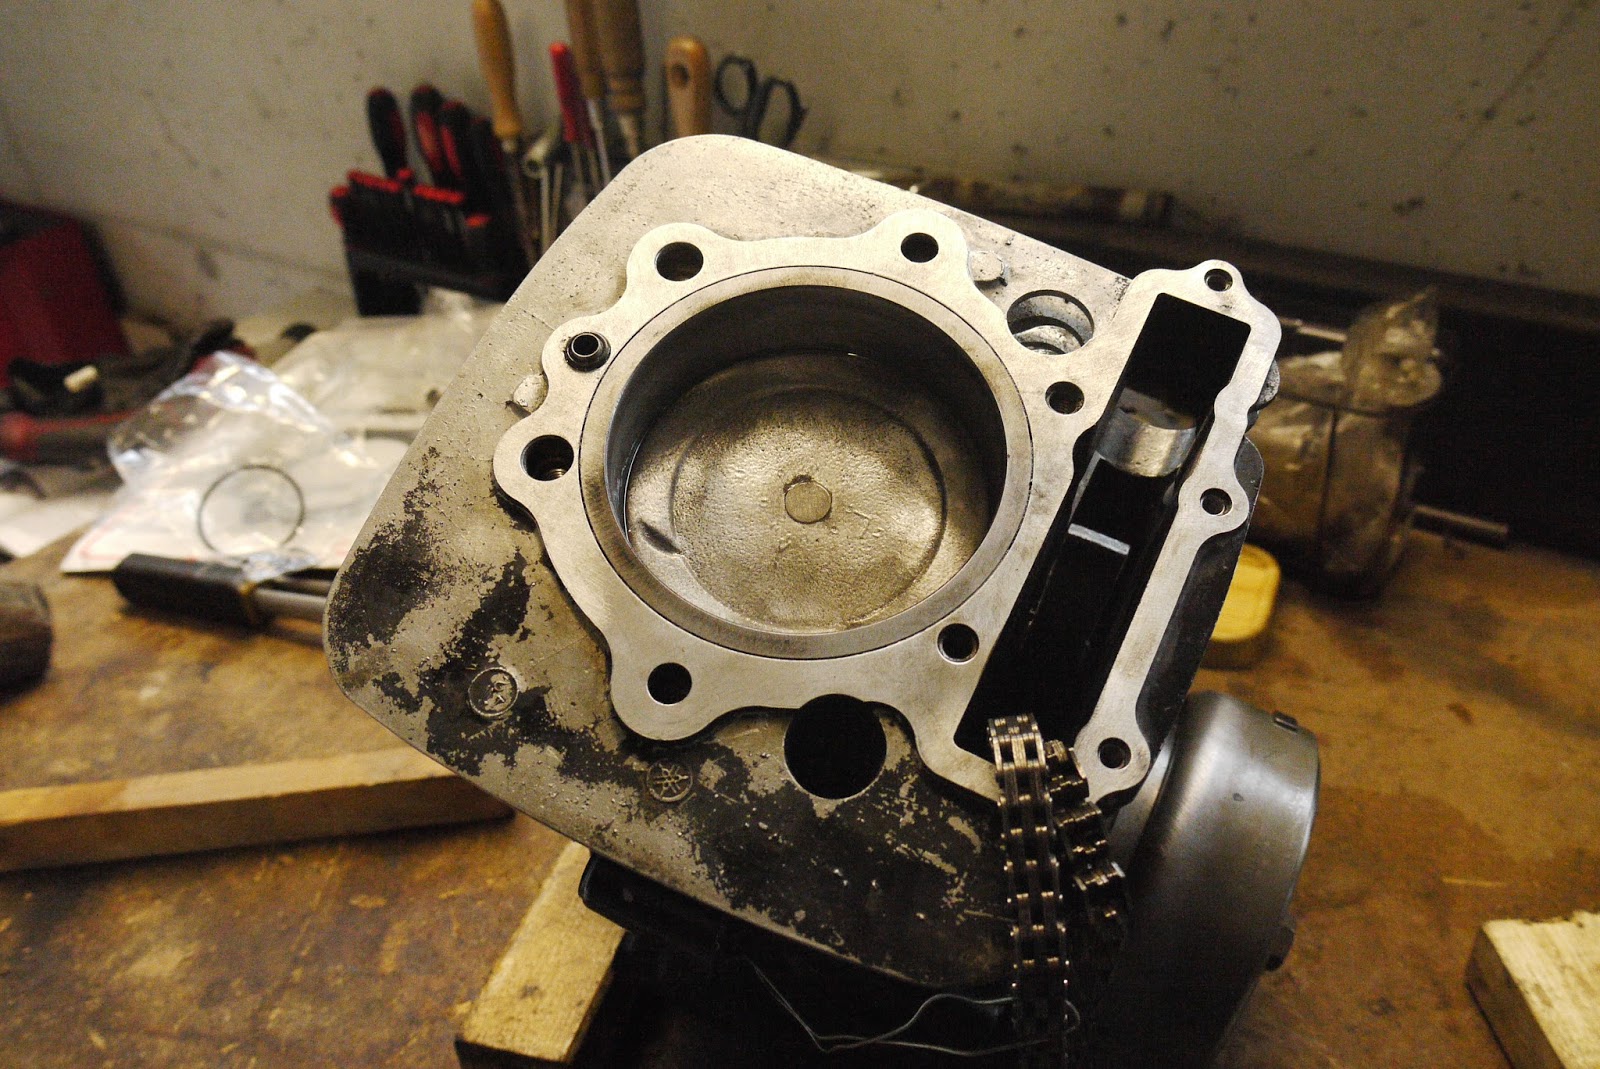
  • Finish that new engine: decide whether to move to the other set of engine cases I have or not, improve on some of the past work, reshape the combustion chambers, install the BT1100 crank, shorten the cylinders and finally assemble everything and install)
  • alter the speedo illumination, so I can run two LEDs on the inside: one on the top, one on the bottom (same as on the XS-hack)
  • build a new 2in1in2 exhaust with a better collector
  • new pannier-rack
  • swap the yokes and also check the fork tubes for straightness
SR500:
  • Get it running and then sell it - more on that very soon
Dre-XT-Stueck:
  • swap the handlebars
  • finish the carb swap to the later model (needs a new choke-cable)
  • install the pannier rack and see where it needs tweaking
  • fit the XT550 headlight 
  • convert to 600cc
Hotrod-TR1:
  • sell the turbo-kit
  • build a second turbo-kit from leftovers based on the GT15
  • fit the supercharger
  • burn some tyres
  • try to legally register it overhere 
Tools & Workshop-projects:
  • build a fly-cutter for skimming the TR1 cylinder heads
  • build a fixture to use the above 😉
  • build a proper belt sander as the small one I have right now is pretty useless
  • fit the DRO to the mill's quill
  • build my own version of the fog-buster (mist cooling) for my mill
  • build the tube sander
  • rebuild the lathe-spindle and feeds
  • build a set of starter rollers
  • rebuild the spindle on the drillpress
 I know, not the world's most exciting post, but now you know what to expect in the coming months.

Sunday 25 March 2018

XT600 engine rebuild - finished ... not. (part 4)

Don't you hate those stories that seemingly only consist of cliffhangers? Well, me too.

I picked up where we last left off and that was by installing the primary gears and timing the counterbalancer.

As the old piston was still fine, only new rings were installed and the piston thouroughly cleaned.


The cylinder was given a quick once over with the three-legged hone in order to give the new rings something to bite into and both top and bottom were cleaned with chemical gasket remover and a rotating nylon brush.


The combustion chamber needed a bit more cleaning as a lot of old oil, most likely caused by the stuck oil-scraper ring, had deposited on the valves.


The rockers are in like new shape.


Cam installed and timed up.


Some MOS2-based lube was used as assembly lube, as the engine will probably sit a couple more days and weeks until it is fired up the first time.


As valve adjustment is significantly easier with the engine out of the frame, it was done on the bench.


... and there you have it: The engine is ready for install.


Except for the fact that we swapped the gearbox for one out of a later model and so the clutch center has got a different spline. 

Tuesday 20 March 2018

Repurposing an old boring bar for boring head use on the mill

Chinese boring heads receive a terrible amount of bad press and compared to some German precision tooling from a company starting with W**********, they aren't even worthy to be considered as sh*te. That being out of the way, when the price-point (new) sets you apart roughly by the factor of 100, you may expect or accept (depending on the point of view) slight variations in quality and finish.

Now that we've established that these boring heads are somewhat inferior to their European counterparts, it is quite safe to assume, that the actual boring tools with their brazed on carbide are equally challenged. And this is where this post comes in. I used to have an old boring bar with TNMG16 insert that for many reasons, the main one being that the new one required a smaller pilot hole as it has no top-support of the insert, was swapped out for a TCMT16-tool on the lathe.

Now the old tool had a 20mm shaft, milled down top and bottom to 16mm, so it was necessary to turn it down to 12mm to fit into the boring head.


Fit it into the boring head and tighten the locking screw VERY tight once so you have a mark.


Also while I was at it, all the Chinesium set screws were replaced with genuine 8.8 stuff from my local hardware store.


Then just quickly run over that mark with the 6mm endmill and make a nice flat, so that even in the unlikely case of the set-screw coming loose, I don't end up with the boring bar flying through the room.


And the final article. This should have enough length to bore XV or XT engine cases without removing the case studs, should the need arise.


And compared to the old tooling, which had a 12mm shank, but then tapered down to approx 6mm, this should be a lot beefier resulting in nicer cuts.

Friday 16 March 2018

XT600 engine rebuild - completing the shortblock - once more (Part 3)

Ever had a deja-moo? The feeling, you've seen this b*llsh*t before? Don't worry, you haven't gone a bit soft in the old headroom, but here we are, doing exactly the same job once more as the #3 selector fork was slightly bent.


Using the right chemicals cleaning the gasket goo off was a matter of simply wiping it off.


Gearbox back in.


Using a different selector drum and forks.


Not even remotely as much liquid gasket required as you'd think.


... and back together. 


All in all about one hour of work and an hour well spent as now the gearbox is as smooth as I like it to be.

Wednesday 14 March 2018

The Turbo TR1 - maintenance

Judging by backlog, the last time I worked on the Turbo TR1 was in January over a year ago.
As I admittedly have plans of making this work again this year and also have a rather nice (in my book at least) idea on how to tackle the boost-crisis, it wasn't out of place to do some maintenance.

So that's what the brake fluid looked like when it came out. Mind you, this bike hasn't been driven a single mile in 2017.


This is actually Everyday TR1's brake pump (as identifiable by the mirror), so did those brakes too. Oh and while I was at it, found out that the old brakepump on the Turbo is on its last legs, so a "new one" (14mm) has been ordered.


While I was at it, I also (finally) fitted a left over lower clutch cable cover and some new (to me) solid handle-bar holders as the bar-mount rubbers are well past it.


So what's hot and cooking for this old girl?

That's a Volkswagen-branded Eaton M24 out of a 1.4TSI Polo. Now I hear you say, 24? that means it will only displace 24ci per revolution, doesn't that mean you're going to spin the living cr*p out of it? Well, you see that snout? It's got 1.93:1 step up gears on it, essentially turning it into a blower that displaces 46,3 ci per revolution. Why put that in, instead of the M45, I used to have? Simple packaging really. The M45 just wouldn't fit in between the front of the engine and the frontwheel.

Excited? Me too.

Saturday 10 March 2018

Aaaaw chucks - or when your lathe's spindle tries to take a u-turn (Matra MDR2A)

Lathes are wonderful machines. They literally are the queens of the machine-shop: Of staggering beauty and sometimes with a temper so vile, hell might freeze over. This, is a story of the latter. (Unfortunately!)

When I bought my old Matra MDR2A, almost ten years ago, I put it into service and that was (pretty much) it. I did some maintenance over the years, but nothing overly dramatic to be honest. Unfortunately recently when I did that clutch pressure plate, I had a little crash. On the upside this finally loosened the chuck just that little bit, so I could get it off the spindle nose. What I found was some old damage and the reason, why I couldn't get it off as it was glued on.


In the course of the process even the three M8 screws holding the chuck to the backplate got a bit bent.


I did, what every good machinist would do: I screwed the backplate back on, but the damage was done: I couldn't find the position again. 


Overall runout between highest and lowest registered as 0.70mm and a half of that on the diameter of the backplate.


Get out the old machinist's blue...


and then start turning her back down until it runs true and *JUST* no more blue is left. 


So that's the backplate all cleaned up again. You can also see a scribed mark on the outer circumference, this is where originally there used to be a punchmark for aligning the chuck to the backplate.


Now the runout registers at around 0.03mm on the outside of the backplate and also on the workpiece directly in the chuck and that's realistically speaking as good as she'll ever get again, after all this is a 1946 to 1948 Matra lathe, so she's well in her seventies.


While I had the chuck off, I also took the backplate off and cleaned out the decade-old grease and replaced it with some fresh moly grease and now she's still a bit sloppy, but waaaay smoother. 


Also found some o-rings to prevent the bar of my chuck key from falling out. (Stuff I do, while thinking about how to assess the damage correctly.)


And here's the reason, why I can exactly say, when my lathe was built - because it was already overhauled once in the 1950ies or 1960ies, during her service with the German Bundeswehr.


So what does the future have in stock? Most likely a new spindle or at least a spindle sleeve to step her up one or two sizes to a M39x4 spindle nose instead of the original M33x3.5. As the nose at the root of the threads is only approx. one (!!!) mm in wall thickness.

Alternatively, I shall admit that, if the right lathe comes along, I might be tempted to part with the old girl. But don't worry, at the moment I am not even entirely sure what the "right lathe" could be.

Wednesday 7 March 2018

XT600 engine rebuild - completing the shortblock (Part 2)

It took a while to finally get said oil-pump gasket, which stopped me from assembling the shortblock. Aside from the fact that the gearbox insisted to stay in the wrong side of the cases, when taking the engine apart, it all went pretty smoothly.


Transferred the whole gearbox to the correct side of the cases and wiped the mating surfaces down with a bit of brake-clean and a clean rag.


It really only takes a 1mm wide bead of RTV-sealant (I am using Dirko-HT - also known as the red plague overhere!)


And that's it. This is how it has been sitting in my dad's boiler room for about a week to dry.


As it was so cold, that even the oil got a bit stiff, I'll have to do the manual inspection of all gearbox shafts turning freely this weekend, because whereever the oil accumulated, it was as if I was spinning a shaft in grease...

Saturday 3 March 2018

The XS Triple Sidecar - living with the Triple at -12 degrees

Now as some of you noticed, not much has happened on the blog in the last two weeks. Simple reason: I've been on vacation in Cambodia. So, when I came back it was a slightly nippy 50 degrees Celsius less overhere in merry ol' Europe than in said Asian country. Of course this was the ideal moment to test the actual winter-proofing of the XS Triple Sidecar.

 Step 1, winter-proof the rider. Balaclava, warm jacket, textil trousers with a zip-on top and suspenders, plus some warm three-finger gloves outta do it.
The bike had been parked in the same spot for two weeks and was properly cold. And what happened: Nothing. Well, next to nothing, she simply fired up and with the carbs originally being off a two-stroke snowmobile, the chokes are running really, really rich, which helped tremendously in this case. 


As you can see on the right, it truly was twelve degrees below zero that morning...


Unfortunately all the bad-weather motorcycling on the sidecar has showed a little flaw in the final drive, as clearly it filled up with water to a degree and once it had heated up a bit, it started to boil over. So a final drive oil-change is due rather soon. And I'll definitely have to come up with a better breather arrangement.


One of the other things was that the throttle cables could do with a bit of oiling and I think I should start investigating towards some proper K&N filters with a 63mm inlet diameter as the cheap ones are pretty rusty by now.