Monday 31 July 2017

The XS Triple Sidecar - finishing the sidecar

With the XS Triple Sidecar slowly turning into a suXSess-sidecar, there's a lot of small jobs that I've postponed, but which are either necessary or really ruin the fun to be had.

First up was the thread of the clutch-cable adjuster. The first two or three threads were well and truly f*cked. Nothing a tap wouldn't fix, but ... 


Next a decent front mudguard was to be installed as the one originally on it was made of GRP and mostly consisted of hairline cracks... 


Both the sidecar mudguard and the original wiring loom routed inside it were well and truly past it, so I had to get a new (to me) mudguard and a new wiring harness and fit it. This also meant getting new sidecar light holders as the old ones were rusted quite thin...


One of the most bizarre truths about Russian/Ukraine and Soviet stuff is: The older the part the better the quality, so in which case you always go with the oldest working part. In this case this meant re-fitting some old lights from the 60ies or 70ies that were still "CCCP"-marked instead of later (mid-90ies) stuff as the threads on the back were galled up. Still no total loss as they provided some new "E"-marked lenses.


Next step was to connect the dots and hook up the sidecar lights with the rear lights (and to do that in a fashion that makes it easy to remove)


And the last step was to cut out the left sidepanel to clear the sidecar-mount.


And there she is in all her beauty... 


The right sidepanel will need more tweaking to make it fit, so it's best left for another day. 😉

The next installment will most likely be about dialing the sidecar in and making some more efficient muffler-inserts.

Sunday 30 July 2017

Project "pretty one" - Another XT500 4 valve and the Italian Beauty

So my dad probably can't help it, but he's got a soft spot for his very first XT 500 4 Valve, which is an odd-ball model and is a smaller bore XT 600. Now ever since this one turned into a smoke bomb, we said we're gonna investigate and fix the f*cker.


So here we are. The most harmless reason would have been that either the scavenge oil-pump (XT600s are a dry-sump setup) is leaking or for some other reason not sucking enough of the good juice back to the oil tank resulting in too much oil in the crankcase or that the check valve in the clutch cover is stuck resulting in the oil tank emptying itself into the engine, when park for a (longer) while.


That's said check-valve. Poke it with a stick to see if it's stuck. (It wasn't.)


Next step was to work towards the oil-pump. For this the clutch has to come off as it's driven from a gear on the backside of the clutch basket.


With the clutch basket off, a yellow-ish gear becomes visible, which is the oil-pump. Unlike on the older 2-valve XTs and SRs. It's fixed with nice hex-bolts instead of the old philipps, which always put up a terrible fight.


Undo those three bolts and pull out the oil-pump. There's a pretty self-explanatory check procedure to check the lobe-clearances between rotor and housing and even though the pump was working fine, it's over the service limit.


This means the Dre-XT-Stück will be degraded to a parts donor for the pretty one in the rather near future. Either it will donate the complete engine, if I can't find anything obvious, when I take the engine apart further OR I'll just swap over parts.

Now why did my dad park up this fine XT for several years AND didn't show quite the enthusiasm to fix it? Well the reason comes from Italy and you've seen her before. It's his Moto 6.5, a bike so nice, he only rides it whilst wearing a shirt. And it got even nicer now that we've added some progressive fork springs, which together with the modified SV650 rear-shock makes the fine Italian lady quite a respectable weapon in the twisties. (On the first rideout I managed to get it down to the pegs in a roundabout with great ease, just saying...)


The mark is to check the sag with my dad on it and it's perfect: slightly less than a third of the overall travel. (30mm vs. 130mm overall)


And as I wrote before, a bike so nice, you have to ride it wearing a shirt. Luckily it's pretty much sorted by now, so all that's left to do for my dad is to enjoy it this Summer and probably do an oil-change at some point in the not too distant future. 

Thursday 27 July 2017

The other XS Triple Sidecar - finishing fuel petcock adapters

Now this is "just" a quick intermission, as I am actually really busy on my new XS Triple Side. (Or success sidecar as someone dubbed it by now - not sure whether that's sarcastic or not!)

The other XS Triple Sidecar is still for sale and one of the things I found out: Even though the petcocks weren't leaking, when I installed the fuel tank, now after some use they are. So recently I decided to make some adapters to fit standard M16x1 Guzzi-petcocks.

This is the penultimate step before fitting them to the bike. As I epoxied them in there was some ridges on the back, which had to be milled down.


As the stock petcocks were also flowing very unequally (as was visible via the filters installed), I hope to kill two birds with one stone and make sure that the bike now finally works as it should and hopefully very soon make someone happy.

Monday 24 July 2017

The XS Triple Sidecar - sync'ing and rejetting and rejetting and...

Good things sometimes take a while and with the VM36-carbs on the XS Triple sidecar it was no different...


Let's talk about jetting carbs. First step after soldering the cables was to make a base-setup of the carbs. This requires a bit of experience and lots of jets. Depending on what the carbs come from, it can quite easily be, that you slap them on and fire the bike and see what's going on. As these VM36s came off a two-stroke Skidoo both the pilots and mains had to be swapped out.


Next set the throttle-slide-stops (i.e. the idle adjustment) to the same level. A rather crude way to do it is to simply slide in a drill under the throttle slide cutout and then set all three of them so they just touch it.


Then the next step is to fire the bike up and see what happens. If you're lucky it will fire up and you will have to work the throttle and the air- or mix-screws a bit to make it start, run and finally idle. Be aware that just because a bike idles means absolutely nothing in terms of how well it is set up. (Spot the missing mainjet in this picture... yes it came loose and lay around in the float chamber, still the bike idled.)


Next you try to sync the carbs (assuming you have both idle and at least midrange) - I did this with my trust vacuum clocks, but you can of course also just do it via the cables.


As you might have noticed, the pictures look a bit different than usual, that's because I've been using my trusty old DSLR instead of my normal camera, so it would have been rude not to play around a bit.

Some backfire through the #1 carb

Once sync'ed and rejetted a few times, it started to sound more like this...


So are those VM36s are simple install and why isn't everybody doing them? Well firstly they are an incredibly tight fit as you can see in the pictures below, I had to remove some of the breather tubes as the carbs were touching each other.


... and then there's this thing with the cable splitter under the tank, which is huge and there's no off-the-shelf solution for. But is it worth it (after a testride): Hell yeah, she's a gas guzzling, fire-breathing, two-wheeled hoodlum that will reward exactly one-smile per mile, because it goes all the way!

Friday 21 July 2017

Ms. Braaaaaap - gets a new exhaust

To (incorrectly) quote Mark Twain: Reports of my death are greatly exaggerated. Or in the case of Ms. Braaaaaap, I did toy with the idea of selling her, but as there were no (serious) takers, I guess she'll stay around a bit longer.

She suffered from a few (smaller) issues like the tail-light not working correctly, which by now all have been remedied (more or less, but more on that in another post). Except for a very, very, very noisy exhaust. And those who know me, are aware that I am not exactly very girlish in such matters.

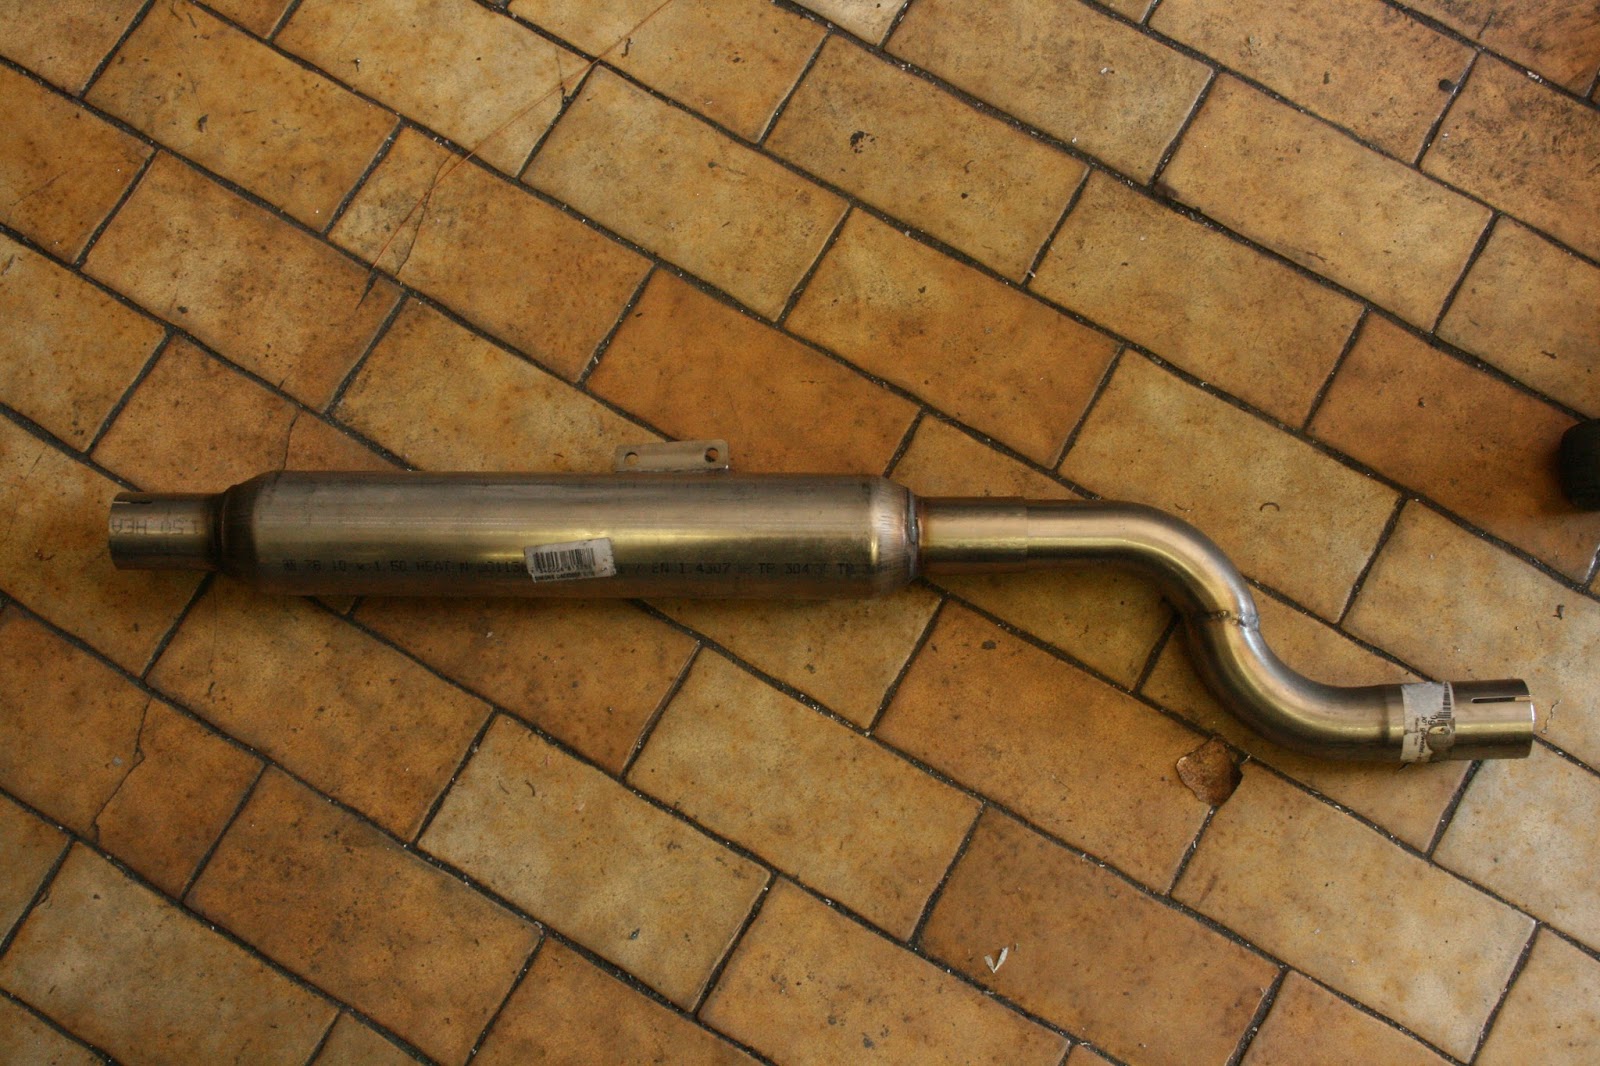
So here we have the (old) offender, which was the very first exhaust I made, back then with a stainless steel electrode.


As I normally don't have the sidecover off the next two photos show my homegrown airbox-lid and a modified MZ TS250 inlet rubber (no pre-silencer on this one anymore) to make getting the carb in and out much easier!


As it was MOT-time, I though, well I still have that old beaten up Sebring, which I could "just" slap on and that's it. So I took the old exhaust and wanted to fit the Sebring, but nope... won't go over the seal on the stainless downpipe.


While I was at it, it seemed rude not to extract the broke bolt that was stuck in there.


So as that clearly didn't work, I decided to say f*ck it, I'll build a new exhaust straight away. These universal 1.75" silencers are a sort of personal favourite and I had an old waterjet cut mounting plate left over.


Test fitting a 90 degree bend behind the rear shock, following the idea, that some sharper bends would slow down the exhaust gas and thereby reduce the exhaust-crackle notably. 


The bracket was only partially useful and needed some tweaking with the bandsaw. 


After a bit of drilling I welded the cut-off-part onto the silencer...


... and there you go. Might be a bit long for the taste of some, but it's quiet (enough) and doesn't hamper performance, which means I can use the bike regularly again. 


That's what the exhaust looks like, when taken off the bike.


And after a nicely spirited ride to the MOT man, who failed me again, as he thinks no exhausts without "E"-markings are allowed anymore. (Which is wrong, but no amount of arguing with him could convince him. So I guess, I'll do a few more modifications, including re-installing the diskbrake-frontend and then get all those mods added to the paperwork, so I can enjoy the XT without remorse.)


Before you ask, there's nothing substantially wrong with the drum-brake frontend, it actually stops quite well, for a drumbrake (running some rather soft Ferodo shoes) and even when compared with the stock XT600 diskbrake, but I didn't forget the amount of maintenance work involved to keep it that way, if you actually use the XT regularly.