Thursday 26 April 2018

The new TR1 engine - a fresh start ... again (part 18)

I admit this project has:
  • taken quite a break
  • taken more turns than an Alpine road built by the Romans.
Additionally I`have to admit, that I had sort of given up the hope of finding a suitably priced BT1100 engine again, after I sold the last two.

As luck had it a bit of chatting with some people revealed a slightly parted out BT1100 engine for the right price with a bent shifter fork.

Saturday 21 April 2018

Getting Dre-XT-Stück ready for its roadworthyness inspection (and making her mine)

As some may (or may not) remember, I was given the Dre-XT-Stück as a Christmas-present and also somewhat for fixing up the pretty one. Truth is, life aside from what you see on the blog is keeping me quite busy, so in reality I haven't done much to her.

In an attempt to "make her mine" and get some other stuff dialed in, I changed the gear-lever position to fit with my boots.


Fitted some new and some not so new sidecover rubber grommets...


... and installed an auto-decompressor cable to make kickstarting a bit more comfortable. 


Lest I forget, there's also a new horn hidden underneath the tank, which is obnoxiously loud. (Or in other words PERFECT!)


Additionally I swapped out the stock carb for one out of a later XT600, as the carb that was installed was overhauled with an XT600 43F jet kit, which meant every single jet in there was too big. As my dad and me plan to do some rideouts and only I will have panniers on the XT, it also leads to the convenient situation, that we only have to carry one set of throttle cables. (As the ones from a 43F are ever so slightly shorter!) Unfortunately this carb is also jetted a bit rich as it has got bigger mains in both carb bodies, which probably works brilliantly in a 600, but in the 500 not so much... but still these jets at the very least are still available. I also have to make a new choke cable, because 90 Euros for a choke knob is a but much for my taste.

Wednesday 18 April 2018

The XS Triple Sidecar - spring clean

Now I admit, I am not the great cleaner, when it comes to my bikes. Unfortunately with Winter usage of bikes comes exposition to salt. A lot of salt. Now over the years I've tried quite a few things, but two years ago I tried some protective spray wax, as used on new cars to prepare them for oversea shipping.

As a sidenote, it comes off very easily with hot water and soap.


I'll let that result speak for itself.


Yes it truly is this shiny. 😎

Friday 13 April 2018

XT600 engine rebuild - clutch woes and finishing (part 5)

Swapping out the older gearbox to the newer style resulted in a few extra challenges, when installing the clutch.


The older version of the gearbox shaft uses a 6-tooth spline, whereas the newer version uses a 13 tooth spline. 


This meant getting a new inner clutch disk.


Apart from that it was pretty easy, as all the other parts are interchangeable.


Finally finished.

Wednesday 11 April 2018

Fixing my drillpress'es death wobble

Wednesday morning is my morning. It's the day of the week, where I do stuff in the workshop that otherwise I wouldn't have the time for, as due to other time commitments, I can only do small jobs.

My drillpress has had a terrible wobble ever since I got it. Only recently after breaking a 2mm drill because of that, I decided that enough is enough and I really had to sort it out. The nice thing about these Chinese drill presses is that they are dead cheap and much to my surprise so are spare parts.


Disassembly is very straight-forward: losen the quill-guide screw and remove the return-spring.


Pull the quill-handle out and have a hand underneath the spindle.


I know for a fact, that the drillpress has been used rather sparingly... The wear patterns aren't too nice.


Heated up the bearing seat in order to get the old (completely dead) bearings out. 


New SKF bearings (beware the sizes vary between the years, my drillpress is from 2009) - but regardless of the badge most of them are the same design.


The bearing seats in the spindle were between gentle push-fit and throw it in and hope fore the best. A classic case for bearing glue. 


All in all (with buying new bearings) it was a good two hour job, but I have to admit it was worth it.

Sunday 8 April 2018

The XS Triple Sidecar - modifying flatslides to fit (part 2)

Just let me clarify this: This wasn't meant to be a two-part story, but I guess life (and engineering problems) have a funny way of caring about your plans.

Step one: In order to have full adjustability on all three carbs I wanted to convert the center carb to an adjustable linkage as well. Unfortunately the fixed one is drilled slightly different and can't be fitted. So a new shaft had to be made: one 10mm ally bar


Make a nice snug fit 5mm center punch to mark the shaft precisely.


The punch marks are a lot more visible of the area has been marked with a felt pen.


I decided against the stock pin-setup for the throttle butterfly, which in turn meant making some room for the bolt head on the mill.


And as it didn't matter anymore anyway, I picked up some 15x15x2mm stainless angle bar and make a new set of rails for the carbs.


Final install and sync on the bike. (And yes, I am still waiting for the 6mm banjos, but other than that it's done.)


A first jetting at #20, #137.5 revealed it running rich on the top end, so after a slight rejet to #20, #125 that's definitely usable for the moment. Maybe a #22.5 pilot and half a turn less on the mix screw, but that's something for another day...

Sunday 1 April 2018

The XS Triple Sidecar - modifying flatslides to fit

If you're running one of the more common bikes, you simply buy a set of flatslide carbs second hand, slap 'em on and there's probably even some info out there on how to jet them so you at least have a point to start. But I wanted a triple.

First step was to get the spacing right. As you can see these carbs are spaced pretty tight already. (At least #1 and #2 are.) In order to do that the old carbs had to come off and I had to take some measurements. 


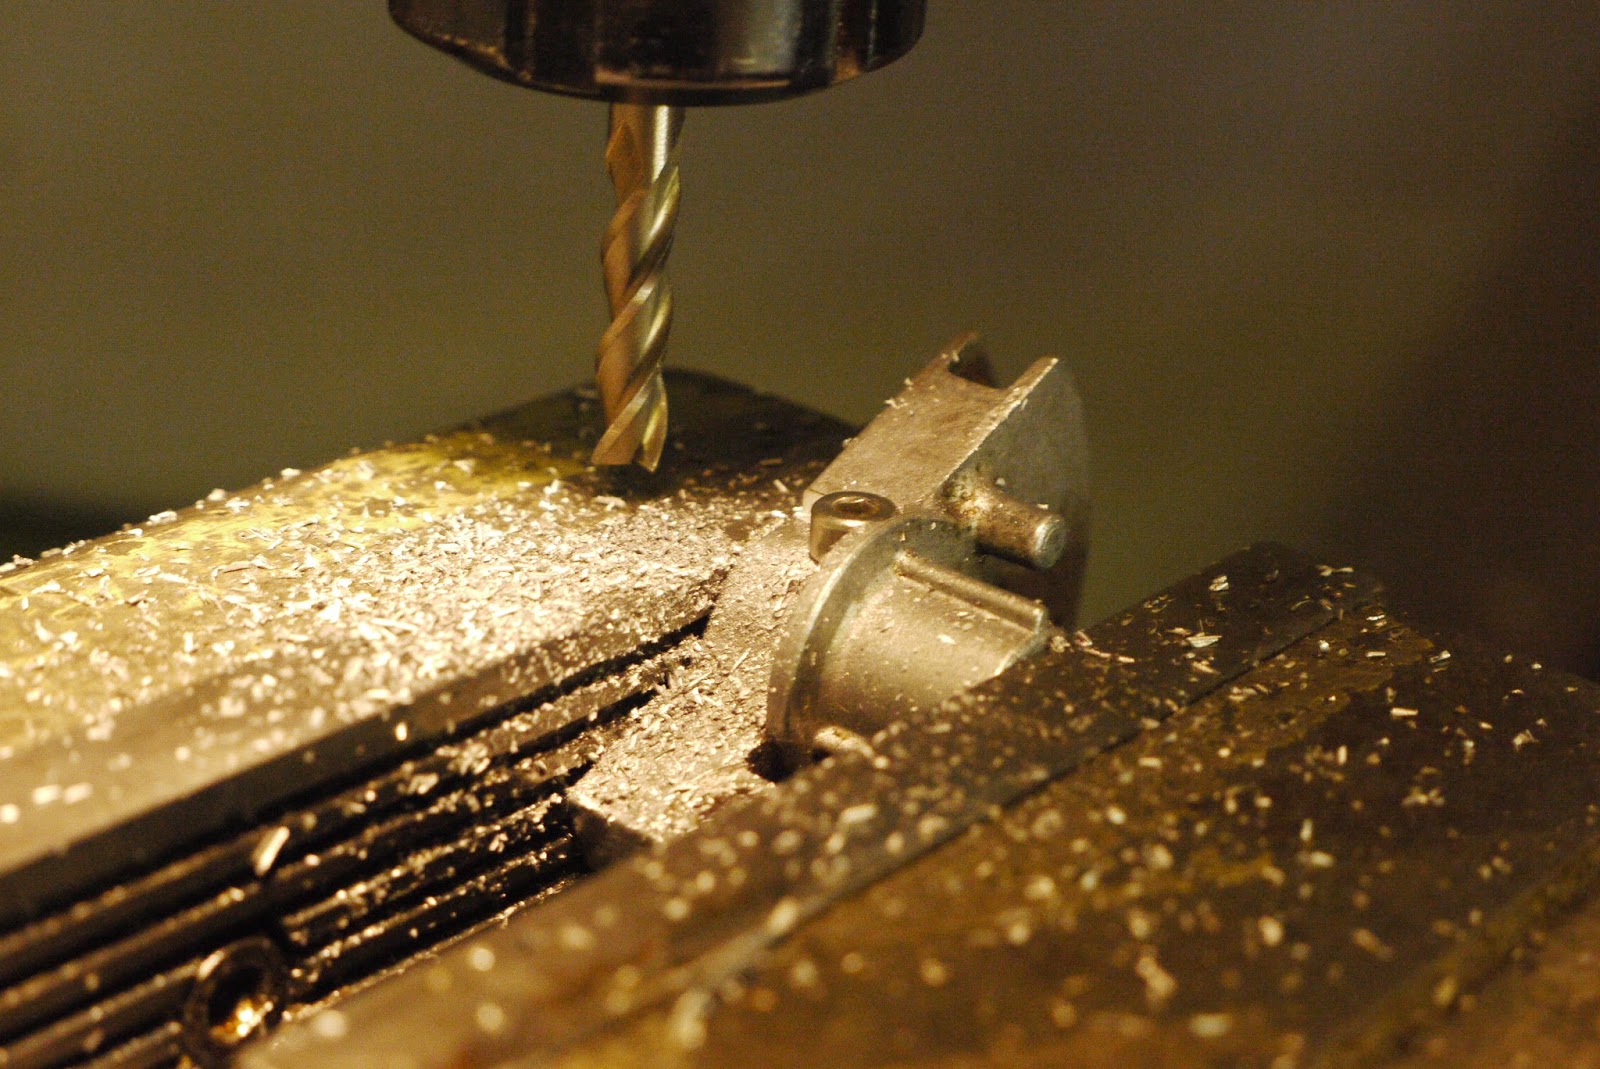
It became apparent that the only way to make this work would be by moving the fuel inlets on the two outer carbs to the outside, as each pair of carbs had to be spaced more than 25mm closer together and at the very most seven or eight mm would have been possible. Luckily the castings were all identical, just drilled according to the individual requirement. As such it was just a matter of drilling out the fuel passage from the other side and then thread both sides.


In order to gain another nine milimetres, the casting boss was milled flush with the carb body.


As there wasn't enough meat to tap the carb bodies in M8x1.00, I had to make three adaptors to use some industrial/hydraulic Lego.


Testfitted the carbs onto the engine. As I have used this type of carbs before on the XS400 RatRacer, I still had a piece of throttle shaft left over, which I used to straighten out the carbs and have them sit as perfectly straight as I could to prevent binding later on.


Quickly tacked the rails together for a test-fit.


And then re-tap (M4) the throttle shaft to accomodate for the new spacing. 


And then shorten the throttle shaft on the lathe. (Did I mention, that I got myself a MGEHR16 parting tool? It's the dog's d*ngl**s...)


Sorting out the choke linkage was a beautifully simple job, as it only meant to cut a bit of 4mm stainless rod to length and tighten up the hooks of the choke setup. 


Installed and looking d*mn sexy. 


They say that every great triumph needs a bit of tragedy. 


This one needed a bit of re-engineering. The solution will be found in the next post.

(Oh and yes, the VM36s will be for sale, once they received a half-decent cleanup.)