Showing posts with label overhauling brakes. Show all posts

Sunday, 1 October 2023

Dre-XT-Stück - brakefluid sightglass swap

One could kick this post off with some sleazy remark how sightglasses are the vision ports into the brake-system's soul or some rubbish like that. But as a matter of fact, they are actually quite useful in checking the fluid level inside the reservoir and assuming they are clear enough allow you to avoid having your bike's brakefluid tested at the inspection, because it looks fresh after all.

This is not a clear sightglass or in other words, this is the one that has to be swapped out.

I drained all the brakefluid from the reservoir and stuffed it with a paper towel to avoid dirt and metal shavings to get into the actual brake pump.

In order to get the actual sightglass out, I decided to drill a hole ...

Put an M8 bolt through and used a slidehammer to yank it out.

Worked a treat, except the metal ring around the glass stayed in place.

This was less hassle than I anticipated though. I warmed up the housing with a hot air gun and with the lightest bit of prying it came out. (Thanks to the o-ring it's very easy to get behind it.) Using the O-ring as a guide it was also rather easy to avoid damaging the bore.

I bought the new sightglass "on that site" and it came in a bag of three. Don't woryy, they are standardized, so just check the diameter and order a bag of two or three. As I am pretty sure, if you don't, the one you're trying to push in will break.
 

Warmed up the housing once more with the hot air gun and with a bit of cardboard (to avoid scratching the plastic lens) on one side and a spacer on the inside it pushes in with reasonable force. I used some parallel pliers, but woodworking clamps or C-clamps will definitely work just as well.


Looks a lot better than before and the engineer at the inspection only glanced at it and didn't even remotely consider checking the actual boiling point. (Which would have been fine as I had to refill the reservoir anyway...)

Tuesday, 25 August 2020

Everyday TR1 - improving front brakes

Lately I did some work in order to get the rear drum brake to work as it should. The front brakes are actually working very well with the right pads, but... they squeal a bit.

In general these calipers are meant to slide freely along the center holding pin, once this one gets a bit sticky, the caliper will not align perfectly* perpendicular with the brake disk anymore.

As suspected the slider is sticky and the silicone paste that was on there has vanished. (Been washed out.)


After quite some scrubbing with a brass brush removed most of the caked on residue, yet still the surface felt somewhat rough.


Therefore the next step was to attack the slider bushing with a small polishing disk and polish it to an almost mirror finish. 


Then reassemble the whole lot and lo-and-behold the brakes feel more crispy. Especially the point where you can feel that they start to bite is more precise. The squealing? Well, it improved...

Sunday, 8 December 2019

Make Dre-XT-Stueck great again - Forks and brakes (part 1)

For the better part of the last year, the old Dre-XT-Stueck served in a lot of roles, most prominently as my daily ride to get to work and general run-around in town. It's not like it wasn't comfortable or reliable enough – much the contrary to be honest – but it lacked in two main areas.

  1. Brakes and suspension
  2. downright horsepower
As the old girl is a type 55A, which means it's a smaller-bore version of the XT600N, type 43F, it also means it originally runs both the very first version of the XT brakes and forks. At a casual first glance both calipers look rather similar. 


The particular issue with my Gen 1 caliper was that it tended to fade terribly after a few repeated harder stops. Also it tended to feel a lot more wooden. (It should be noted, that both calipers at the time of comparison have been freshly and relatively freshly overhauled and were in fully working condition.) On both calipers the brake-piston is the same diameter, but the one crucial difference is where the pads are guided: Gen 1 is using a screwed in guide rod, which gets all sorts of stuff thrown at it, where as the later model only guides the pads with two noses, reducing the risk of pad stiction in the caliper. 

The new brake caliper (and fork legs) came in as part of a trade for the troubled XT600 Tenere and actually worked. 


Turns out, I hadn't prematurely ordered a stainless steel brake piston and fresh seals. Also as the Dre-XT-Stueck is being used all year round (more or less), the stainless brake piston should last notably longer than the OEM chromed mild-steel one.


The casual oberserver will not that the spacing of the mount points is radically different than on the older caliper, which in turn also meant that the actual fork legs had to be switched out as well. 

Generally I drain the old oil and then flush (multiple times) with Diesel. Usually it's a case of draining the forks and then rinse them once with Diesel and it's good. In the picture below you see what came out after the second go. I suppose these were still filled with the original oil.


As the oil-seals still were up to the job, I left them in place and filled the forks to Tenere specs + 5percent (600ml) and they appear to be damping very nicely and stiff.


One of the things that annoyed me in the past was that I was only able to affix the front mudguard with two bolts as one of the rear ones had snapped in its bolthole making the whole lot a rather flappy affair. 


As usual methods hadn't worked, the triples had to come out and a nut was tig welded on. As a certain someone suffered a bit from "my-foot-slipped-off-the-clutch-mista-officer"-syndrome on the tig-pedal, it formed a rather elegant blob of molten metal.


Regardless of which, the stub then came out nicely.


Luckily the headstock bearings (I had bought a new set of fresh tapered roller bearings) only needed a bit of fresh grease, but otherwise were in good condition. Top-tip: don't skimp on the grease and also add some to the bearing cover cup. As that extra-grease prevents water from coming in. 


And that's it - the Dre-XT-Stück is sorted in the suspension department (at least the front end). Now I hear you say, hey why didn't you go with forks from something a tad more modern? Firstly these were essentially more or less free and due to the Tenere springs and oil-level a reasonable amount stiffer and quite frankly these make for a deniable asset in the case of a police control. 

Wednesday, 13 June 2018

The XS Triple Sidecar - fixing the sidecar up for roadworthyness inspection

Normally fixing up a winter-sidecar means frantic hacking away on various rusted bits and bobs, but as I had already done most of that, this time it was about swapping out some rusty bolts, chamfering the brake pads, swapping the front tyre for a slightly less bald one.


One of those things was the lower clutch adjuster. It had fallen out on one of the very first test rides and was replaced with a spare M8 bolt I had with me...


It's a good idea to oil a clutch cable BEFORE it goes stiff, and a bit of old engine oil is perfect for the job.


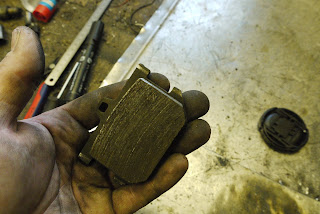
I always chamfer my brake pads as it prevents them from squealing. Especially these cheap ones are very prone to that. 


The speed cable may be rusty on the outside, but oiling it up in Autumn paid its dividends.


The bald front tyre was replaced with a super fine Pirelli Gordon specimen from the late 80ies. It's harder than a rock, has plenty of tread left and no hairline cracks. (Watch this space in two months, when it will look like I've dug it out of a swamp or the like, as they perish very quickly once re-exposed to UV-light.)


I was totally prepared to replace the rear tyre as well, but that super flat Block C has still got some life left in it. 


The last thing to tackle was to weld up the muffler inserts, as I had only tacked them in, when I took them out earlier in a vain effort to find some of the missing horsepower. (It was some well clogged pod-filters!)


As the old girl sometimes struggled a bit with starting I deduced, that (just as on my first XS-triple) a lack of grounding to the right handlebar switch resulted in bad starting at times.


Another thing that I had spent a lot of time contemplating on, was how to solve the lack of a lock to hold the seat in place. I've come up with beautifully elaborate solutions with milled, turned and welded parts of finest stainless or 6000-series aluminium alloys. But in the end a simple R-clip and a hole will do the job almost as fine and the amount of time invested was, as I have to admit somewhat more reasonable.


The sidecar passed the inspection with flying colors, which also means, as soon as the mule is sorted out, I can tackle the mods I have planned for the sidecar, which are: different exhaust setup (angled up a bit so I can swap the rear wheel, without removing the exhaust) and a slightly altered rear-subframe.

Sunday, 1 January 2017

The XS Triple Sidecar - cleaning the roundslide carbs, brake rebuild and filling some holes in the tub

Having noticed *duh* that the year is coming to an end and I haven't quite finished the sidecar over the Christmas holidays (not that I thought I would), it was well about time to get my hands dirty and get some more stuff done on it.

First thing was to dive into the Mikuni VM36es, which came off a Polaris snowmobile. The jetting is a bit hefty for a 4-stroke at #50 pilots and #230 mains, but the slide cut out is ok and both needle and needle are just slightly richer than on the 4-stroke VM38-9s I run on my TR1 and won't do harm as the XS will mostly be run part throttle (it's a sidecar not a racebike) and from my first XS-sidecar I am well aware that a bit of extra cooling can't do harm.


So that's what I started with. They were very clean on the inside, but rather filthy on the outside. But more importantly they came with and without a few things, which makes using OEM carbs so annoying at times:
  1. They come with cable chokes.
  2. Except for a slightly weird retainer clip for the throttle cable they are perfectly standard VMs on the inside.
  3. They come with rubberised float needles.
  4. They came with 3-way junction boxes for both throttle and choke. 
Now onto the junction box. This is obviously not meant to be taken apart as I found out and so I ordered a 3-way junction box from Amal (244/2080), which is meant for both Triumph and BSA triples.


Unfortunately the cables are glued into the box and I don't quite see how I can get the center piece out. If you know, please send me a mail or even better drop a comment below this post so other people can benefit as well.

When taking the carbs apart, it can be vital to support  the float-pin-towers, in case said float pin is a bit stubborn. (Funny arrangement by the way, the floats are part of the float-chamber on those VMs!)

Ultra-sonic cleaning of the carbs in order to remove all the schmoo on the outside. 


Before and after. 


I let the (empty) bath set over night, but it's no use. This particular batch of the cleaning solution can't be under no circumstances re-used. 


Result!


If you've read any of my older posts, you know how the (dis-)assembly works. But honestly, I've never seen such a dirty carb. (Not surprised the pump was dead as well. Both came off the same bike!)


... and filled in some holes as I don't plan on running a rack on the back of the tub. Well at least not the stock one. I do have one in storage which is a lot bigger, but doesn't require any visible holes on the outside. Oh and yes, there were some other holes I had to fill in, but those were rather hard to take pictures of, so you simply have to take my word for it. 


 Next steps will be the installation of a new sidecar axle and building the sidecar brake, which I hope to have in place by some time next week.