Showing posts with label vx800. Show all posts

Friday, 8 November 2024

Project Status Update Winter 2024

It's been a while, but in my defense a lot got done and I promise in the coming weeks, I plan to do quite a bit of catching up on the blog as the Suzuki is getting close to the finish line. So here's a bit of an overview, what's planned for the Winter season/the coming weeks. 


Everyday TR1:

Only a bit of maintenance is due really.

  • Oil- and filter change at (1)35,000km
  • clean and grease the starter motor
  • a good cleaning and greasing
  • throttle cable incl. splitter needs to be changed, because this will create problems rather sooner than later
  • the sub-frame mount of the rear mudguard needs to be addressed as the bolt touches the tire ever so slightly when the rear shock bottoms out (and I already have a solution with a P-clamp that basically only needs to be installed and then that'll solve the issue)

 XT600 - Dre-XT-Stück:

I got a lot more use out of the old girl this year than several of the last few years combined, still to call the old girl "trouble free" is a bit of a stretch.

  • Headbolt threads in the cylinder need to be upgraded with M12-to-M8 adapters like I did it on the pretty one as the left front one is starting to fail and thus leaking oil
  • a road-legal pannier rack is due
  • I still have this KTM Adventure 790 rearshock, which needs an adapter to get it to the right length
  • oil the throttle and clutch cables
  • other than that, a good clean and a bit of TLC should do the trick

SR500 sidecar:

As this one will be used the most, the main thing will be to get it ready for Winter-use.

  • Spray it down with wax to protect the metal parts from the omni-present salt
  • install hand muffs
  • Check which bolts have come loose lately
  • modify the summer wheel to work with the modified sprocket carrier and get a bigger rear sprocket

Suzuki SJ410 - the Pickle:

Not sure, if I'll have this ready at the start of Winter, but we're getting there as the little cube is already painted and mostly there to get inspected. The big things still missing to get it on the road are:

  • fix up the front and rear bumpers
  • repair the wiring and remove most of the rather dodgy fixes
  • make the heater work
  • replace the rear brake drums for the later model ones I have already overhauled (they are self-adjusting and more common, so e.g. the drums are still available as aftermarket parts)
  • get the handbrake working
  • change the various oils and check for leaks and fix those
  • fit the winter tyres (which can mean either fit the tyres with the Winter tyres on them or fit the second set of NEW Winter tyres to the wheels which are currently on there - might in the end by a matter of the available time)

Other vehicles that need fixing:

VX800:

This was probably the let down of the season, because it got new tyres and the started to not run right, which resulted in pulling the fuel petcock (because we assumed it was blocked by rust and also leaking slightly) and that was perfectly alright...

  • convert to electric fuel pump out of a VS750 (chopper version of the same bike) as the diaphragm pump is as dead as nails
  • Repair the petcock threads in the tank because one of the metal-look-a-like bolts stripped part of its threads

Goldwing GL1200 - Volkskrad:

This really "just" needs finishing. We got stuck at the point, when I had to get a repair-kit for the rear brakepump. This has to be installed and then the rest needs to be assembled etc. The future on this one might be rather open really. 

Aprilia Moto 6.5:

Somewhat as predicted the broken regulator/rectifier fried another battery, so this has to be addressed and in an ideal world, I am not going to do that with a stock Ducati-elettronica unit, but something out of Japan. I just have to dig out the necessary specs to find a suitable replacement.

Bandit 1200:

Unless I am mistaken, this one might want (again) a replacement of the clutch slave seal and a good cleanup of the rear brake caliper.

As the avid reader might have noticed, there's quite a few vehicles missing from this list - that's intentional, because this is the stuff that HAS to be done. Everything beyond that is probably a case of how cold (or not) it will be during the Winter and the amount of extra time available for tinkering.


Sunday, 2 June 2024

VX800 - fixing the clutch lever

So my dad has got this somewhat weird, yet in a way wonderful Suzuki VX800. Whilst it has reached the point where it is actually usable by now, some of the bits on it are still heavily worn out and somewhat neglected. Such is the case with the clutch lever. It appears that the bike at some point was dropped onto the left side as the left footpeg is a bit mangled and the clutch lever slightly bent. 

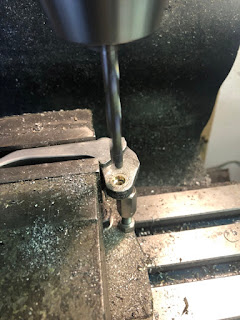
The thing with the bent clutch lever is though that it wore out it's pivot very oval. In general a slightly sloppy clutch lever is not the end of the world, but here the hole has widened to the point where it affected the clutch disengagement. So the plan was to drill it out, fit a bushing made from bearing bronze and then bore/ream/drill that one to size as needed. 

So I drilled out the hole until I ended up with one that was round again and there was still some wall thickness left.

Chamfered the edges to make pressing in the bushing a bit easier.

I decided to make the bushing AFTER drilling out the lever mainly, because it is easier to make the bushing fit the hole than the other way round. I recall the bore being 8mm and I think made an 11 or 12mm hole, with a 3mm pilot hole and the bushing 1/10mm oversize. I had originally contemplated using some bearing retaining compound (e.g. Loctite green), but the bushing went in nicely and showed no signs of being either loose in the hole OR having deformed either part.

After putting the little engineer back into his cage, I realized that plain old drilling the bushing would be more than adequate for the task at hand.

... and fitted to the bike. Vacuum cleaner is strictly optional.

Obviously this one of those repairs which makes next to no sense unless you have the machinery needed to do it yourself, as it was easily a one hour job. On the other hand the bearing bronze bushing will last for a very, very long time now, especially if greased up properly. And if not, it can be replaced.

Saturday, 25 September 2021

VX800 - from roadworthy to worth all the work

Just because you've put all that work in, doesn't mean it's worth it in the end. And quite often it's small stuff that gets on your nerves: subpar brakes, leaky petcocks or just badly sync'ed carbs can make all the difference, between getting on the bike or rather playing a game of golf. (Ok, the comparison might be a bit dramatic, but you get the idea...)

Now this VX800 started off as a tatty but somewhat sound basis. Over the course of time some of the fleas it had presented itself:

1) a ripped diaphragm on the rear carb

2) another pinhole on the fuel tank (by now I feel like this is what I've done all Summer - weld up fuel tanks)

3) Pinholes in the petcock's diaphragm

4) The clutch mechanism needed a good deal of adjustment - which only inadequately hides the fact that the clutch will eventually have to be done.


5) Steel braided brake hose all around, because the rubber lines acted more like party balloons


6) And then a good ol' sync of the carbs. Something which I'd like to elaborate a bit, because all the manuals are a bit overly complicated on the matter. In essence, you dial in the idle with the knob on the rear most carburettor...

... and then both carb butterflies are linked with the link-cable. 

So far, so simple. If you encounter a bike which is completely off on the sync (like this one): Make sure the throttle cable from the throttle-grip to the front cylinder's carb has got sufficient play or you can adjust whatever you want, but you will never manage to sync the carbs at rpms below 4000rpm and that's where your new idle is. Also there's a throttle stop on the front carb, which is the little philipps-head bolt and basically makes sure you could set the idle on each carb individually. Also take note that the bar the idle adjuster pushes against can seize... took me a while to figure that one out.

Once you have all of this figured out, it's a really straight forward job.

Guess the proof of the pudding is in the eating ... or riding in this case.

Wednesday, 28 July 2021

Getting the VX800 roadworthy

It's been a while since the old VX800 moved in into my dad's garage to get her ready to go on the road again.

In order to achieve this (moderate) goal, I will not lie, but the fuel tank had to be welded three times. (Don't laugh you haven't seen the other addition to the fleet yet!)

The other "mildly" interesting feature was that the front pads were COMPLETELY covered in oil, but the fork isn't leaking any or showing any signs that it did so in the past. The caliper is super easy to take apart, just a tip, the rear pad comes out second and then it's easy sailing.

Brake fluid looked well seasoned, but interestingly nothing was seized or the like.

Talking about those brakepads - I read on a forum a while ago, that if you heat them up for a prolonged period of time, the oil will cook out. My dad and I tried that out on the barbeque and admittedly we haven't put them back in, but the oil was forming drops on the side of the pads, so it must have worked to some extent. 

Last and definitely not least, the original orange fog-light-substitutes had to go. Instantly. Also they were only present on the front and some weird ones were fitted to the rear. A universal flasher relay was necessary as well to actually make them go, but that's only minor stuff.

So what's she like to ride and I tell you, it's a very, very gentle bike. No big surprises there, perfect daily-driver material, if you wanted a v-twin that can do everything from Autobahn to cruising, yep this one will be it. 


The handling, after pumping up the front tyre to stupid pressure (3 bar) it stopped feeling like the bars were connected to the forks with rubber bands. The engine, oh the engine is sweet once warmed up it easily revs to 9000 or even 9500rpm. Not that there's anything dramatic happening up there, but you know... better have those RPMs in the backpocket and not need them, rather than the other way round. And that's a pretty good way to describe the whole bike - just... no pressure, do as you please.

Friday, 14 May 2021

New addition to the stable: Suzuki VX800

So the family of bikes has grown by another member - an early 90ies Suzuki VX800. It came to me for the right price, the condition looked like it was salvageable and in a positive way it totally exceeded my expectations. (And nearly cost me my left eye.)

This is the corpus delicti and it doesn't look half as filthy as it actually was, when we picked it up. It's a very early (American) S501 model with the narrower cylinder bank, but it looks well maintained and the loom isn't butchered, so hey... not complaining.  

Two weeks later, my dad done some proper good cleaning and stripped both airboxes from it. The carb setup on these is pretty unique - a downdraft carb for the front and a normal sidedraft carb for the rear cylinder and as the tank goes down a lot further than the front carb there's a fuel pump under the battery tray.


I am not going to state the obvious by saying the carbs are FILTHY. But... they were filthy to a new level. That's the rear cylinder's float chamber filled with carb cleaner.

Fuel vapours made the slide stick to the carb housing. (It actually ran, when bought... sort of.)

... and that's a new level of crud in a float-chamber for me.

Obviously, some mishaps happened and when tapping the float-pin out, my dear assistant got a bit over-excited and didn't listen to my advise to support the float's post. Some chemical metal and about a week or two of waiting sorted the problem nicely. 


As the tank is full of rusty debris, my trusty little scooter aux-tank had to come to the rescue and feed the carbs - and yes, she's running again. The rear carb will need a bit more cleaning. I think there's some sticky residue left on the slide as it's not really very responsive, but other than that...

... next step will be fork seals and brake pads and fluid (and maybe also a set of braided brake hose, because why wouldn't you) and she should be good enough for inspection again.