Now one would assume (lightheartedly nonetheless), that if your XS650SE runs on a 16" rear, that the simillar looking 18" from the XS250/360/400/500 should bolt right in ... more or less. Less. The chainrun is about 7mm off and needs to be closer to the wheel.
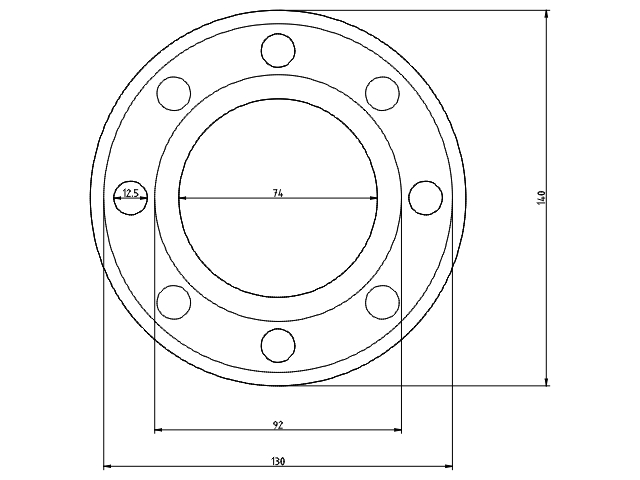
The idea behind this adapter was two-fold: Space the sprocket out by 7mm and reinforce the sprocket studs with some POM-rings to stiffen up the whole lot. The major dimensions, in case you want to copy it:
Now the fun started, when my mate Alex came round with a 10mm piece of flat aluminium, so the first hour was spent in actually transferring the all the basic dimensions onto the flat stock and then cut it down far enough so I could actually chuck it up in my lathe...
Things are starting to take shape...
Came out nicely and should explain the drawing.
The XS500 wheel and as you can see, the studs have been milled down on two sides, as to align the sprocket.
It fits!
Four more POM-spacers to stiffen things up.
Et voilá: The finished product. There's six hours between the first and the last picture...
Kudos to you, if you're still following this story, I've read Shakespeare plays that consisted of fewer acts.
Either way, the last part of the sidecar brake was the actuation or more down to Earth: The brakepump. Now I could have gone the easy way and hooked the sidecar brake up via the rear brake pump and called it a day. BUT every time I want to get my sidecar inside the shop, I'd have to take the brakeline off, which would then mean bleeding brakes etc.
When I bought the 850 engine, I also picked up some other parts, including a complete rear brake assembly with the goal of mirroring the standard rear brake of the bike.
This is essentially the first mockup in order to see whether both brake levers would sit on the same heigth (nope) and whether there would be enough room to have them sit side by side.
Some fooling around with the stock return spring, which in the end I didn't use, because it caused too much headache in the shape of parts that would have had to be fabricated.
More mockups...
I've made a little jig to make all the brackets and clamps roughly the same and it came in handy again, when making the big clamp, which was to become the base for the brake pump.
You know sh*t is serious, when Mama "B" comes out to play... (Seriously, this thing is somewhere around 10kg and is an easy going 2.2kW of power (and that's not what's going in, but what it's rated at the spindle...)
You know you have something close to a nice fit, when it just clamps to the tube without bolts.
The (unnecessarily) modified brake-lever spindle.
Another mockup of how this is supposed to go together
Less mockup, more almost finished.
Spot the spring. These can be had for around 3 Euros at my DIY-store the amount of headscratching it saved me from: priceless.
It's not overly impressive (and the video's a bit shaky), but it snaps back beautifully.
And that's the finished product. If you look very, very closely you can see a hole in the right brake lever and that's where the connecting bracket will go in to link both brakes. (For legal reasons.)
Thanks to my friend Manuel, I was allowed (again) to borrow a complete SR500 ignition to make sure this was really the matter with the old girl. If you follow the steps outline in this post, it should take you about 30-40 minutes to swap out both the rotor and stator of the ignition.
Marking her territory like a boss.
As you can see in the pictures above and below, the sprocket cover has already been removed and there's a late 48T-ignition sitting on the tarp.
The only special tool required is the correct alternator rotor puller, which can be bought via Kedo (and probably some others!) When using it, make sure you put a softer copper washer between the puller and the end of the crank (a 1 cent coin is perfect) to prevent it from galling. Also be aware, that between the rotor and the crankshaft nut are TWO washers.
Once the rotor is removed, the stator is only held on with three bolts and you're pretty much on the home-stretch. The factory manual now claims, that you have to remove the oil-feed line from the engine in order to get the harness out. This is not true, it is sufficient to undo the single bolt holding on the oil and then GENTLY bend the hardline outwards a bit.
Make sure you've put some threadlock on the end of the crankshaft, as a loose rotor will ruin the crank's taper for sure.
All reassembled and I even cleaned away the oil underneath!
One could really be under the impression, that the old girl just hasn't heard about the signs of the times and simply just doesn't want to leave. The other thing that might be just as true is that as the bike is being sold off to a friend, I simply don't want to take any chances and just make sure it's gonna be as reliable with her as it was with me.
Amongst the ignition, I still suspected the coil to be slightly troublesome, mainly because I did always have some issues with hot-starts and some odd misfiring, which no amount of re-jetting could fully cure. (And after almost a decade of riding Eastern Bloc bikes, I did have my fine share of failed coils.)
Luckily I've bought a new (spare) coil for my old SR a while back from Kedo. It said universal 6V+12V coil for XT and SR on the box and I never bothered to have a real look. Turns out this one runs a different connector and is slightly smaller than stock.
Nevertheless a bit of cunning wiring later and a test was to be conducted. (I then cut off the wiring and plug from the old coil and made an adapter, but somehow I forgot to take a picture.)
And guess what, all the misfires are gone now. Yet still, it cuts out and looses spark when hot and can't be restarted. I'll cross-reference the igniton with some components from a friend's SR500 and hopefully that'll finally cure it.
So we left off in the last post with the swingarm with being almost done. There really were only a few minor things to do and if phrases like that put a devilish little grin on your face, you're totally right: Another full day in the end.
There was a bit of the insert poking out of the back of the swingarm and even though it didn't do any harm, I quickly milled it down.
A slightly bigger task was to knock up a mount for the brake torque arm and quite a bit of headscratching I came up with this design
While the fresh paint was drying, I chucked the swingarm pin into the lathe and polished it up with some scotchbrite. Came out really nice and slid home like... (insert dirty comment here)
Assembling a Dnepr swingarm isn't too difficult if you follow one golden rule: If you want to push pins in holes: Plenty of lube. I was slightly worried, because the rubber bushings are at least 40 years old and it was a cozy three to four degrees above freezing in the workshop, but the job almost did itself.
I admit, I double and triple checked every thing, but that moment, when you spin the wheel and it does just do that...
Quite a bit of new bolts and hardware had to be installed as the original stuff was a) weird fine-thread stuff, b) rusty as hell and c) quite a lot of the bolts were pretty mangled.
Now the current Koni 7610-1303's are intended for usage on light bikes, e.g. like a SR500, so they do tend to sag a bit. I still had some 7610-1343's on a shelf from my old Kawasaki RatZ 1000. Even though they are too long by quite a bit, the springs are spot on, so I guess I am on the hunt for a good set of the correct Koni 7610-1407s.